Compare commits
81 Commits
user/alibe
...
smolvla-de
| Author | SHA1 | Date | |
|---|---|---|---|

|
61580a8596 | ||
|
|
6c8f1f962b | ||
|
|
7848b15bfb | ||
|
|
008b592545 | ||
|
|
55a61259e8 | ||
|
|
e94d78f8a0 | ||
|
|
67c8d27e9c | ||
|
|
c8b51ef205 | ||
|
|
9779c58b07 | ||
|
|
5fbe4f9987 | ||
|
|
f47fd7aabf | ||
|
|
a9251e612f | ||
|
|
aec1b29d23 | ||
|
|
63ddfefa08 | ||
|
|
596e9050bd | ||
|
|
6047bbee10 | ||
|
|
1522e60f83 | ||
|
|
d4ee470b00 | ||
|
|
2b27084d63 | ||
|
|
ddb26b7189 | ||
|
|
483be9aac2 | ||
|
|
96550e4ad1 | ||
|
|
69901b9b6a | ||
|
|
c0146eed7f | ||
|
|
2f9ba4e2cc | ||
|
|
f3d931e1b2 | ||
|
|
0447604fce | ||
|
|
0b2285d1ec | ||
|
|
a989c79558 | ||
|
|
06450c6777 | ||
|
|
fe88c5942c | ||
|
|
a5727e37b4 | ||
|
|
c940676bdd | ||
|
|
2b71789e15 | ||
|
|
7c8be7fb9b | ||
|
|
b8637c09ec | ||
|
|
1688fa3a88 | ||
|
|
b852d15774 | ||
|
|
ce6a26deeb | ||
|
|
697c76f75e | ||
|
|
8d7969e7cb | ||
|
|
dcc0c234dd | ||
|
|
6007a221f0 | ||
|
|
35e67585bf | ||
|
|
438334d58e | ||
|
|
69e8946480 | ||
|
|
96fa48b5ec | ||
|
|
8fc18be065 | ||
|
|
5350a02dc1 | ||
|
|
58afa2fbb0 | ||
|
|
d8079587a2 | ||
|
|
f976935ba1 | ||
|
|
5c87365cc1 | ||
|
|
edfebd522c | ||
|
|
2de93a8000 | ||
|
|
d0521189b1 | ||
|
|
10b7b35325 | ||
|
|
459c95197b | ||
|
|
37748c83ca | ||
|
|
3fb04efec1 | ||
|
|
2889f3a06a | ||
|
|
f5335fe696 | ||
|
|
f0a903c98f | ||
|
|
0e7caae714 | ||
|
|
1ee2ca5c26 | ||
|
|
4e4eec92dc | ||
|
|
95df341b4f | ||
|
|
9e6f49f507 | ||
|
|
a28f02ecb3 | ||
|
|
09343acce7 | ||
|
|
e23b41e79a | ||
|
|
b536f47e3f | ||
|
|
bfd26eef5a | ||
|
|
1537d0ab90 | ||
|
|
2be7f3a3ff | ||
|
|
0cf864870c | ||
|
|
1786916a16 | ||
|
|
0507ad4f68 | ||
|
|
bed90e3a41 | ||
|
|
6163daaaa4 | ||
|
|
8e2a394442 |
@@ -1,68 +0,0 @@
|
||||
{
|
||||
"homing_offset": [
|
||||
2048,
|
||||
3072,
|
||||
3072,
|
||||
-1024,
|
||||
-1024,
|
||||
2048,
|
||||
-2048,
|
||||
2048,
|
||||
-2048
|
||||
],
|
||||
"drive_mode": [
|
||||
1,
|
||||
1,
|
||||
1,
|
||||
0,
|
||||
0,
|
||||
1,
|
||||
0,
|
||||
1,
|
||||
0
|
||||
],
|
||||
"start_pos": [
|
||||
2015,
|
||||
3058,
|
||||
3061,
|
||||
1071,
|
||||
1071,
|
||||
2035,
|
||||
2152,
|
||||
2029,
|
||||
2499
|
||||
],
|
||||
"end_pos": [
|
||||
-1008,
|
||||
-1963,
|
||||
-1966,
|
||||
2141,
|
||||
2143,
|
||||
-971,
|
||||
3043,
|
||||
-1077,
|
||||
3144
|
||||
],
|
||||
"calib_mode": [
|
||||
"DEGREE",
|
||||
"DEGREE",
|
||||
"DEGREE",
|
||||
"DEGREE",
|
||||
"DEGREE",
|
||||
"DEGREE",
|
||||
"DEGREE",
|
||||
"DEGREE",
|
||||
"LINEAR"
|
||||
],
|
||||
"motor_names": [
|
||||
"waist",
|
||||
"shoulder",
|
||||
"shoulder_shadow",
|
||||
"elbow",
|
||||
"elbow_shadow",
|
||||
"forearm_roll",
|
||||
"wrist_angle",
|
||||
"wrist_rotate",
|
||||
"gripper"
|
||||
]
|
||||
}
|
||||
@@ -1,68 +0,0 @@
|
||||
{
|
||||
"homing_offset": [
|
||||
2048,
|
||||
3072,
|
||||
3072,
|
||||
-1024,
|
||||
-1024,
|
||||
2048,
|
||||
-2048,
|
||||
2048,
|
||||
-1024
|
||||
],
|
||||
"drive_mode": [
|
||||
1,
|
||||
1,
|
||||
1,
|
||||
0,
|
||||
0,
|
||||
1,
|
||||
0,
|
||||
1,
|
||||
0
|
||||
],
|
||||
"start_pos": [
|
||||
2035,
|
||||
3024,
|
||||
3019,
|
||||
979,
|
||||
981,
|
||||
1982,
|
||||
2166,
|
||||
2124,
|
||||
1968
|
||||
],
|
||||
"end_pos": [
|
||||
-990,
|
||||
-2017,
|
||||
-2015,
|
||||
2078,
|
||||
2076,
|
||||
-1030,
|
||||
3117,
|
||||
-1016,
|
||||
2556
|
||||
],
|
||||
"calib_mode": [
|
||||
"DEGREE",
|
||||
"DEGREE",
|
||||
"DEGREE",
|
||||
"DEGREE",
|
||||
"DEGREE",
|
||||
"DEGREE",
|
||||
"DEGREE",
|
||||
"DEGREE",
|
||||
"LINEAR"
|
||||
],
|
||||
"motor_names": [
|
||||
"waist",
|
||||
"shoulder",
|
||||
"shoulder_shadow",
|
||||
"elbow",
|
||||
"elbow_shadow",
|
||||
"forearm_roll",
|
||||
"wrist_angle",
|
||||
"wrist_rotate",
|
||||
"gripper"
|
||||
]
|
||||
}
|
||||
@@ -1,68 +0,0 @@
|
||||
{
|
||||
"homing_offset": [
|
||||
2048,
|
||||
3072,
|
||||
3072,
|
||||
-1024,
|
||||
-1024,
|
||||
2048,
|
||||
-2048,
|
||||
2048,
|
||||
-2048
|
||||
],
|
||||
"drive_mode": [
|
||||
1,
|
||||
1,
|
||||
1,
|
||||
0,
|
||||
0,
|
||||
1,
|
||||
0,
|
||||
1,
|
||||
0
|
||||
],
|
||||
"start_pos": [
|
||||
2056,
|
||||
2895,
|
||||
2896,
|
||||
1191,
|
||||
1190,
|
||||
2018,
|
||||
2051,
|
||||
2056,
|
||||
2509
|
||||
],
|
||||
"end_pos": [
|
||||
-1040,
|
||||
-2004,
|
||||
-2006,
|
||||
2126,
|
||||
2127,
|
||||
-1010,
|
||||
3050,
|
||||
-1117,
|
||||
3143
|
||||
],
|
||||
"calib_mode": [
|
||||
"DEGREE",
|
||||
"DEGREE",
|
||||
"DEGREE",
|
||||
"DEGREE",
|
||||
"DEGREE",
|
||||
"DEGREE",
|
||||
"DEGREE",
|
||||
"DEGREE",
|
||||
"LINEAR"
|
||||
],
|
||||
"motor_names": [
|
||||
"waist",
|
||||
"shoulder",
|
||||
"shoulder_shadow",
|
||||
"elbow",
|
||||
"elbow_shadow",
|
||||
"forearm_roll",
|
||||
"wrist_angle",
|
||||
"wrist_rotate",
|
||||
"gripper"
|
||||
]
|
||||
}
|
||||
@@ -1,68 +0,0 @@
|
||||
{
|
||||
"homing_offset": [
|
||||
2048,
|
||||
3072,
|
||||
3072,
|
||||
-1024,
|
||||
-1024,
|
||||
2048,
|
||||
-2048,
|
||||
2048,
|
||||
-2048
|
||||
],
|
||||
"drive_mode": [
|
||||
1,
|
||||
1,
|
||||
1,
|
||||
0,
|
||||
0,
|
||||
1,
|
||||
0,
|
||||
1,
|
||||
0
|
||||
],
|
||||
"start_pos": [
|
||||
2068,
|
||||
3034,
|
||||
3030,
|
||||
1038,
|
||||
1041,
|
||||
1991,
|
||||
1948,
|
||||
2090,
|
||||
1985
|
||||
],
|
||||
"end_pos": [
|
||||
-1025,
|
||||
-2014,
|
||||
-2015,
|
||||
2058,
|
||||
2060,
|
||||
-955,
|
||||
3091,
|
||||
-940,
|
||||
2576
|
||||
],
|
||||
"calib_mode": [
|
||||
"DEGREE",
|
||||
"DEGREE",
|
||||
"DEGREE",
|
||||
"DEGREE",
|
||||
"DEGREE",
|
||||
"DEGREE",
|
||||
"DEGREE",
|
||||
"DEGREE",
|
||||
"LINEAR"
|
||||
],
|
||||
"motor_names": [
|
||||
"waist",
|
||||
"shoulder",
|
||||
"shoulder_shadow",
|
||||
"elbow",
|
||||
"elbow_shadow",
|
||||
"forearm_roll",
|
||||
"wrist_angle",
|
||||
"wrist_rotate",
|
||||
"gripper"
|
||||
]
|
||||
}
|
||||
3
.gitattributes
vendored
@@ -17,4 +17,5 @@
|
||||
*.mp4 filter=lfs diff=lfs merge=lfs -text
|
||||
*.arrow filter=lfs diff=lfs merge=lfs -text
|
||||
*.json !text !filter !merge !diff
|
||||
tests/artifacts/cameras/*.{png,bag} filter=lfs diff=lfs merge=lfs -text
|
||||
tests/artifacts/cameras/*.png filter=lfs diff=lfs merge=lfs -text
|
||||
*.bag filter=lfs diff=lfs merge=lfs -text
|
||||
|
||||
2
.github/PULL_REQUEST_TEMPLATE.md
vendored
@@ -24,7 +24,7 @@ Examples:
|
||||
pytest -sx tests/test_stuff.py::test_something
|
||||
```
|
||||
```bash
|
||||
python lerobot/scripts/train.py --some.option=true
|
||||
python -m lerobot.scripts.train --some.option=true
|
||||
```
|
||||
|
||||
## SECTION TO REMOVE BEFORE SUBMITTING YOUR PR
|
||||
|
||||
24
.github/workflows/build-docker-images.yml
vendored
@@ -40,24 +40,24 @@ jobs:
|
||||
git lfs install
|
||||
|
||||
- name: Set up Docker Buildx
|
||||
uses: docker/setup-buildx-action@v3
|
||||
uses: docker/setup-buildx-action@b5ca514318bd6ebac0fb2aedd5d36ec1b5c232a2 # v3.10.0
|
||||
with:
|
||||
cache-binary: false
|
||||
|
||||
- name: Check out code
|
||||
uses: actions/checkout@v4
|
||||
uses: actions/checkout@11bd71901bbe5b1630ceea73d27597364c9af683 # v4.2.2
|
||||
with:
|
||||
lfs: true
|
||||
persist-credentials: false
|
||||
|
||||
- name: Login to DockerHub
|
||||
uses: docker/login-action@v3
|
||||
uses: docker/login-action@74a5d142397b4f367a81961eba4e8cd7edddf772 # v3.4.0
|
||||
with:
|
||||
username: ${{ secrets.DOCKERHUB_USERNAME }}
|
||||
password: ${{ secrets.DOCKERHUB_PASSWORD }}
|
||||
|
||||
- name: Build and Push CPU
|
||||
uses: docker/build-push-action@v5
|
||||
uses: docker/build-push-action@ca052bb54ab0790a636c9b5f226502c73d547a25 # v5.4.0
|
||||
with:
|
||||
context: .
|
||||
file: ./docker/lerobot-cpu/Dockerfile
|
||||
@@ -78,24 +78,24 @@ jobs:
|
||||
git lfs install
|
||||
|
||||
- name: Set up Docker Buildx
|
||||
uses: docker/setup-buildx-action@v3
|
||||
uses: docker/setup-buildx-action@b5ca514318bd6ebac0fb2aedd5d36ec1b5c232a2 # v3.10.0
|
||||
with:
|
||||
cache-binary: false
|
||||
|
||||
- name: Check out code
|
||||
uses: actions/checkout@v4
|
||||
uses: actions/checkout@11bd71901bbe5b1630ceea73d27597364c9af683 # v4.2.2
|
||||
with:
|
||||
lfs: true
|
||||
persist-credentials: false
|
||||
|
||||
- name: Login to DockerHub
|
||||
uses: docker/login-action@v3
|
||||
uses: docker/login-action@74a5d142397b4f367a81961eba4e8cd7edddf772 # v3.4.0
|
||||
with:
|
||||
username: ${{ secrets.DOCKERHUB_USERNAME }}
|
||||
password: ${{ secrets.DOCKERHUB_PASSWORD }}
|
||||
|
||||
- name: Build and Push GPU
|
||||
uses: docker/build-push-action@v5
|
||||
uses: docker/build-push-action@ca052bb54ab0790a636c9b5f226502c73d547a25 # v5.4.0
|
||||
with:
|
||||
context: .
|
||||
file: ./docker/lerobot-gpu/Dockerfile
|
||||
@@ -110,23 +110,23 @@ jobs:
|
||||
group: aws-general-8-plus
|
||||
steps:
|
||||
- name: Set up Docker Buildx
|
||||
uses: docker/setup-buildx-action@v3
|
||||
uses: docker/setup-buildx-action@b5ca514318bd6ebac0fb2aedd5d36ec1b5c232a2 # v3.10.0
|
||||
with:
|
||||
cache-binary: false
|
||||
|
||||
- name: Check out code
|
||||
uses: actions/checkout@v4
|
||||
uses: actions/checkout@11bd71901bbe5b1630ceea73d27597364c9af683 # v4.2.2
|
||||
with:
|
||||
persist-credentials: false
|
||||
|
||||
- name: Login to DockerHub
|
||||
uses: docker/login-action@v3
|
||||
uses: docker/login-action@74a5d142397b4f367a81961eba4e8cd7edddf772 # v3.4.0
|
||||
with:
|
||||
username: ${{ secrets.DOCKERHUB_USERNAME }}
|
||||
password: ${{ secrets.DOCKERHUB_PASSWORD }}
|
||||
|
||||
- name: Build and Push GPU dev
|
||||
uses: docker/build-push-action@v5
|
||||
uses: docker/build-push-action@ca052bb54ab0790a636c9b5f226502c73d547a25 # v5.4.0
|
||||
with:
|
||||
context: .
|
||||
file: ./docker/lerobot-gpu-dev/Dockerfile
|
||||
|
||||
8
.github/workflows/nightly-tests.yml
vendored
@@ -33,7 +33,7 @@ jobs:
|
||||
runs-on:
|
||||
group: aws-general-8-plus
|
||||
container:
|
||||
image: huggingface/lerobot-cpu:latest
|
||||
image: huggingface/lerobot-cpu:latest # zizmor: ignore[unpinned-images]
|
||||
options: --shm-size "16gb"
|
||||
credentials:
|
||||
username: ${{ secrets.DOCKERHUB_USERNAME }}
|
||||
@@ -44,7 +44,7 @@ jobs:
|
||||
working-directory: /lerobot
|
||||
steps:
|
||||
- name: Tests
|
||||
run: pytest -v --cov=./lerobot --disable-warnings tests
|
||||
run: pytest -v --cov=./src/lerobot --disable-warnings tests
|
||||
|
||||
- name: Tests end-to-end
|
||||
run: make test-end-to-end
|
||||
@@ -60,7 +60,7 @@ jobs:
|
||||
CUDA_VISIBLE_DEVICES: "0"
|
||||
TEST_TYPE: "single_gpu"
|
||||
container:
|
||||
image: huggingface/lerobot-gpu:latest
|
||||
image: huggingface/lerobot-gpu:latest # zizmor: ignore[unpinned-images]
|
||||
options: --gpus all --shm-size "16gb"
|
||||
credentials:
|
||||
username: ${{ secrets.DOCKERHUB_USERNAME }}
|
||||
@@ -74,7 +74,7 @@ jobs:
|
||||
run: nvidia-smi
|
||||
|
||||
- name: Test
|
||||
run: pytest -v --cov=./lerobot --cov-report=xml --disable-warnings tests
|
||||
run: pytest -v --cov=./src/lerobot --cov-report=xml --disable-warnings tests
|
||||
# TODO(aliberts): Link with HF Codecov account
|
||||
# - name: Upload coverage reports to Codecov with GitHub Action
|
||||
# uses: codecov/codecov-action@v4
|
||||
|
||||
8
.github/workflows/quality.yml
vendored
@@ -33,12 +33,12 @@ jobs:
|
||||
runs-on: ubuntu-latest
|
||||
steps:
|
||||
- name: Checkout Repository
|
||||
uses: actions/checkout@v4
|
||||
uses: actions/checkout@11bd71901bbe5b1630ceea73d27597364c9af683 # v4.2.2
|
||||
with:
|
||||
persist-credentials: false
|
||||
|
||||
- name: Set up Python
|
||||
uses: actions/setup-python@v4
|
||||
uses: actions/setup-python@7f4fc3e22c37d6ff65e88745f38bd3157c663f7c # v4.9.1
|
||||
with:
|
||||
python-version: ${{ env.PYTHON_VERSION }}
|
||||
|
||||
@@ -64,9 +64,9 @@ jobs:
|
||||
runs-on: ubuntu-latest
|
||||
steps:
|
||||
- name: Checkout Repository
|
||||
uses: actions/checkout@v4
|
||||
uses: actions/checkout@11bd71901bbe5b1630ceea73d27597364c9af683 # v4.2.2
|
||||
with:
|
||||
persist-credentials: false
|
||||
|
||||
- name: typos-action
|
||||
uses: crate-ci/typos@v1.29.10
|
||||
uses: crate-ci/typos@db35ee91e80fbb447f33b0e5fbddb24d2a1a884f # v1.29.10
|
||||
|
||||
8
.github/workflows/test-docker-build.yml
vendored
@@ -35,7 +35,7 @@ jobs:
|
||||
matrix: ${{ steps.set-matrix.outputs.matrix }}
|
||||
steps:
|
||||
- name: Check out code
|
||||
uses: actions/checkout@v4
|
||||
uses: actions/checkout@11bd71901bbe5b1630ceea73d27597364c9af683 # v4.2.2
|
||||
with:
|
||||
persist-credentials: false
|
||||
|
||||
@@ -64,17 +64,17 @@ jobs:
|
||||
docker-file: ${{ fromJson(needs.get_changed_files.outputs.matrix) }}
|
||||
steps:
|
||||
- name: Set up Docker Buildx
|
||||
uses: docker/setup-buildx-action@v3
|
||||
uses: docker/setup-buildx-action@b5ca514318bd6ebac0fb2aedd5d36ec1b5c232a2 # v3.10.0
|
||||
with:
|
||||
cache-binary: false
|
||||
|
||||
- name: Check out code
|
||||
uses: actions/checkout@v4
|
||||
uses: actions/checkout@11bd71901bbe5b1630ceea73d27597364c9af683 # v4.2.2
|
||||
with:
|
||||
persist-credentials: false
|
||||
|
||||
- name: Build Docker image
|
||||
uses: docker/build-push-action@v5
|
||||
uses: docker/build-push-action@ca052bb54ab0790a636c9b5f226502c73d547a25 # v5.4.0
|
||||
with:
|
||||
file: ${{ matrix.docker-file }}
|
||||
context: .
|
||||
|
||||
20
.github/workflows/test.yml
vendored
@@ -17,7 +17,7 @@ name: Tests
|
||||
on:
|
||||
pull_request:
|
||||
paths:
|
||||
- "lerobot/**"
|
||||
- "src/**"
|
||||
- "tests/**"
|
||||
- "examples/**"
|
||||
- ".github/**"
|
||||
@@ -29,7 +29,7 @@ on:
|
||||
branches:
|
||||
- main
|
||||
paths:
|
||||
- "lerobot/**"
|
||||
- "src/**"
|
||||
- "tests/**"
|
||||
- "examples/**"
|
||||
- ".github/**"
|
||||
@@ -50,7 +50,7 @@ jobs:
|
||||
env:
|
||||
MUJOCO_GL: egl
|
||||
steps:
|
||||
- uses: actions/checkout@v4
|
||||
- uses: actions/checkout@11bd71901bbe5b1630ceea73d27597364c9af683 # v4.2.2
|
||||
with:
|
||||
lfs: true # Ensure LFS files are pulled
|
||||
persist-credentials: false
|
||||
@@ -62,7 +62,7 @@ jobs:
|
||||
sudo apt-get install -y libegl1-mesa-dev ffmpeg portaudio19-dev
|
||||
|
||||
- name: Install uv and python
|
||||
uses: astral-sh/setup-uv@v5
|
||||
uses: astral-sh/setup-uv@d4b2f3b6ecc6e67c4457f6d3e41ec42d3d0fcb86 # v5.4.2
|
||||
with:
|
||||
enable-cache: true
|
||||
version: ${{ env.UV_VERSION }}
|
||||
@@ -73,7 +73,7 @@ jobs:
|
||||
|
||||
- name: Test with pytest
|
||||
run: |
|
||||
uv run pytest tests -v --cov=./lerobot --durations=0 \
|
||||
uv run pytest tests -v --cov=./src/lerobot --durations=0 \
|
||||
-W ignore::DeprecationWarning:imageio_ffmpeg._utils:7 \
|
||||
-W ignore::UserWarning:torch.utils.data.dataloader:558 \
|
||||
-W ignore::UserWarning:gymnasium.utils.env_checker:247 \
|
||||
@@ -85,7 +85,7 @@ jobs:
|
||||
env:
|
||||
MUJOCO_GL: egl
|
||||
steps:
|
||||
- uses: actions/checkout@v4
|
||||
- uses: actions/checkout@11bd71901bbe5b1630ceea73d27597364c9af683 # v4.2.2
|
||||
with:
|
||||
lfs: true # Ensure LFS files are pulled
|
||||
persist-credentials: false
|
||||
@@ -94,7 +94,7 @@ jobs:
|
||||
run: sudo apt-get update && sudo apt-get install -y ffmpeg
|
||||
|
||||
- name: Install uv and python
|
||||
uses: astral-sh/setup-uv@v5
|
||||
uses: astral-sh/setup-uv@d4b2f3b6ecc6e67c4457f6d3e41ec42d3d0fcb86 # v5.4.2
|
||||
with:
|
||||
enable-cache: true
|
||||
version: ${{ env.UV_VERSION }}
|
||||
@@ -105,7 +105,7 @@ jobs:
|
||||
|
||||
- name: Test with pytest
|
||||
run: |
|
||||
uv run pytest tests -v --cov=./lerobot --durations=0 \
|
||||
uv run pytest tests -v --cov=./src/lerobot --durations=0 \
|
||||
-W ignore::DeprecationWarning:imageio_ffmpeg._utils:7 \
|
||||
-W ignore::UserWarning:torch.utils.data.dataloader:558 \
|
||||
-W ignore::UserWarning:gymnasium.utils.env_checker:247 \
|
||||
@@ -117,7 +117,7 @@ jobs:
|
||||
env:
|
||||
MUJOCO_GL: egl
|
||||
steps:
|
||||
- uses: actions/checkout@v4
|
||||
- uses: actions/checkout@11bd71901bbe5b1630ceea73d27597364c9af683 # v4.2.2
|
||||
with:
|
||||
lfs: true # Ensure LFS files are pulled
|
||||
persist-credentials: false
|
||||
@@ -129,7 +129,7 @@ jobs:
|
||||
sudo apt-get install -y libegl1-mesa-dev ffmpeg portaudio19-dev
|
||||
|
||||
- name: Install uv and python
|
||||
uses: astral-sh/setup-uv@v5
|
||||
uses: astral-sh/setup-uv@d4b2f3b6ecc6e67c4457f6d3e41ec42d3d0fcb86 # v5.4.2
|
||||
with:
|
||||
enable-cache: true
|
||||
version: ${{ env.UV_VERSION }}
|
||||
|
||||
4
.github/workflows/trufflehog.yml
vendored
@@ -24,12 +24,12 @@ jobs:
|
||||
runs-on: ubuntu-latest
|
||||
steps:
|
||||
- name: Checkout code
|
||||
uses: actions/checkout@v4
|
||||
uses: actions/checkout@11bd71901bbe5b1630ceea73d27597364c9af683 # v4.2.2
|
||||
with:
|
||||
fetch-depth: 0
|
||||
persist-credentials: false
|
||||
|
||||
- name: Secret Scanning
|
||||
uses: trufflesecurity/trufflehog@main
|
||||
uses: trufflesecurity/trufflehog@90694bf9af66e7536abc5824e7a87246dbf933cb # v3.88.35
|
||||
with:
|
||||
extra_args: --only-verified
|
||||
|
||||
8
.gitignore
vendored
@@ -11,7 +11,10 @@
|
||||
# WITHOUT WARRANTIES OR CONDITIONS OF ANY KIND, either express or implied.
|
||||
# See the License for the specific language governing permissions and
|
||||
# limitations under the License.
|
||||
|
||||
# Dev scripts
|
||||
.dev
|
||||
|
||||
# Logging
|
||||
logs
|
||||
tmp
|
||||
@@ -26,6 +29,7 @@ outputs
|
||||
|
||||
# VS Code
|
||||
.vscode
|
||||
.devcontainer
|
||||
|
||||
# HPC
|
||||
nautilus/*.yaml
|
||||
@@ -91,10 +95,8 @@ coverage.xml
|
||||
.hypothesis/
|
||||
.pytest_cache/
|
||||
|
||||
# Ignore .cache except calibration
|
||||
# Ignore .cache
|
||||
.cache/*
|
||||
!.cache/calibration/
|
||||
!.cache/calibration/**
|
||||
|
||||
# Translations
|
||||
*.mo
|
||||
|
||||
@@ -37,18 +37,18 @@ repos:
|
||||
- id: trailing-whitespace
|
||||
|
||||
- repo: https://github.com/adhtruong/mirrors-typos
|
||||
rev: v1.31.1
|
||||
rev: v1.33.1
|
||||
hooks:
|
||||
- id: typos
|
||||
args: [--force-exclude]
|
||||
|
||||
- repo: https://github.com/asottile/pyupgrade
|
||||
rev: v3.19.1
|
||||
rev: v3.20.0
|
||||
hooks:
|
||||
- id: pyupgrade
|
||||
|
||||
- repo: https://github.com/astral-sh/ruff-pre-commit
|
||||
rev: v0.11.5
|
||||
rev: v0.11.13
|
||||
hooks:
|
||||
- id: ruff
|
||||
args: [--fix]
|
||||
@@ -57,12 +57,12 @@ repos:
|
||||
|
||||
##### Security #####
|
||||
- repo: https://github.com/gitleaks/gitleaks
|
||||
rev: v8.24.3
|
||||
rev: v8.27.2
|
||||
hooks:
|
||||
- id: gitleaks
|
||||
|
||||
- repo: https://github.com/woodruffw/zizmor-pre-commit
|
||||
rev: v1.5.2
|
||||
rev: v1.9.0
|
||||
hooks:
|
||||
- id: zizmor
|
||||
|
||||
|
||||
@@ -67,7 +67,7 @@ post it.
|
||||
|
||||
## Adding new policies, datasets or environments
|
||||
|
||||
Look at our implementations for [datasets](./lerobot/common/datasets/), [policies](./lerobot/common/policies/),
|
||||
Look at our implementations for [datasets](./src/lerobot/datasets/), [policies](./src/lerobot/policies/),
|
||||
environments ([aloha](https://github.com/huggingface/gym-aloha),
|
||||
[xarm](https://github.com/huggingface/gym-xarm),
|
||||
[pusht](https://github.com/huggingface/gym-pusht))
|
||||
@@ -269,9 +269,6 @@ Follow these steps to start contributing:
|
||||
the PR as a draft PR. These are useful to avoid duplicated work, and to differentiate
|
||||
it from PRs ready to be merged;
|
||||
4. Make sure existing tests pass;
|
||||
<!-- 5. Add high-coverage tests. No quality testing = no merge.
|
||||
|
||||
See an example of a good PR here: https://github.com/huggingface/lerobot/pull/ -->
|
||||
|
||||
### Tests
|
||||
|
||||
|
||||
2
MANIFEST.in
Normal file
@@ -0,0 +1,2 @@
|
||||
include src/lerobot/templates/lerobot_modelcard_template.md
|
||||
include src/lerobot/datasets/card_template.md
|
||||
52
Makefile
@@ -40,14 +40,17 @@ test-end-to-end:
|
||||
${MAKE} DEVICE=$(DEVICE) test-diffusion-ete-eval
|
||||
${MAKE} DEVICE=$(DEVICE) test-tdmpc-ete-train
|
||||
${MAKE} DEVICE=$(DEVICE) test-tdmpc-ete-eval
|
||||
${MAKE} DEVICE=$(DEVICE) test-smolvla-ete-train
|
||||
${MAKE} DEVICE=$(DEVICE) test-smolvla-ete-eval
|
||||
|
||||
test-act-ete-train:
|
||||
python lerobot/scripts/train.py \
|
||||
python -m lerobot.scripts.train \
|
||||
--policy.type=act \
|
||||
--policy.dim_model=64 \
|
||||
--policy.n_action_steps=20 \
|
||||
--policy.chunk_size=20 \
|
||||
--policy.device=$(DEVICE) \
|
||||
--policy.push_to_hub=false \
|
||||
--env.type=aloha \
|
||||
--env.episode_length=5 \
|
||||
--dataset.repo_id=lerobot/aloha_sim_transfer_cube_human \
|
||||
@@ -65,12 +68,12 @@ test-act-ete-train:
|
||||
--output_dir=tests/outputs/act/
|
||||
|
||||
test-act-ete-train-resume:
|
||||
python lerobot/scripts/train.py \
|
||||
python -m lerobot.scripts.train \
|
||||
--config_path=tests/outputs/act/checkpoints/000002/pretrained_model/train_config.json \
|
||||
--resume=true
|
||||
|
||||
test-act-ete-eval:
|
||||
python lerobot/scripts/eval.py \
|
||||
python -m lerobot.scripts.eval \
|
||||
--policy.path=tests/outputs/act/checkpoints/000004/pretrained_model \
|
||||
--policy.device=$(DEVICE) \
|
||||
--env.type=aloha \
|
||||
@@ -79,12 +82,13 @@ test-act-ete-eval:
|
||||
--eval.batch_size=1
|
||||
|
||||
test-diffusion-ete-train:
|
||||
python lerobot/scripts/train.py \
|
||||
python -m lerobot.scripts.train \
|
||||
--policy.type=diffusion \
|
||||
--policy.down_dims='[64,128,256]' \
|
||||
--policy.diffusion_step_embed_dim=32 \
|
||||
--policy.num_inference_steps=10 \
|
||||
--policy.device=$(DEVICE) \
|
||||
--policy.push_to_hub=false \
|
||||
--env.type=pusht \
|
||||
--env.episode_length=5 \
|
||||
--dataset.repo_id=lerobot/pusht \
|
||||
@@ -102,7 +106,7 @@ test-diffusion-ete-train:
|
||||
--output_dir=tests/outputs/diffusion/
|
||||
|
||||
test-diffusion-ete-eval:
|
||||
python lerobot/scripts/eval.py \
|
||||
python -m lerobot.scripts.eval \
|
||||
--policy.path=tests/outputs/diffusion/checkpoints/000002/pretrained_model \
|
||||
--policy.device=$(DEVICE) \
|
||||
--env.type=pusht \
|
||||
@@ -111,9 +115,10 @@ test-diffusion-ete-eval:
|
||||
--eval.batch_size=1
|
||||
|
||||
test-tdmpc-ete-train:
|
||||
python lerobot/scripts/train.py \
|
||||
python -m lerobot.scripts.train \
|
||||
--policy.type=tdmpc \
|
||||
--policy.device=$(DEVICE) \
|
||||
--policy.push_to_hub=false \
|
||||
--env.type=xarm \
|
||||
--env.task=XarmLift-v0 \
|
||||
--env.episode_length=5 \
|
||||
@@ -132,7 +137,7 @@ test-tdmpc-ete-train:
|
||||
--output_dir=tests/outputs/tdmpc/
|
||||
|
||||
test-tdmpc-ete-eval:
|
||||
python lerobot/scripts/eval.py \
|
||||
python -m lerobot.scripts.eval \
|
||||
--policy.path=tests/outputs/tdmpc/checkpoints/000002/pretrained_model \
|
||||
--policy.device=$(DEVICE) \
|
||||
--env.type=xarm \
|
||||
@@ -140,3 +145,36 @@ test-tdmpc-ete-eval:
|
||||
--env.task=XarmLift-v0 \
|
||||
--eval.n_episodes=1 \
|
||||
--eval.batch_size=1
|
||||
|
||||
|
||||
test-smolvla-ete-train:
|
||||
python -m lerobot.scripts.train \
|
||||
--policy.type=smolvla \
|
||||
--policy.n_action_steps=20 \
|
||||
--policy.chunk_size=20 \
|
||||
--policy.device=$(DEVICE) \
|
||||
--policy.push_to_hub=false \
|
||||
--env.type=aloha \
|
||||
--env.episode_length=5 \
|
||||
--dataset.repo_id=lerobot/aloha_sim_transfer_cube_human \
|
||||
--dataset.image_transforms.enable=true \
|
||||
--dataset.episodes="[0]" \
|
||||
--batch_size=2 \
|
||||
--steps=4 \
|
||||
--eval_freq=2 \
|
||||
--eval.n_episodes=1 \
|
||||
--eval.batch_size=1 \
|
||||
--save_freq=2 \
|
||||
--save_checkpoint=true \
|
||||
--log_freq=1 \
|
||||
--wandb.enable=false \
|
||||
--output_dir=tests/outputs/smolvla/
|
||||
|
||||
test-smolvla-ete-eval:
|
||||
python -m lerobot.scripts.eval \
|
||||
--policy.path=tests/outputs/smolvla/checkpoints/000004/pretrained_model \
|
||||
--policy.device=$(DEVICE) \
|
||||
--env.type=aloha \
|
||||
--env.episode_length=5 \
|
||||
--eval.n_episodes=1 \
|
||||
--eval.batch_size=1
|
||||
|
||||
75
README.md
@@ -23,7 +23,7 @@
|
||||
</div>
|
||||
|
||||
<h2 align="center">
|
||||
<p><a href="https://github.com/huggingface/lerobot/blob/main/examples/12_use_so101.md">
|
||||
<p><a href="https://huggingface.co/docs/lerobot/so101">
|
||||
Build Your Own SO-101 Robot!</a></p>
|
||||
</h2>
|
||||
|
||||
@@ -48,11 +48,11 @@
|
||||
<p>Train it in minutes with a few simple moves on your laptop.</p>
|
||||
<p>Then sit back and watch your creation act autonomously! 🤯</p>
|
||||
|
||||
<p><a href="https://github.com/huggingface/lerobot/blob/main/examples/12_use_so101.md">
|
||||
<p><a href="https://huggingface.co/docs/lerobot/so101">
|
||||
See the full SO-101 tutorial here.</a></p>
|
||||
|
||||
<p>Want to take it to the next level? Make your SO-101 mobile by building LeKiwi!</p>
|
||||
<p>Check out the <a href="https://github.com/huggingface/lerobot/blob/main/examples/11_use_lekiwi.md">LeKiwi tutorial</a> and bring your robot to life on wheels.</p>
|
||||
<p>Check out the <a href="https://huggingface.co/docs/lerobot/lekiwi">LeKiwi tutorial</a> and bring your robot to life on wheels.</p>
|
||||
|
||||
<img src="media/lekiwi/kiwi.webp?raw=true" alt="LeKiwi mobile robot" title="LeKiwi mobile robot" width="50%">
|
||||
</div>
|
||||
@@ -90,6 +90,7 @@
|
||||
|
||||
### Acknowledgment
|
||||
|
||||
- The LeRobot team 🤗 for building SmolVLA [Paper](https://arxiv.org/abs/2506.01844), [Blog](https://huggingface.co/blog/smolvla).
|
||||
- Thanks to Tony Zhao, Zipeng Fu and colleagues for open sourcing ACT policy, ALOHA environments and datasets. Ours are adapted from [ALOHA](https://tonyzhaozh.github.io/aloha) and [Mobile ALOHA](https://mobile-aloha.github.io).
|
||||
- Thanks to Cheng Chi, Zhenjia Xu and colleagues for open sourcing Diffusion policy, Pusht environment and datasets, as well as UMI datasets. Ours are adapted from [Diffusion Policy](https://diffusion-policy.cs.columbia.edu) and [UMI Gripper](https://umi-gripper.github.io).
|
||||
- Thanks to Nicklas Hansen, Yunhai Feng and colleagues for open sourcing TDMPC policy, Simxarm environments and datasets. Ours are adapted from [TDMPC](https://github.com/nicklashansen/tdmpc) and [FOWM](https://www.yunhaifeng.com/FOWM).
|
||||
@@ -129,7 +130,7 @@ pip install -e .
|
||||
```
|
||||
|
||||
> **NOTE:** If you encounter build errors, you may need to install additional dependencies (`cmake`, `build-essential`, and `ffmpeg libs`). On Linux, run:
|
||||
`sudo apt-get install cmake build-essential python3-dev pkg-config libavformat-dev libavcodec-dev libavdevice-dev libavutil-dev libswscale-dev libswresample-dev libavfilter-dev pkg-config`. For other systems, see: [Compiling PyAV](https://pyav.org/docs/develop/overview/installation.html#bring-your-own-ffmpeg)
|
||||
`sudo apt-get install cmake build-essential python3-dev pkg-config libavformat-dev libavcodec-dev libavdevice-dev libavutil-dev libswscale-dev libswresample-dev libavfilter-dev`. For other systems, see: [Compiling PyAV](https://pyav.org/docs/develop/overview/installation.html#bring-your-own-ffmpeg)
|
||||
|
||||
For simulations, 🤗 LeRobot comes with gymnasium environments that can be installed as extras:
|
||||
- [aloha](https://github.com/huggingface/gym-aloha)
|
||||
@@ -148,44 +149,20 @@ wandb login
|
||||
|
||||
(note: you will also need to enable WandB in the configuration. See below.)
|
||||
|
||||
## Walkthrough
|
||||
|
||||
```
|
||||
.
|
||||
├── examples # contains demonstration examples, start here to learn about LeRobot
|
||||
| └── advanced # contains even more examples for those who have mastered the basics
|
||||
├── lerobot
|
||||
| ├── configs # contains config classes with all options that you can override in the command line
|
||||
| ├── common # contains classes and utilities
|
||||
| | ├── datasets # various datasets of human demonstrations: aloha, pusht, xarm
|
||||
| | ├── envs # various sim environments: aloha, pusht, xarm
|
||||
| | ├── policies # various policies: act, diffusion, tdmpc
|
||||
| | ├── robot_devices # various real devices: dynamixel motors, opencv cameras, koch robots
|
||||
| | └── utils # various utilities
|
||||
| └── scripts # contains functions to execute via command line
|
||||
| ├── eval.py # load policy and evaluate it on an environment
|
||||
| ├── train.py # train a policy via imitation learning and/or reinforcement learning
|
||||
| ├── control_robot.py # teleoperate a real robot, record data, run a policy
|
||||
| ├── push_dataset_to_hub.py # convert your dataset into LeRobot dataset format and upload it to the Hugging Face hub
|
||||
| └── visualize_dataset.py # load a dataset and render its demonstrations
|
||||
├── outputs # contains results of scripts execution: logs, videos, model checkpoints
|
||||
└── tests # contains pytest utilities for continuous integration
|
||||
```
|
||||
|
||||
### Visualize datasets
|
||||
|
||||
Check out [example 1](./examples/1_load_lerobot_dataset.py) that illustrates how to use our dataset class which automatically downloads data from the Hugging Face hub.
|
||||
|
||||
You can also locally visualize episodes from a dataset on the hub by executing our script from the command line:
|
||||
```bash
|
||||
python lerobot/scripts/visualize_dataset.py \
|
||||
python -m lerobot.scripts.visualize_dataset \
|
||||
--repo-id lerobot/pusht \
|
||||
--episode-index 0
|
||||
```
|
||||
|
||||
or from a dataset in a local folder with the `root` option and the `--local-files-only` (in the following case the dataset will be searched for in `./my_local_data_dir/lerobot/pusht`)
|
||||
```bash
|
||||
python lerobot/scripts/visualize_dataset.py \
|
||||
python -m lerobot.scripts.visualize_dataset \
|
||||
--repo-id lerobot/pusht \
|
||||
--root ./my_local_data_dir \
|
||||
--local-files-only 1 \
|
||||
@@ -198,7 +175,7 @@ It will open `rerun.io` and display the camera streams, robot states and actions
|
||||
https://github-production-user-asset-6210df.s3.amazonaws.com/4681518/328035972-fd46b787-b532-47e2-bb6f-fd536a55a7ed.mov?X-Amz-Algorithm=AWS4-HMAC-SHA256&X-Amz-Credential=AKIAVCODYLSA53PQK4ZA%2F20240505%2Fus-east-1%2Fs3%2Faws4_request&X-Amz-Date=20240505T172924Z&X-Amz-Expires=300&X-Amz-Signature=d680b26c532eeaf80740f08af3320d22ad0b8a4e4da1bcc4f33142c15b509eda&X-Amz-SignedHeaders=host&actor_id=24889239&key_id=0&repo_id=748713144
|
||||
|
||||
|
||||
Our script can also visualize datasets stored on a distant server. See `python lerobot/scripts/visualize_dataset.py --help` for more instructions.
|
||||
Our script can also visualize datasets stored on a distant server. See `python -m lerobot.scripts.visualize_dataset --help` for more instructions.
|
||||
|
||||
### The `LeRobotDataset` format
|
||||
|
||||
@@ -251,7 +228,7 @@ Check out [example 2](./examples/2_evaluate_pretrained_policy.py) that illustrat
|
||||
|
||||
We also provide a more capable script to parallelize the evaluation over multiple environments during the same rollout. Here is an example with a pretrained model hosted on [lerobot/diffusion_pusht](https://huggingface.co/lerobot/diffusion_pusht):
|
||||
```bash
|
||||
python lerobot/scripts/eval.py \
|
||||
python -m lerobot.scripts.eval \
|
||||
--policy.path=lerobot/diffusion_pusht \
|
||||
--env.type=pusht \
|
||||
--eval.batch_size=10 \
|
||||
@@ -263,10 +240,10 @@ python lerobot/scripts/eval.py \
|
||||
Note: After training your own policy, you can re-evaluate the checkpoints with:
|
||||
|
||||
```bash
|
||||
python lerobot/scripts/eval.py --policy.path={OUTPUT_DIR}/checkpoints/last/pretrained_model
|
||||
python -m lerobot.scripts.eval --policy.path={OUTPUT_DIR}/checkpoints/last/pretrained_model
|
||||
```
|
||||
|
||||
See `python lerobot/scripts/eval.py --help` for more instructions.
|
||||
See `python -m lerobot.scripts.eval --help` for more instructions.
|
||||
|
||||
### Train your own policy
|
||||
|
||||
@@ -278,14 +255,14 @@ A link to the wandb logs for the run will also show up in yellow in your termina
|
||||
|
||||

|
||||
|
||||
Note: For efficiency, during training every checkpoint is evaluated on a low number of episodes. You may use `--eval.n_episodes=500` to evaluate on more episodes than the default. Or, after training, you may want to re-evaluate your best checkpoints on more episodes or change the evaluation settings. See `python lerobot/scripts/eval.py --help` for more instructions.
|
||||
Note: For efficiency, during training every checkpoint is evaluated on a low number of episodes. You may use `--eval.n_episodes=500` to evaluate on more episodes than the default. Or, after training, you may want to re-evaluate your best checkpoints on more episodes or change the evaluation settings. See `python -m lerobot.scripts.eval --help` for more instructions.
|
||||
|
||||
#### Reproduce state-of-the-art (SOTA)
|
||||
|
||||
We provide some pretrained policies on our [hub page](https://huggingface.co/lerobot) that can achieve state-of-the-art performances.
|
||||
You can reproduce their training by loading the config from their run. Simply running:
|
||||
```bash
|
||||
python lerobot/scripts/train.py --config_path=lerobot/diffusion_pusht
|
||||
python -m lerobot.scripts.train --config_path=lerobot/diffusion_pusht
|
||||
```
|
||||
reproduces SOTA results for Diffusion Policy on the PushT task.
|
||||
|
||||
@@ -311,7 +288,7 @@ python lerobot/scripts/push_dataset_to_hub.py \
|
||||
|
||||
See `python lerobot/scripts/push_dataset_to_hub.py --help` for more instructions.
|
||||
|
||||
If your dataset format is not supported, implement your own in `lerobot/common/datasets/push_dataset_to_hub/${raw_format}_format.py` by copying examples like [pusht_zarr](https://github.com/huggingface/lerobot/blob/main/lerobot/common/datasets/push_dataset_to_hub/pusht_zarr_format.py), [umi_zarr](https://github.com/huggingface/lerobot/blob/main/lerobot/common/datasets/push_dataset_to_hub/umi_zarr_format.py), [aloha_hdf5](https://github.com/huggingface/lerobot/blob/main/lerobot/common/datasets/push_dataset_to_hub/aloha_hdf5_format.py), or [xarm_pkl](https://github.com/huggingface/lerobot/blob/main/lerobot/common/datasets/push_dataset_to_hub/xarm_pkl_format.py). -->
|
||||
If your dataset format is not supported, implement your own in `lerobot/datasets/push_dataset_to_hub/${raw_format}_format.py` by copying examples like [pusht_zarr](https://github.com/huggingface/lerobot/blob/main/lerobot/datasets/push_dataset_to_hub/pusht_zarr_format.py), [umi_zarr](https://github.com/huggingface/lerobot/blob/main/lerobot/datasets/push_dataset_to_hub/umi_zarr_format.py), [aloha_hdf5](https://github.com/huggingface/lerobot/blob/main/lerobot/datasets/push_dataset_to_hub/aloha_hdf5_format.py), or [xarm_pkl](https://github.com/huggingface/lerobot/blob/main/lerobot/datasets/push_dataset_to_hub/xarm_pkl_format.py). -->
|
||||
|
||||
|
||||
### Add a pretrained policy
|
||||
@@ -360,7 +337,7 @@ with profile(
|
||||
If you want, you can cite this work with:
|
||||
```bibtex
|
||||
@misc{cadene2024lerobot,
|
||||
author = {Cadene, Remi and Alibert, Simon and Soare, Alexander and Gallouedec, Quentin and Zouitine, Adil and Wolf, Thomas},
|
||||
author = {Cadene, Remi and Alibert, Simon and Soare, Alexander and Gallouedec, Quentin and Zouitine, Adil and Palma, Steven and Kooijmans, Pepijn and Aractingi, Michel and Shukor, Mustafa and Aubakirova, Dana and Russi, Martino and Capuano, Francesco and Pascale, Caroline and Choghari, Jade and Moss, Jess and Wolf, Thomas},
|
||||
title = {LeRobot: State-of-the-art Machine Learning for Real-World Robotics in Pytorch},
|
||||
howpublished = "\url{https://github.com/huggingface/lerobot}",
|
||||
year = {2024}
|
||||
@@ -368,6 +345,15 @@ If you want, you can cite this work with:
|
||||
```
|
||||
|
||||
Additionally, if you are using any of the particular policy architecture, pretrained models, or datasets, it is recommended to cite the original authors of the work as they appear below:
|
||||
- [SmolVLA](https://arxiv.org/abs/2506.01844)
|
||||
```bibtex
|
||||
@article{shukor2025smolvla,
|
||||
title={SmolVLA: A Vision-Language-Action Model for Affordable and Efficient Robotics},
|
||||
author={Shukor, Mustafa and Aubakirova, Dana and Capuano, Francesco and Kooijmans, Pepijn and Palma, Steven and Zouitine, Adil and Aractingi, Michel and Pascal, Caroline and Russi, Martino and Marafioti, Andres and Alibert, Simon and Cord, Matthieu and Wolf, Thomas and Cadene, Remi},
|
||||
journal={arXiv preprint arXiv:2506.01844},
|
||||
year={2025}
|
||||
}
|
||||
```
|
||||
|
||||
- [Diffusion Policy](https://diffusion-policy.cs.columbia.edu)
|
||||
```bibtex
|
||||
@@ -408,6 +394,19 @@ Additionally, if you are using any of the particular policy architecture, pretra
|
||||
year={2024}
|
||||
}
|
||||
```
|
||||
|
||||
|
||||
- [HIL-SERL](https://hil-serl.github.io/)
|
||||
```bibtex
|
||||
@Article{luo2024hilserl,
|
||||
title={Precise and Dexterous Robotic Manipulation via Human-in-the-Loop Reinforcement Learning},
|
||||
author={Jianlan Luo and Charles Xu and Jeffrey Wu and Sergey Levine},
|
||||
year={2024},
|
||||
eprint={2410.21845},
|
||||
archivePrefix={arXiv},
|
||||
primaryClass={cs.RO}
|
||||
}
|
||||
```
|
||||
## Star History
|
||||
|
||||
[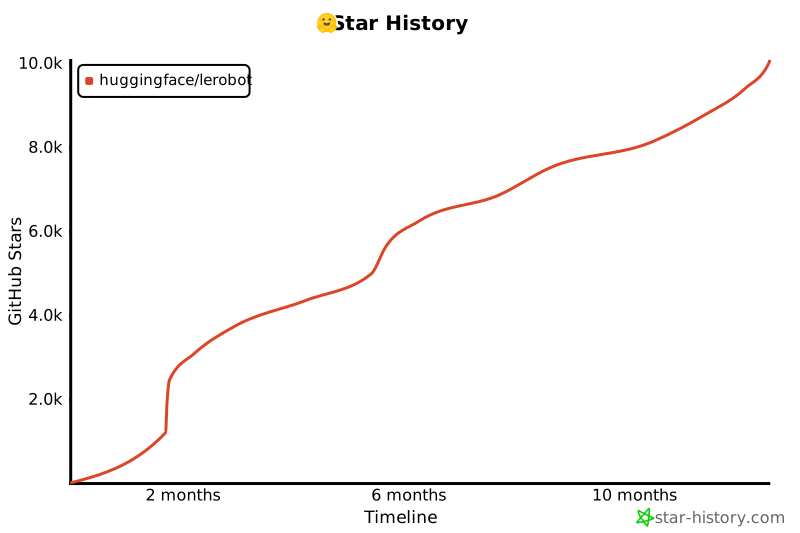](https://star-history.com/#huggingface/lerobot&Timeline)
|
||||
|
||||
2
benchmarks/video/capture_camera_feed.py
Normal file → Executable file
@@ -55,7 +55,7 @@ def display_and_save_video_stream(output_dir: Path, fps: int, width: int, height
|
||||
if not ret:
|
||||
print("Error: Could not read frame.")
|
||||
break
|
||||
rr.log("video/stream", rr.Image(frame.numpy()), static=True)
|
||||
rr.log("video/stream", rr.Image(frame), static=True)
|
||||
cv2.imwrite(str(capture_dir / f"frame_{frame_index:06d}.png"), frame)
|
||||
frame_index += 1
|
||||
|
||||
|
||||
@@ -35,12 +35,12 @@ import torch
|
||||
from skimage.metrics import mean_squared_error, peak_signal_noise_ratio, structural_similarity
|
||||
from tqdm import tqdm
|
||||
|
||||
from lerobot.common.datasets.lerobot_dataset import LeRobotDataset
|
||||
from lerobot.common.datasets.video_utils import (
|
||||
from lerobot.datasets.lerobot_dataset import LeRobotDataset
|
||||
from lerobot.datasets.video_utils import (
|
||||
decode_video_frames_torchvision,
|
||||
encode_video_frames,
|
||||
)
|
||||
from lerobot.common.utils.benchmark import TimeBenchmark
|
||||
from lerobot.utils.benchmark import TimeBenchmark
|
||||
|
||||
BASE_ENCODING = OrderedDict(
|
||||
[
|
||||
|
||||
@@ -22,7 +22,7 @@ RUN apt-get update && apt-get install -y --no-install-recommends \
|
||||
COPY . /lerobot
|
||||
WORKDIR /lerobot
|
||||
RUN /opt/venv/bin/pip install --upgrade --no-cache-dir pip \
|
||||
&& /opt/venv/bin/pip install --no-cache-dir ".[test, aloha, xarm, pusht, dynamixel]" \
|
||||
&& /opt/venv/bin/pip install --no-cache-dir ".[test, aloha, xarm, pusht, smolvla]" \
|
||||
--extra-index-url https://download.pytorch.org/whl/cpu
|
||||
|
||||
# Execute in bash shell rather than python
|
||||
|
||||
@@ -21,4 +21,4 @@ RUN apt-get update && apt-get install -y --no-install-recommends \
|
||||
COPY . /lerobot
|
||||
WORKDIR /lerobot
|
||||
RUN /opt/venv/bin/pip install --upgrade --no-cache-dir pip \
|
||||
&& /opt/venv/bin/pip install --no-cache-dir ".[test, aloha, xarm, pusht, dynamixel]"
|
||||
&& /opt/venv/bin/pip install --no-cache-dir ".[test, aloha, xarm, pusht, dynamixel, smolvla]"
|
||||
|
||||
@@ -5,8 +5,40 @@
|
||||
title: Installation
|
||||
title: Get started
|
||||
- sections:
|
||||
- local: assemble_so101
|
||||
title: Assemble SO-101
|
||||
- local: getting_started_real_world_robot
|
||||
title: Getting Started with Real-World Robots
|
||||
- local: il_robots
|
||||
title: Imitation Learning for Robots
|
||||
- local: il_sim
|
||||
title: Imitation Learning in Sim
|
||||
- local: cameras
|
||||
title: Cameras
|
||||
- local: integrate_hardware
|
||||
title: Bring Your Own Hardware
|
||||
- local: hilserl
|
||||
title: Train a Robot with RL
|
||||
- local: hilserl_sim
|
||||
title: Train RL in Simulation
|
||||
title: "Tutorials"
|
||||
- sections:
|
||||
- local: smolvla
|
||||
title: Finetune SmolVLA
|
||||
title: "Policies"
|
||||
- sections:
|
||||
- local: so101
|
||||
title: SO-101
|
||||
- local: so100
|
||||
title: SO-100
|
||||
- local: koch
|
||||
title: Koch v1.1
|
||||
- local: lekiwi
|
||||
title: LeKiwi
|
||||
title: "Robots"
|
||||
- sections:
|
||||
- local: notebooks
|
||||
title: Notebooks
|
||||
title: "Resources"
|
||||
- sections:
|
||||
- local: contributing
|
||||
title: Contribute to LeRobot
|
||||
- local: backwardcomp
|
||||
title: Backward compatibility
|
||||
title: "About"
|
||||
|
||||
@@ -1,348 +0,0 @@
|
||||
# Assemble SO-101
|
||||
|
||||
In the steps below we explain how to assemble our flagship robot, the SO-101.
|
||||
|
||||
## Source the parts
|
||||
|
||||
Follow this [README](https://github.com/TheRobotStudio/SO-ARM100). It contains the bill of materials, with a link to source the parts, as well as the instructions to 3D print the parts,
|
||||
and advice if it's your first time printing or if you don't own a 3D printer.
|
||||
|
||||
Before assembling, you will first need to configure your motors. To this end, we provide a nice script, so let's first install LeRobot. After configuration, we will also guide you through assembly.
|
||||
|
||||
## Install LeRobot
|
||||
|
||||
To install LeRobot follow our [Installation Guide](./installation)
|
||||
|
||||
## Configure motors
|
||||
|
||||
To configure the motors designate one bus servo adapter and 6 motors for your leader arm, and similarly the other bus servo adapter and 6 motors for the follower arm. It's convenient to label them and write on each motor if it's for the follower `F` or for the leader `L` and it's ID from 1 to 6.
|
||||
|
||||
You now should plug the 5V or 12V power supply to the motor bus. 5V for the STS3215 7.4V motors and 12V for the STS3215 12V motors. Note that the leader arm always uses the 7.4V motors, so watch out that you plug in the right power supply if you have 12V and 7.4V motors, otherwise you might burn your motors! Now, connect the motor bus to your computer via USB. Note that the USB doesn't provide any power, and both the power supply and USB have to be plugged in.
|
||||
|
||||
### Find the USB ports associated to each arm
|
||||
|
||||
To find the port for each bus servo adapter, run this script:
|
||||
```bash
|
||||
python lerobot/scripts/find_motors_bus_port.py
|
||||
```
|
||||
##### Example outputs of script
|
||||
|
||||
<hfoptions id="example">
|
||||
<hfoption id="Mac">
|
||||
|
||||
Example output leader arm's port: `/dev/tty.usbmodem575E0031751`
|
||||
|
||||
```bash
|
||||
Finding all available ports for the MotorBus.
|
||||
['/dev/tty.usbmodem575E0032081', '/dev/tty.usbmodem575E0031751']
|
||||
Remove the usb cable from your MotorsBus and press Enter when done.
|
||||
|
||||
[...Disconnect leader arm and press Enter...]
|
||||
|
||||
The port of this MotorsBus is /dev/tty.usbmodem575E0031751
|
||||
Reconnect the usb cable.
|
||||
```
|
||||
|
||||
Example output follower arm port: `/dev/tty.usbmodem575E0032081`
|
||||
|
||||
```
|
||||
Finding all available ports for the MotorBus.
|
||||
['/dev/tty.usbmodem575E0032081', '/dev/tty.usbmodem575E0031751']
|
||||
Remove the usb cable from your MotorsBus and press Enter when done.
|
||||
|
||||
[...Disconnect follower arm and press Enter...]
|
||||
|
||||
The port of this MotorsBus is /dev/tty.usbmodem575E0032081
|
||||
Reconnect the usb cable.
|
||||
```
|
||||
|
||||
</hfoption>
|
||||
<hfoption id="Linux">
|
||||
|
||||
On Linux, you might need to give access to the USB ports by running:
|
||||
```bash
|
||||
sudo chmod 666 /dev/ttyACM0
|
||||
sudo chmod 666 /dev/ttyACM1
|
||||
```
|
||||
|
||||
Example output leader arm port: `/dev/ttyACM0`
|
||||
|
||||
```bash
|
||||
Finding all available ports for the MotorBus.
|
||||
['/dev/ttyACM0', '/dev/ttyACM1']
|
||||
Remove the usb cable from your MotorsBus and press Enter when done.
|
||||
|
||||
[...Disconnect leader arm and press Enter...]
|
||||
|
||||
The port of this MotorsBus is /dev/ttyACM0
|
||||
Reconnect the usb cable.
|
||||
```
|
||||
|
||||
Example output follower arm port: `/dev/ttyACM1`
|
||||
|
||||
```
|
||||
Finding all available ports for the MotorBus.
|
||||
['/dev/ttyACM0', '/dev/ttyACM1']
|
||||
Remove the usb cable from your MotorsBus and press Enter when done.
|
||||
|
||||
[...Disconnect follower arm and press Enter...]
|
||||
|
||||
The port of this MotorsBus is /dev/ttyACM1
|
||||
Reconnect the usb cable.
|
||||
```
|
||||
</hfoption>
|
||||
</hfoptions>
|
||||
|
||||
#### Update config file
|
||||
|
||||
Now that you have your ports, update the **port** default values of [`SO101RobotConfig`](https://github.com/huggingface/lerobot/blob/main/lerobot/common/robot_devices/robots/configs.py).
|
||||
You will find a class called `so101` where you can update the `port` values with your actual motor ports:
|
||||
```diff
|
||||
@RobotConfig.register_subclass("so101")
|
||||
@dataclass
|
||||
class So101RobotConfig(ManipulatorRobotConfig):
|
||||
calibration_dir: str = ".cache/calibration/so101"
|
||||
# `max_relative_target` limits the magnitude of the relative positional target vector for safety purposes.
|
||||
# Set this to a positive scalar to have the same value for all motors, or a list that is the same length as
|
||||
# the number of motors in your follower arms.
|
||||
max_relative_target: int | None = None
|
||||
|
||||
leader_arms: dict[str, MotorsBusConfig] = field(
|
||||
default_factory=lambda: {
|
||||
"main": FeetechMotorsBusConfig(
|
||||
- port="/dev/tty.usbmodem58760431091",
|
||||
+ port="{ADD YOUR LEADER PORT}",
|
||||
motors={
|
||||
# name: (index, model)
|
||||
"shoulder_pan": [1, "sts3215"],
|
||||
"shoulder_lift": [2, "sts3215"],
|
||||
"elbow_flex": [3, "sts3215"],
|
||||
"wrist_flex": [4, "sts3215"],
|
||||
"wrist_roll": [5, "sts3215"],
|
||||
"gripper": [6, "sts3215"],
|
||||
},
|
||||
),
|
||||
}
|
||||
)
|
||||
|
||||
follower_arms: dict[str, MotorsBusConfig] = field(
|
||||
default_factory=lambda: {
|
||||
"main": FeetechMotorsBusConfig(
|
||||
- port="/dev/tty.usbmodem585A0076891",
|
||||
+ port="{ADD YOUR FOLLOWER PORT}",
|
||||
motors={
|
||||
# name: (index, model)
|
||||
"shoulder_pan": [1, "sts3215"],
|
||||
"shoulder_lift": [2, "sts3215"],
|
||||
"elbow_flex": [3, "sts3215"],
|
||||
"wrist_flex": [4, "sts3215"],
|
||||
"wrist_roll": [5, "sts3215"],
|
||||
"gripper": [6, "sts3215"],
|
||||
},
|
||||
),
|
||||
}
|
||||
)
|
||||
```
|
||||
|
||||
Here is a video of the process:
|
||||
<div class="video-container">
|
||||
<video controls width="600">
|
||||
<source src="https://huggingface.co/datasets/huggingface/documentation-images/resolve/main/lerobot/lerobot-find-motorbus.mp4" type="video/mp4" />
|
||||
</video>
|
||||
</div>
|
||||
|
||||
## Step-by-Step Assembly Instructions
|
||||
|
||||
The follower arm uses 6x STS3215 motors with 1/345 gearing. The leader however uses three differently geared motors to make sure it can both sustain its own weight and it can be moved without requiring much force. Which motor is needed for which joint is shown in table below.
|
||||
|
||||
| Leader-Arm Axis | Motor | Gear Ratio |
|
||||
|-----------------|:-------:|:----------:|
|
||||
| Base / Shoulder Yaw | 1 | 1 / 191 |
|
||||
| Shoulder Pitch | 2 | 1 / 345 |
|
||||
| Elbow | 3 | 1 / 191 |
|
||||
| Wrist Roll | 4 | 1 / 147 |
|
||||
| Wrist Pitch | 5 | 1 / 147 |
|
||||
| Gripper | 6 | 1 / 147 |
|
||||
|
||||
### Set motor IDs
|
||||
|
||||
Plug your motor in one of the two ports of the motor bus and run this script to set its ID to 1. Replace the text after --port to the corresponding control board port.
|
||||
```bash
|
||||
python lerobot/scripts/configure_motor.py \
|
||||
--port /dev/tty.usbmodem58760432961 \
|
||||
--brand feetech \
|
||||
--model sts3215 \
|
||||
--baudrate 1000000 \
|
||||
--ID 1
|
||||
```
|
||||
|
||||
Then unplug your motor and plug the second motor and set its ID to 2.
|
||||
```bash
|
||||
python lerobot/scripts/configure_motor.py \
|
||||
--port /dev/tty.usbmodem58760432961 \
|
||||
--brand feetech \
|
||||
--model sts3215 \
|
||||
--baudrate 1000000 \
|
||||
--ID 2
|
||||
```
|
||||
|
||||
Redo this process for all your motors until ID 6. Do the same for the 6 motors of the leader arm, but make sure to change the power supply if you use motors with different voltage and make sure you give the right ID to the right motor according to the table above.
|
||||
|
||||
Here is a video of the process:
|
||||
<div class="video-container">
|
||||
<video controls width="600">
|
||||
<source src="https://huggingface.co/datasets/huggingface/documentation-images/resolve/main/lerobot/lerobot-configure-motor.mp4" type="video/mp4" />
|
||||
</video>
|
||||
</div>
|
||||
|
||||
### Clean Parts
|
||||
Remove all support material from the 3D-printed parts, the easiest way to do this is using a small screwdriver to get underneath the support material.
|
||||
|
||||
### Joint 1
|
||||
|
||||
- Place the first motor into the base.
|
||||
- Fasten the motor with 4 M2x6mm screws (smallest screws). Two from the top and two from bottom.
|
||||
- Slide over the first motor holder and fasten it using two M2x6mm screws (one on each side).
|
||||
- Install both motor horns, securing the top horn with a M3x6mm screw.
|
||||
- Attach the shoulder part.
|
||||
- Tighten the shoulder part with 4 M3x6mm screws on top and 4 M3x6mm screws on the bottom
|
||||
- Add the shoulder motor holder.
|
||||
|
||||
<div class="video-container">
|
||||
<video controls width="600">
|
||||
<source src="https://huggingface.co/datasets/huggingface/documentation-images/resolve/main/lerobot/Joint1_v2.mp4" type="video/mp4" />
|
||||
</video>
|
||||
</div>
|
||||
|
||||
### Joint 2
|
||||
|
||||
- Slide the second motor in from the top.
|
||||
- Fasten the second motor with 4 M2x6mm screws.
|
||||
- Attach both motor horns to motor 2, again use the M3x6mm horn screw.
|
||||
- Attach the upper arm with 4 M3x6mm screws on each side.
|
||||
|
||||
<div class="video-container">
|
||||
<video controls width="600">
|
||||
<source src="https://huggingface.co/datasets/huggingface/documentation-images/resolve/main/lerobot/Joint2_v2.mp4" type="video/mp4" />
|
||||
</video>
|
||||
</div>
|
||||
|
||||
### Joint 3
|
||||
|
||||
- Insert motor 3 and fasten using 4 M2x6mm screws
|
||||
- Attach both motor horns to motor 3 and secure one again with a M3x6mm horn screw.
|
||||
- Connect the forearm to motor 3 using 4 M3x6mm screws on each side.
|
||||
|
||||
<div class="video-container">
|
||||
<video controls width="600">
|
||||
<source src="https://huggingface.co/datasets/huggingface/documentation-images/resolve/main/lerobot/Joint3_v2.mp4" type="video/mp4" />
|
||||
</video>
|
||||
</div>
|
||||
|
||||
### Joint 4
|
||||
|
||||
- Slide over motor holder 4.
|
||||
- Slide in motor 4.
|
||||
- Fasten motor 4 with 4 M2x6mm screws and attach its motor horns, use a M3x6mm horn screw.
|
||||
|
||||
<div class="video-container">
|
||||
<video controls width="600">
|
||||
<source src="https://huggingface.co/datasets/huggingface/documentation-images/resolve/main/lerobot/Joint4_v2.mp4" type="video/mp4" />
|
||||
</video>
|
||||
</div>
|
||||
|
||||
### Joint 5
|
||||
|
||||
- Insert motor 5 into the wrist holder and secure it with 2 M2x6mm front screws.
|
||||
- Install only one motor horn on the wrist motor and secure it with a M3x6mm horn screw.
|
||||
- Secure the wrist to motor 4 using 4 M3x6mm screws on both sides.
|
||||
|
||||
<div class="video-container">
|
||||
<video controls width="600">
|
||||
<source src="https://huggingface.co/datasets/huggingface/documentation-images/resolve/main/lerobot/Joint5_v2.mp4" type="video/mp4" />
|
||||
</video>
|
||||
</div>
|
||||
|
||||
### Gripper / Handle
|
||||
|
||||
<hfoptions id="assembly">
|
||||
<hfoption id="Follower">
|
||||
|
||||
- Attach the gripper to motor 5, attach it to the motor horn on the wrist using 4 M3x6mm screws.
|
||||
- Insert the gripper motor and secure it with 2 M2x6mm screws on each side.
|
||||
- Attach the motor horns and again use a M3x6mm horn screw.
|
||||
- Install the gripper claw and secure it with 4 M3x6mm screws on both sides.
|
||||
|
||||
<div class="video-container">
|
||||
<video controls width="600">
|
||||
<source src="https://huggingface.co/datasets/huggingface/documentation-images/resolve/main/lerobot/Gripper_v2.mp4" type="video/mp4" />
|
||||
</video>
|
||||
</div>
|
||||
|
||||
</hfoption>
|
||||
<hfoption id="Leader">
|
||||
|
||||
- Mount the leader holder onto the wrist and secure it with 4 M3x6mm screws.
|
||||
- Attach the handle to motor 5 using 1 M2x6mm screw.
|
||||
- Insert the gripper motor, secure it with 2 M2x6mm screws on each side, attach a motor horn using a M3x6mm horn screw.
|
||||
- Attach the follower trigger with 4 M3x6mm screws.
|
||||
|
||||
<div class="video-container">
|
||||
<video controls width="600">
|
||||
<source src="https://huggingface.co/datasets/huggingface/documentation-images/resolve/main/lerobot/Leader_v2.mp4" type="video/mp4" />
|
||||
</video>
|
||||
</div>
|
||||
|
||||
</hfoption>
|
||||
</hfoptions>
|
||||
|
||||
##### Wiring
|
||||
|
||||
- Attach the motor controller on the back.
|
||||
- Then insert all wires, use the wire guides everywhere to make sure the wires don't unplug themselves and stay in place.
|
||||
|
||||
<div class="video-container">
|
||||
<video controls width="600">
|
||||
<source src="https://huggingface.co/datasets/huggingface/documentation-images/resolve/main/lerobot/Wiring_v2.mp4" type="video/mp4" />
|
||||
</video>
|
||||
</div>
|
||||
|
||||
## Calibrate
|
||||
|
||||
Next, you'll need to calibrate your SO-101 robot to ensure that the leader and follower arms have the same position values when they are in the same physical position.
|
||||
The calibration process is very important because it allows a neural network trained on one SO-101 robot to work on another.
|
||||
|
||||
#### Manual calibration of follower arm
|
||||
|
||||
You will need to move the follower arm to these positions sequentially, note that the rotated position is on the right side of the robot and you have to open the gripper fully.
|
||||
|
||||
| 1. Middle position | 2. Zero position | 3. Rotated position | 4. Rest position |
|
||||
| ------------ |------------------------------------------------------------------------------------------------------------------------------------------------------ | --------------------------------------------------------------------------------------------------------------------------------------------------------------- | ------------------------------------------------------------------------------------------------------------------------------------------------------ |
|
||||
| <img src="https://huggingface.co/datasets/huggingface/documentation-images/resolve/main/lerobot/follower_middle.webp?raw=true" alt="SO-101 leader arm middle position" title="SO-101 leader arm middle position" style="width:100%;"> | <img src="https://huggingface.co/datasets/huggingface/documentation-images/resolve/main/lerobot/follower_zero.webp?raw=true" alt="SO-101 leader arm zero position" title="SO-101 leader arm zero position" style="width:100%;"> | <img src="https://huggingface.co/datasets/huggingface/documentation-images/resolve/main/lerobot/follower_rotated.webp?raw=true" alt="SO-101 leader arm rotated position" title="SO-101 leader arm rotated position" style="width:100%;"> | <img src="https://huggingface.co/datasets/huggingface/documentation-images/resolve/main/lerobot/follower_rest.webp?raw=true" alt="SO-101 leader arm rest position" title="SO-101 leader arm rest position" style="width:100%;"> |
|
||||
|
||||
Make sure both arms are connected and run this script to launch manual calibration:
|
||||
```bash
|
||||
python lerobot/scripts/control_robot.py \
|
||||
--robot.type=so101 \
|
||||
--robot.cameras='{}' \
|
||||
--control.type=calibrate \
|
||||
--control.arms='["main_follower"]'
|
||||
```
|
||||
|
||||
#### Manual calibration of leader arm
|
||||
You will also need to move the leader arm to these positions sequentially:
|
||||
|
||||
| 1. Middle position | 2. Zero position | 3. Rotated position | 4. Rest position |
|
||||
| ------------ |------------------------------------------------------------------------------------------------------------------------------------------------------ | --------------------------------------------------------------------------------------------------------------------------------------------------------------- | ------------------------------------------------------------------------------------------------------------------------------------------------------ |
|
||||
| <img src="https://huggingface.co/datasets/huggingface/documentation-images/resolve/main/lerobot/leader_middle.webp?raw=true" alt="SO-101 leader arm middle position" title="SO-101 leader arm middle position" style="width:100%;"> | <img src="https://huggingface.co/datasets/huggingface/documentation-images/resolve/main/lerobot/leader_zero.webp?raw=true" alt="SO-101 leader arm zero position" title="SO-101 leader arm zero position" style="width:100%;"> | <img src="https://huggingface.co/datasets/huggingface/documentation-images/resolve/main/lerobot/leader_rotated.webp?raw=true" alt="SO-101 leader arm rotated position" title="SO-101 leader arm rotated position" style="width:100%;"> | <img src="https://huggingface.co/datasets/huggingface/documentation-images/resolve/main/lerobot/leader_rest.webp?raw=true" alt="SO-101 leader arm rest position" title="SO-101 leader arm rest position" style="width:100%;"> |
|
||||
|
||||
Run this script to launch manual calibration:
|
||||
```bash
|
||||
python lerobot/scripts/control_robot.py \
|
||||
--robot.type=so101 \
|
||||
--robot.cameras='{}' \
|
||||
--control.type=calibrate \
|
||||
--control.arms='["main_leader"]'
|
||||
```
|
||||
|
||||
Congrats 🎉, your robot is all set to learn a task on its own. Start training it by following this tutorial: [Getting started with real-world robots](./getting_started_real_world_robot)
|
||||
82
docs/source/backwardcomp.mdx
Normal file
@@ -0,0 +1,82 @@
|
||||
# Backward compatibility
|
||||
|
||||
## Hardware API redesign
|
||||
|
||||
PR [#777](https://github.com/huggingface/lerobot/pull/777) improves the LeRobot calibration but is **not backward-compatible**. Below is a overview of what changed and how you can continue to work with datasets created before this pull request.
|
||||
|
||||
### What changed?
|
||||
|
||||
| | Before PR #777 | After PR #777 |
|
||||
| --------------------------------- | ------------------------------------------------- | --------------------------------------------------------------------------- |
|
||||
| **Joint range** | Degrees `-180...180°` | **Normalised range** Joints: `–100...100` Gripper: `0...100` |
|
||||
| **Zero position (SO100 / SO101)** | Arm fully extended horizontally | **In middle of the range for each joint** |
|
||||
| **Boundary handling** | Software safeguards to detect ±180 ° wrap-arounds | No wrap-around logic needed due to mid-range zero |
|
||||
|
||||
---
|
||||
|
||||
### Impact on existing datasets
|
||||
|
||||
* Recorded trajectories created **before** PR #777 will replay incorrectly if loaded directly:
|
||||
* Joint angles are offset and incorrectly normalized.
|
||||
* Any models directly finetuned or trained on the old data will need their inputs and outputs converted.
|
||||
|
||||
### Using datasets made with the previous calibration system
|
||||
We provide a migration example script for replaying an episode recorded with the previous calibration here: `examples/backward_compatibility/replay.py`.
|
||||
Below we take you through the modifications that are done in the example script to make the previous calibration datasets work.
|
||||
|
||||
```diff
|
||||
+ key = f"{name.removeprefix('main_')}.pos"
|
||||
action[key] = action_array[i].item()
|
||||
+ action["shoulder_lift.pos"] = -(action["shoulder_lift.pos"] - 90)
|
||||
+ action["elbow_flex.pos"] -= 90
|
||||
```
|
||||
|
||||
Let's break this down.
|
||||
New codebase uses `.pos` suffix for the position observations and we have removed `main_` prefix:
|
||||
```python
|
||||
key = f"{name.removeprefix('main_')}.pos"
|
||||
```
|
||||
|
||||
For `"shoulder_lift"` (id = 2), the 0 position is changed by -90 degrees and the direction is reversed compared to old calibration/code.
|
||||
```python
|
||||
action["shoulder_lift.pos"] = -(action["shoulder_lift.pos"] - 90)
|
||||
```
|
||||
For `"elbow_flex"` (id = 3), the 0 position is changed by -90 degrees compared to old calibration/code.
|
||||
```python
|
||||
action["elbow_flex.pos"] -= 90
|
||||
```
|
||||
|
||||
To use degrees normalization we then set the `--robot.use_degrees` option to `true`.
|
||||
```diff
|
||||
python examples/backward_compatibility/replay.py \
|
||||
--robot.type=so101_follower \
|
||||
--robot.port=/dev/tty.usbmodem5A460814411 \
|
||||
--robot.id=blue \
|
||||
+ --robot.use_degrees=true \
|
||||
--dataset.repo_id=my_dataset_id \
|
||||
--dataset.episode=0
|
||||
```
|
||||
|
||||
### Using policies trained with the previous calibration system
|
||||
|
||||
Policies output actions in the same format as the datasets (`torch.Tensors`). Therefore, the same transformations should be applied.
|
||||
|
||||
To find these transformations, we recommend to first try and and replay an episode of the dataset your policy was trained on using the section above.
|
||||
Then, add these same transformations on your inference script (shown here in the `record.py` script):
|
||||
```diff
|
||||
action_values = predict_action(
|
||||
observation_frame,
|
||||
policy,
|
||||
get_safe_torch_device(policy.config.device),
|
||||
policy.config.use_amp,
|
||||
task=single_task,
|
||||
robot_type=robot.robot_type,
|
||||
)
|
||||
action = {key: action_values[i].item() for i, key in enumerate(robot.action_features)}
|
||||
|
||||
+ action["shoulder_lift.pos"] = -(action["shoulder_lift.pos"] - 90)
|
||||
+ action["elbow_flex.pos"] -= 90
|
||||
robot.send_action(action)
|
||||
```
|
||||
|
||||
If you have questions or run into migration issues, feel free to ask them on [Discord](https://discord.gg/s3KuuzsPFb)
|
||||
173
docs/source/cameras.mdx
Normal file
@@ -0,0 +1,173 @@
|
||||
# Cameras
|
||||
|
||||
LeRobot offers multiple options for video capture, including phone cameras, built-in laptop cameras, external webcams, and Intel RealSense cameras. To efficiently record frames from most cameras, you can use either the `OpenCVCamera` or `RealSenseCamera` class. For additional compatibility details on the `OpenCVCamera` class, refer to the [Video I/O with OpenCV Overview](https://docs.opencv.org/4.x/d0/da7/videoio_overview.html).
|
||||
|
||||
### Finding your camera
|
||||
|
||||
To instantiate a camera, you need a camera identifier. This identifier might change if you reboot your computer or re-plug your camera, a behavior mostly dependant on your operating system.
|
||||
|
||||
To find the camera indices of the cameras plugged into your system, run the following script:
|
||||
```bash
|
||||
python -m lerobot.find_cameras opencv # or realsense for Intel Realsense cameras
|
||||
```
|
||||
|
||||
The output will look something like this if you have two cameras connected:
|
||||
```
|
||||
--- Detected Cameras ---
|
||||
Camera #0:
|
||||
Name: OpenCV Camera @ 0
|
||||
Type: OpenCV
|
||||
Id: 0
|
||||
Backend api: AVFOUNDATION
|
||||
Default stream profile:
|
||||
Format: 16.0
|
||||
Width: 1920
|
||||
Height: 1080
|
||||
Fps: 15.0
|
||||
--------------------
|
||||
(more cameras ...)
|
||||
```
|
||||
|
||||
> [!WARNING]
|
||||
> When using Intel RealSense cameras in `macOS`, you could get this [error](https://github.com/IntelRealSense/librealsense/issues/12307): `Error finding RealSense cameras: failed to set power state`, this can be solved by running the same command with `sudo` permissions. Note that using RealSense cameras in `macOS` is unstable.
|
||||
|
||||
|
||||
## Use Cameras
|
||||
|
||||
Below are two examples, demonstrating how to work with the API.
|
||||
|
||||
- **Asynchronous frame capture** using an OpenCV-based camera
|
||||
- **Color and depth capture** using an Intel RealSense camera
|
||||
|
||||
|
||||
<hfoptions id="shell_restart">
|
||||
<hfoption id="Open CV Camera">
|
||||
|
||||
```python
|
||||
from lerobot.cameras.opencv.configuration_opencv import OpenCVCameraConfig
|
||||
from lerobot.cameras.opencv.camera_opencv import OpenCVCamera
|
||||
from lerobot.cameras.configs import ColorMode, Cv2Rotation
|
||||
|
||||
# Construct an `OpenCVCameraConfig` with your desired FPS, resolution, color mode, and rotation.
|
||||
config = OpenCVCameraConfig(
|
||||
index_or_path=0,
|
||||
fps=15,
|
||||
width=1920,
|
||||
height=1080,
|
||||
color_mode=ColorMode.RGB,
|
||||
rotation=Cv2Rotation.NO_ROTATION
|
||||
)
|
||||
|
||||
# Instantiate and connect an `OpenCVCamera`, performing a warm-up read (default).
|
||||
camera = OpenCVCamera(config)
|
||||
camera.connect()
|
||||
|
||||
# Read frames asynchronously in a loop via `async_read(timeout_ms)`
|
||||
try:
|
||||
for i in range(10):
|
||||
frame = camera.async_read(timeout_ms=200)
|
||||
print(f"Async frame {i} shape:", frame.shape)
|
||||
finally:
|
||||
camera.disconnect()
|
||||
```
|
||||
|
||||
</hfoption>
|
||||
<hfoption id="Intel Realsense Camera">
|
||||
|
||||
```python
|
||||
from lerobot.cameras.realsense.configuration_realsense import RealSenseCameraConfig
|
||||
from lerobot.cameras.realsense.camera_realsense import RealSenseCamera
|
||||
from lerobot.cameras.configs import ColorMode, Cv2Rotation
|
||||
|
||||
# Create a `RealSenseCameraConfig` specifying your camera’s serial number and enabling depth.
|
||||
config = RealSenseCameraConfig(
|
||||
serial_number_or_name="233522074606",
|
||||
fps=15,
|
||||
width=640,
|
||||
height=480,
|
||||
color_mode=ColorMode.RGB,
|
||||
use_depth=True,
|
||||
rotation=Cv2Rotation.NO_ROTATION
|
||||
)
|
||||
|
||||
# Instantiate and connect a `RealSenseCamera` with warm-up read (default).
|
||||
camera = RealSenseCamera(config)
|
||||
camera.connect()
|
||||
|
||||
# Capture a color frame via `read()` and a depth map via `read_depth()`.
|
||||
try:
|
||||
color_frame = camera.read()
|
||||
depth_map = camera.read_depth()
|
||||
print("Color frame shape:", color_frame.shape)
|
||||
print("Depth map shape:", depth_map.shape)
|
||||
finally:
|
||||
camera.disconnect()
|
||||
```
|
||||
</hfoption>
|
||||
</hfoptions>
|
||||
|
||||
|
||||
## Use your phone
|
||||
<hfoptions id="use phone">
|
||||
<hfoption id="Mac">
|
||||
|
||||
To use your iPhone as a camera on macOS, enable the Continuity Camera feature:
|
||||
- Ensure your Mac is running macOS 13 or later, and your iPhone is on iOS 16 or later.
|
||||
- Sign in both devices with the same Apple ID.
|
||||
- Connect your devices with a USB cable or turn on Wi-Fi and Bluetooth for a wireless connection.
|
||||
|
||||
For more details, visit [Apple support](https://support.apple.com/en-gb/guide/mac-help/mchl77879b8a/mac).
|
||||
|
||||
Your iPhone should be detected automatically when running the camera setup script in the next section.
|
||||
|
||||
</hfoption>
|
||||
<hfoption id="Linux">
|
||||
|
||||
If you want to use your phone as a camera on Linux, follow these steps to set up a virtual camera
|
||||
|
||||
1. *Install `v4l2loopback-dkms` and `v4l-utils`*. Those packages are required to create virtual camera devices (`v4l2loopback`) and verify their settings with the `v4l2-ctl` utility from `v4l-utils`. Install them using:
|
||||
```python
|
||||
sudo apt install v4l2loopback-dkms v4l-utils
|
||||
```
|
||||
2. *Install [DroidCam](https://droidcam.app) on your phone*. This app is available for both iOS and Android.
|
||||
3. *Install [OBS Studio](https://obsproject.com)*. This software will help you manage the camera feed. Install it using [Flatpak](https://flatpak.org):
|
||||
```python
|
||||
flatpak install flathub com.obsproject.Studio
|
||||
```
|
||||
4. *Install the DroidCam OBS plugin*. This plugin integrates DroidCam with OBS Studio. Install it with:
|
||||
```python
|
||||
flatpak install flathub com.obsproject.Studio.Plugin.DroidCam
|
||||
```
|
||||
5. *Start OBS Studio*. Launch with:
|
||||
```python
|
||||
flatpak run com.obsproject.Studio
|
||||
```
|
||||
6. *Add your phone as a source*. Follow the instructions [here](https://droidcam.app/obs/usage). Be sure to set the resolution to `640x480`.
|
||||
7. *Adjust resolution settings*. In OBS Studio, go to `File > Settings > Video`. Change the `Base(Canvas) Resolution` and the `Output(Scaled) Resolution` to `640x480` by manually typing it in.
|
||||
8. *Start virtual camera*. In OBS Studio, follow the instructions [here](https://obsproject.com/kb/virtual-camera-guide).
|
||||
9. *Verify the virtual camera setup*. Use `v4l2-ctl` to list the devices:
|
||||
```python
|
||||
v4l2-ctl --list-devices
|
||||
```
|
||||
You should see an entry like:
|
||||
```
|
||||
VirtualCam (platform:v4l2loopback-000):
|
||||
/dev/video1
|
||||
```
|
||||
10. *Check the camera resolution*. Use `v4l2-ctl` to ensure that the virtual camera output resolution is `640x480`. Change `/dev/video1` to the port of your virtual camera from the output of `v4l2-ctl --list-devices`.
|
||||
```python
|
||||
v4l2-ctl -d /dev/video1 --get-fmt-video
|
||||
```
|
||||
You should see an entry like:
|
||||
```
|
||||
>>> Format Video Capture:
|
||||
>>> Width/Height : 640/480
|
||||
>>> Pixel Format : 'YUYV' (YUYV 4:2:2)
|
||||
```
|
||||
|
||||
Troubleshooting: If the resolution is not correct you will have to delete the Virtual Camera port and try again as it cannot be changed.
|
||||
|
||||
If everything is set up correctly, you can proceed with the rest of the tutorial.
|
||||
|
||||
</hfoption>
|
||||
</hfoptions>
|
||||
1
docs/source/contributing.md
Symbolic link
@@ -0,0 +1 @@
|
||||
../../CONTRIBUTING.md
|
||||
@@ -1,370 +0,0 @@
|
||||
# Getting Started with Real-World Robots
|
||||
|
||||
This tutorial will explain you how to train a neural network to autonomously control a real robot.
|
||||
|
||||
**You'll learn:**
|
||||
1. How to record and visualize your dataset.
|
||||
2. How to train a policy using your data and prepare it for evaluation.
|
||||
3. How to evaluate your policy and visualize the results.
|
||||
|
||||
By following these steps, you'll be able to replicate tasks like picking up a Lego block and placing it in a bin with a high success rate, as demonstrated in [this video](https://x.com/RemiCadene/status/1814680760592572934).
|
||||
|
||||
This tutorial is specifically made for the affordable [SO-101](https://github.com/TheRobotStudio/SO-ARM100) robot, but it contains additional information to be easily adapted to various types of robots like [Aloha bimanual robot](https://aloha-2.github.io) by changing some configurations. The SO-101 consists of a leader arm and a follower arm, each with 6 motors. It can work with one or several cameras to record the scene, which serve as visual sensors for the robot.
|
||||
|
||||
During the data collection phase, you will control the follower arm by moving the leader arm. This process is known as "teleoperation." This technique is used to collect robot trajectories. Afterward, you'll train a neural network to imitate these trajectories and deploy the network to enable your robot to operate autonomously.
|
||||
|
||||
If you encounter any issues at any step of the tutorial, feel free to seek help on [Discord](https://discord.com/invite/s3KuuzsPFb) or don't hesitate to iterate with us on the tutorial by creating issues or pull requests.
|
||||
|
||||
## Setup and Calibrate
|
||||
|
||||
If you haven't yet setup and calibrate the SO-101 follow these steps:
|
||||
1. [Find ports and update config file](./assemble_so101#find-the-usb-ports-associated-to-each-arm)
|
||||
2. [Calibrate](./assemble_so101#calibrate)
|
||||
|
||||
## Teleoperate
|
||||
|
||||
Run this simple script to teleoperate your robot (it won't connect and display the cameras):
|
||||
```bash
|
||||
python lerobot/scripts/control_robot.py \
|
||||
--robot.type=so101 \
|
||||
--robot.cameras='{}' \
|
||||
--control.type=teleoperate
|
||||
```
|
||||
|
||||
The teleoperate command will automatically:
|
||||
1. Identify any missing calibrations and initiate the calibration procedure.
|
||||
2. Connect the robot and start teleoperation.
|
||||
|
||||
## Setup Cameras
|
||||
|
||||
To connect a camera you have three options:
|
||||
1. OpenCVCamera which allows us to use any camera: usb, realsense, laptop webcam
|
||||
2. iPhone camera with MacOS
|
||||
3. Phone camera on Linux
|
||||
|
||||
### Use OpenCVCamera
|
||||
|
||||
The [`OpenCVCamera`](../lerobot/common/robot_devices/cameras/opencv.py) class allows you to efficiently record frames from most cameras using the [`opencv2`](https://docs.opencv.org) library. For more details on compatibility, see [Video I/O with OpenCV Overview](https://docs.opencv.org/4.x/d0/da7/videoio_overview.html).
|
||||
|
||||
To instantiate an [`OpenCVCamera`](../lerobot/common/robot_devices/cameras/opencv.py), you need a camera index (e.g. `OpenCVCamera(camera_index=0)`). When you only have one camera like a webcam of a laptop, the camera index is usually `0` but it might differ, and the camera index might change if you reboot your computer or re-plug your camera. This behavior depends on your operating system.
|
||||
|
||||
To find the camera indices, run the following utility script, which will save a few frames from each detected camera:
|
||||
```bash
|
||||
python lerobot/common/robot_devices/cameras/opencv.py \
|
||||
--images-dir outputs/images_from_opencv_cameras
|
||||
```
|
||||
|
||||
The output will look something like this if you have two cameras connected:
|
||||
```
|
||||
Mac or Windows detected. Finding available camera indices through scanning all indices from 0 to 60
|
||||
[...]
|
||||
Camera found at index 0
|
||||
Camera found at index 1
|
||||
[...]
|
||||
Connecting cameras
|
||||
OpenCVCamera(0, fps=30.0, width=1920.0, height=1080.0, color_mode=rgb)
|
||||
OpenCVCamera(1, fps=24.0, width=1920.0, height=1080.0, color_mode=rgb)
|
||||
Saving images to outputs/images_from_opencv_cameras
|
||||
Frame: 0000 Latency (ms): 39.52
|
||||
[...]
|
||||
Frame: 0046 Latency (ms): 40.07
|
||||
Images have been saved to outputs/images_from_opencv_cameras
|
||||
```
|
||||
|
||||
Check the saved images in `outputs/images_from_opencv_cameras` to identify which camera index corresponds to which physical camera (e.g. `0` for `camera_00` or `1` for `camera_01`):
|
||||
```
|
||||
camera_00_frame_000000.png
|
||||
[...]
|
||||
camera_00_frame_000047.png
|
||||
camera_01_frame_000000.png
|
||||
[...]
|
||||
camera_01_frame_000047.png
|
||||
```
|
||||
|
||||
Note: Some cameras may take a few seconds to warm up, and the first frame might be black or green.
|
||||
|
||||
Now that you have the camera indexes, you should specify the camera's in the config.
|
||||
|
||||
### Use your phone
|
||||
<hfoptions id="use phone">
|
||||
<hfoption id="Mac">
|
||||
|
||||
To use your iPhone as a camera on macOS, enable the Continuity Camera feature:
|
||||
- Ensure your Mac is running macOS 13 or later, and your iPhone is on iOS 16 or later.
|
||||
- Sign in both devices with the same Apple ID.
|
||||
- Connect your devices with a USB cable or turn on Wi-Fi and Bluetooth for a wireless connection.
|
||||
|
||||
For more details, visit [Apple support](https://support.apple.com/en-gb/guide/mac-help/mchl77879b8a/mac).
|
||||
|
||||
Your iPhone should be detected automatically when running the camera setup script in the next section.
|
||||
|
||||
</hfoption>
|
||||
<hfoption id="Linux">
|
||||
|
||||
If you want to use your phone as a camera on Linux, follow these steps to set up a virtual camera
|
||||
|
||||
1. *Install `v4l2loopback-dkms` and `v4l-utils`*. Those packages are required to create virtual camera devices (`v4l2loopback`) and verify their settings with the `v4l2-ctl` utility from `v4l-utils`. Install them using:
|
||||
```python
|
||||
sudo apt install v4l2loopback-dkms v4l-utils
|
||||
```
|
||||
2. *Install [DroidCam](https://droidcam.app) on your phone*. This app is available for both iOS and Android.
|
||||
3. *Install [OBS Studio](https://obsproject.com)*. This software will help you manage the camera feed. Install it using [Flatpak](https://flatpak.org):
|
||||
```python
|
||||
flatpak install flathub com.obsproject.Studio
|
||||
```
|
||||
4. *Install the DroidCam OBS plugin*. This plugin integrates DroidCam with OBS Studio. Install it with:
|
||||
```python
|
||||
flatpak install flathub com.obsproject.Studio.Plugin.DroidCam
|
||||
```
|
||||
5. *Start OBS Studio*. Launch with:
|
||||
```python
|
||||
flatpak run com.obsproject.Studio
|
||||
```
|
||||
6. *Add your phone as a source*. Follow the instructions [here](https://droidcam.app/obs/usage). Be sure to set the resolution to `640x480`.
|
||||
7. *Adjust resolution settings*. In OBS Studio, go to `File > Settings > Video`. Change the `Base(Canvas) Resolution` and the `Output(Scaled) Resolution` to `640x480` by manually typing it in.
|
||||
8. *Start virtual camera*. In OBS Studio, follow the instructions [here](https://obsproject.com/kb/virtual-camera-guide).
|
||||
9. *Verify the virtual camera setup*. Use `v4l2-ctl` to list the devices:
|
||||
```python
|
||||
v4l2-ctl --list-devices
|
||||
```
|
||||
You should see an entry like:
|
||||
```
|
||||
VirtualCam (platform:v4l2loopback-000):
|
||||
/dev/video1
|
||||
```
|
||||
10. *Check the camera resolution*. Use `v4l2-ctl` to ensure that the virtual camera output resolution is `640x480`. Change `/dev/video1` to the port of your virtual camera from the output of `v4l2-ctl --list-devices`.
|
||||
```python
|
||||
v4l2-ctl -d /dev/video1 --get-fmt-video
|
||||
```
|
||||
You should see an entry like:
|
||||
```
|
||||
>>> Format Video Capture:
|
||||
>>> Width/Height : 640/480
|
||||
>>> Pixel Format : 'YUYV' (YUYV 4:2:2)
|
||||
```
|
||||
|
||||
Troubleshooting: If the resolution is not correct you will have to delete the Virtual Camera port and try again as it cannot be changed.
|
||||
|
||||
If everything is set up correctly, you can proceed with the rest of the tutorial.
|
||||
|
||||
</hfoption>
|
||||
</hfoptions>
|
||||
|
||||
## Teleoperate with cameras
|
||||
|
||||
We can now teleoperate again while at the same time visualizing the cameras and joint positions with `rerun`.
|
||||
|
||||
```bash
|
||||
python lerobot/scripts/control_robot.py \
|
||||
--robot.type=so101 \
|
||||
--control.type=teleoperate
|
||||
--control.display_data=true
|
||||
```
|
||||
|
||||
## Record a dataset
|
||||
|
||||
Once you're familiar with teleoperation, you can record your first dataset with SO-101.
|
||||
|
||||
We use the Hugging Face hub features for uploading your dataset. If you haven't previously used the Hub, make sure you can login via the cli using a write-access token, this token can be generated from the [Hugging Face settings](https://huggingface.co/settings/tokens).
|
||||
|
||||
Add your token to the cli by running this command:
|
||||
```bash
|
||||
huggingface-cli login --token ${HUGGINGFACE_TOKEN} --add-to-git-credential
|
||||
```
|
||||
|
||||
Then store your Hugging Face repository name in a variable:
|
||||
```bash
|
||||
HF_USER=$(huggingface-cli whoami | head -n 1)
|
||||
echo $HF_USER
|
||||
```
|
||||
|
||||
Now you can record a dataset, to record 2 episodes and upload your dataset to the hub execute this command:
|
||||
```bash
|
||||
python lerobot/scripts/control_robot.py \
|
||||
--robot.type=so101 \
|
||||
--control.type=record \
|
||||
--control.fps=30 \
|
||||
--control.single_task="Grasp a lego block and put it in the bin." \
|
||||
--control.repo_id=${HF_USER}/so101_test \
|
||||
--control.tags='["so101","tutorial"]' \
|
||||
--control.warmup_time_s=5 \
|
||||
--control.episode_time_s=30 \
|
||||
--control.reset_time_s=30 \
|
||||
--control.num_episodes=2 \
|
||||
--control.push_to_hub=true
|
||||
```
|
||||
|
||||
You will see a lot of lines appearing like this one:
|
||||
```
|
||||
INFO 2024-08-10 15:02:58 ol_robot.py:219 dt:33.34 (30.0hz) dtRlead: 5.06 (197.5hz) dtWfoll: 0.25 (3963.7hz) dtRfoll: 6.22 (160.7hz) dtRlaptop: 32.57 (30.7hz) dtRphone: 33.84 (29.5hz)
|
||||
```
|
||||
|
||||
| Field | Meaning |
|
||||
|:---|:---|
|
||||
| `2024-08-10 15:02:58` | Timestamp when `print` was called. |
|
||||
| `ol_robot.py:219` | Source file and line number of the `print` call (`lerobot/scripts/control_robot.py` at line `219`). |
|
||||
| `dt: 33.34 (30.0 Hz)` | Delta time (ms) between teleop steps (target: 30.0 Hz, `--fps 30`). Yellow if step is too slow. |
|
||||
| `dtRlead: 5.06 (197.5 Hz)` | Delta time (ms) for reading present position from the **leader arm**. |
|
||||
| `dtWfoll: 0.25 (3963.7 Hz)` | Delta time (ms) for writing goal position to the **follower arm** (asynchronous). |
|
||||
| `dtRfoll: 6.22 (160.7 Hz)` | Delta time (ms) for reading present position from the **follower arm**. |
|
||||
| `dtRlaptop: 32.57 (30.7 Hz)` | Delta time (ms) for capturing an image from the **laptop camera** (async thread). |
|
||||
| `dtRphone: 33.84 (29.5 Hz)` | Delta time (ms) for capturing an image from the **phone camera** (async thread). |
|
||||
|
||||
|
||||
#### Dataset upload
|
||||
Locally your dataset is stored in this folder: `~/.cache/huggingface/lerobot/{repo-id}` (e.g. `data/cadene/so101_test`). At the end of data recording, your dataset will be uploaded on your Hugging Face page (e.g. https://huggingface.co/datasets/cadene/so101_test) that you can obtain by running:
|
||||
```bash
|
||||
echo https://huggingface.co/datasets/${HF_USER}/so101_test
|
||||
```
|
||||
Your dataset will be automatically tagged with `LeRobot` for the community to find it easily, and you can also add custom tags (in this case `tutorial` for example).
|
||||
|
||||
You can look for other LeRobot datasets on the hub by searching for `LeRobot` [tags](https://huggingface.co/datasets?other=LeRobot).
|
||||
|
||||
#### Record function
|
||||
|
||||
The `record` function provides a suite of tools for capturing and managing data during robot operation:
|
||||
|
||||
##### 1. Frame Capture and Video Encoding
|
||||
- Frames from cameras are saved to disk during recording.
|
||||
- At the end of each episode, frames are encoded into video files.
|
||||
|
||||
##### 2. Data Storage
|
||||
- Data is stored using the `LeRobotDataset` format.
|
||||
- By default, the dataset is pushed to your Hugging Face page.
|
||||
- To disable uploading, use `--control.push_to_hub=false`.
|
||||
|
||||
##### 3. Checkpointing and Resuming
|
||||
- Checkpoints are automatically created during recording.
|
||||
- If an issue occurs, you can resume by re-running the same command with `--control.resume=true`.
|
||||
- To start recording from scratch, **manually delete** the dataset directory.
|
||||
|
||||
##### 4. Recording Parameters
|
||||
Set the flow of data recording using command-line arguments:
|
||||
- `--control.warmup_time_s=10`
|
||||
Number of seconds before starting data collection (default: **10 seconds**).
|
||||
Allows devices to warm up and synchronize.
|
||||
- `--control.episode_time_s=60`
|
||||
Duration of each data recording episode (default: **60 seconds**).
|
||||
- `--control.reset_time_s=60`
|
||||
Duration for resetting the environment after each episode (default: **60 seconds**).
|
||||
- `--control.num_episodes=50`
|
||||
Total number of episodes to record (default: **50**).
|
||||
|
||||
##### 5. Keyboard Controls During Recording
|
||||
Control the data recording flow using keyboard shortcuts:
|
||||
- Press **Right Arrow (`→`)**: Early stop the current episode or reset time and move to the next.
|
||||
- Press **Left Arrow (`←`)**: Cancel the current episode and re-record it.
|
||||
- Press **Escape (`ESC`)**: Immediately stop the session, encode videos, and upload the dataset.
|
||||
|
||||
#### Tips for gathering data
|
||||
|
||||
Once you're comfortable with data recording, you can create a larger dataset for training. A good starting task is grasping an object at different locations and placing it in a bin. We suggest recording at least 50 episodes, with 10 episodes per location. Keep the cameras fixed and maintain consistent grasping behavior throughout the recordings. Also make sure the object you are manipulating is visible on the camera's. A good rule of thumb is you should be able to do the task yourself by only looking at the camera images.
|
||||
|
||||
In the following sections, you’ll train your neural network. After achieving reliable grasping performance, you can start introducing more variations during data collection, such as additional grasp locations, different grasping techniques, and altering camera positions.
|
||||
|
||||
Avoid adding too much variation too quickly, as it may hinder your results.
|
||||
|
||||
|
||||
#### Troubleshooting:
|
||||
- On Linux, if the left and right arrow keys and escape key don't have any effect during data recording, make sure you've set the `$DISPLAY` environment variable. See [pynput limitations](https://pynput.readthedocs.io/en/latest/limitations.html#linux).
|
||||
|
||||
## Visualize a dataset
|
||||
|
||||
If you uploaded your dataset to the hub with `--control.push_to_hub=true`, you can [visualize your dataset online](https://huggingface.co/spaces/lerobot/visualize_dataset) by copy pasting your repo id given by:
|
||||
```bash
|
||||
echo ${HF_USER}/so101_test
|
||||
```
|
||||
|
||||
If you didn't upload with `--control.push_to_hub=false`, you can visualize it locally with (via a window in the browser `http://127.0.0.1:9090` with the visualization tool):
|
||||
```bash
|
||||
python lerobot/scripts/visualize_dataset_html.py \
|
||||
--repo-id ${HF_USER}/so101_test \
|
||||
--local-files-only 1
|
||||
```
|
||||
|
||||
This will launch a local web server that looks like this:
|
||||
<div style="text-align:center;">
|
||||
<img src="https://huggingface.co/datasets/huggingface/documentation-images/resolve/main/lerobot/visualize_dataset_html.webp?raw=true" alt="Koch v1.1 leader and follower arms" title="Koch v1.1 leader and follower arms" width="100%"></img>
|
||||
</div>
|
||||
|
||||
## Replay an episode
|
||||
|
||||
A useful feature is the `replay` function, which allows to replay on your robot any episode that you've recorded or episodes from any dataset out there. This function helps you test the repeatability of your robot's actions and assess transferability across robots of the same model.
|
||||
|
||||
You can replay the first episode on your robot with:
|
||||
```bash
|
||||
python lerobot/scripts/control_robot.py \
|
||||
--robot.type=so101 \
|
||||
--control.type=replay \
|
||||
--control.fps=30 \
|
||||
--control.repo_id=${HF_USER}/so101_test \
|
||||
--control.episode=0
|
||||
```
|
||||
|
||||
Your robot should replicate movements similar to those you recorded. For example, check out [this video](https://x.com/RemiCadene/status/1793654950905680090) where we use `replay` on a Aloha robot from [Trossen Robotics](https://www.trossenrobotics.com).
|
||||
|
||||
## Train a policy
|
||||
|
||||
To train a policy to control your robot, use the [`python lerobot/scripts/train.py`](../lerobot/scripts/train.py) script. A few arguments are required. Here is an example command:
|
||||
```bash
|
||||
python lerobot/scripts/train.py \
|
||||
--dataset.repo_id=${HF_USER}/so101_test \
|
||||
--policy.type=act \
|
||||
--output_dir=outputs/train/act_so101_test \
|
||||
--job_name=act_so101_test \
|
||||
--policy.device=cuda \
|
||||
--wandb.enable=true
|
||||
```
|
||||
|
||||
Let's explain the command:
|
||||
1. We provided the dataset as argument with `--dataset.repo_id=${HF_USER}/so101_test`.
|
||||
2. We provided the policy with `policy.type=act`. This loads configurations from [`configuration_act.py`](../lerobot/common/policies/act/configuration_act.py). Importantly, this policy will automatically adapt to the number of motor states, motor actions and cameras of your robot (e.g. `laptop` and `phone`) which have been saved in your dataset.
|
||||
4. We provided `policy.device=cuda` since we are training on a Nvidia GPU, but you could use `policy.device=mps` to train on Apple silicon.
|
||||
5. We provided `wandb.enable=true` to use [Weights and Biases](https://docs.wandb.ai/quickstart) for visualizing training plots. This is optional but if you use it, make sure you are logged in by running `wandb login`.
|
||||
|
||||
Training should take several hours. You will find checkpoints in `outputs/train/act_so101_test/checkpoints`.
|
||||
|
||||
To resume training from a checkpoint, below is an example command to resume from `last` checkpoint of the `act_so101_test` policy:
|
||||
```bash
|
||||
python lerobot/scripts/train.py \
|
||||
--config_path=outputs/train/act_so101_test/checkpoints/last/pretrained_model/train_config.json \
|
||||
--resume=true
|
||||
```
|
||||
|
||||
#### Upload policy checkpoints
|
||||
|
||||
Once training is done, upload the latest checkpoint with:
|
||||
```bash
|
||||
huggingface-cli upload ${HF_USER}/act_so101_test \
|
||||
outputs/train/act_so101_test/checkpoints/last/pretrained_model
|
||||
```
|
||||
|
||||
You can also upload intermediate checkpoints with:
|
||||
```bash
|
||||
CKPT=010000
|
||||
huggingface-cli upload ${HF_USER}/act_so101_test${CKPT} \
|
||||
outputs/train/act_so101_test/checkpoints/${CKPT}/pretrained_model
|
||||
```
|
||||
|
||||
## Evaluate your policy
|
||||
|
||||
You can use the `record` function from [`lerobot/scripts/control_robot.py`](../lerobot/scripts/control_robot.py) but with a policy checkpoint as input. For instance, run this command to record 10 evaluation episodes:
|
||||
```bash
|
||||
python lerobot/scripts/control_robot.py \
|
||||
--robot.type=so101 \
|
||||
--control.type=record \
|
||||
--control.fps=30 \
|
||||
--control.single_task="Grasp a lego block and put it in the bin." \
|
||||
--control.repo_id=${HF_USER}/eval_act_so101_test \
|
||||
--control.tags='["tutorial"]' \
|
||||
--control.warmup_time_s=5 \
|
||||
--control.episode_time_s=30 \
|
||||
--control.reset_time_s=30 \
|
||||
--control.num_episodes=10 \
|
||||
--control.push_to_hub=true \
|
||||
--control.policy.path=outputs/train/act_so101_test/checkpoints/last/pretrained_model
|
||||
```
|
||||
|
||||
As you can see, it's almost the same command as previously used to record your training dataset. Two things changed:
|
||||
1. There is an additional `--control.policy.path` argument which indicates the path to your policy checkpoint with (e.g. `outputs/train/eval_act_so101_test/checkpoints/last/pretrained_model`). You can also use the model repository if you uploaded a model checkpoint to the hub (e.g. `${HF_USER}/act_so101_test`).
|
||||
2. The name of dataset begins by `eval` to reflect that you are running inference (e.g. `${HF_USER}/eval_act_so101_test`).
|
||||
548
docs/source/hilserl.mdx
Normal file
@@ -0,0 +1,548 @@
|
||||
# HIL-SERL Real Robot Training Workflow Guide
|
||||
|
||||
In this tutorial you will go through the full Human-in-the-Loop Sample-Efficient Reinforcement Learning (HIL-SERL) workflow using LeRobot. You will master training a policy with RL on a real robot in just a few hours.
|
||||
|
||||
HIL-SERL is a sample-efficient reinforcement learning algorithm that combines human demonstrations with online learning and human interventions. The approach starts from a small set of human demonstrations, uses them to train a reward classifier, and then employs an actor-learner architecture where humans can intervene during policy execution to guide exploration and correct unsafe behaviors. In this tutorial, you'll use a gamepad to provide interventions and control the robot during the learning process.
|
||||
|
||||
It combines three key ingredients:
|
||||
1. **Offline demonstrations & reward classifier:** a handful of human-teleop episodes plus a vision-based success detector give the policy a shaped starting point.
|
||||
2. **On-robot actor / learner loop with human interventions:** a distributed Soft Actor Critic (SAC) learner updates the policy while an actor explores on the physical robot; the human can jump in at any time to correct dangerous or unproductive behaviour.
|
||||
3. **Safety & efficiency tools:** joint/end-effector (EE) bounds, crop region of interest (ROI) preprocessing and WandB monitoring keep the data useful and the hardware safe.
|
||||
|
||||
Together these elements let HIL-SERL reach near-perfect task success and faster cycle times than imitation-only baselines.
|
||||
|
||||
<p align="center">
|
||||
<img src="https://huggingface.co/datasets/huggingface/documentation-images/resolve/main/lerobot/hilserl-main-figure.png" alt="HIL-SERL workflow" title="HIL-SERL workflow" width="100%"></img>
|
||||
</p>
|
||||
|
||||
<p align="center"><i>HIL-SERL workflow, Luo et al. 2024</i></p>
|
||||
|
||||
This guide provides step-by-step instructions for training a robot policy using LeRobot's HilSerl implementation to train on a real robot.
|
||||
|
||||
## What do I need?
|
||||
|
||||
- A gamepad (recommended) or keyboard to control the robot
|
||||
- A Nvidia GPU
|
||||
- A real robot with a follower and leader arm (optional if you use the keyboard or the gamepad)
|
||||
- A URDF file for the robot for the kinematics package (check `lerobot/common/model/kinematics.py`)
|
||||
|
||||
## What kind of tasks can I train?
|
||||
|
||||
One can use HIL-SERL to train on a variety of manipulation tasks. Some recommendations:
|
||||
- Start with a simple task to understand how the system works.
|
||||
- Push cube to a goal region
|
||||
- Pick and lift cube with the gripper
|
||||
- Avoid extremely long horizon tasks. Focus on tasks that can be completed in 5-10 seconds.
|
||||
- Once you have a good idea of how the system works, you can try more complex tasks and longer horizons.
|
||||
- Pick and place cube
|
||||
- Bimanual tasks to pick objects with two arms
|
||||
- Hand-over tasks to transfer objects from one arm to another
|
||||
- Go crazy!
|
||||
|
||||
## Install LeRobot with HIL-SERL
|
||||
|
||||
To install LeRobot with HIL-SERL, you need to install the `hilserl` extra.
|
||||
|
||||
```bash
|
||||
pip install -e ".[hilserl]"
|
||||
```
|
||||
|
||||
## Real Robot Training Workflow
|
||||
|
||||
### Understanding Configuration
|
||||
|
||||
The training process begins with proper configuration for the HILSerl environment. The configuration class of interest is `HILSerlRobotEnvConfig` in `lerobot/envs/configs.py`. Which is defined as:
|
||||
|
||||
```python
|
||||
class HILSerlRobotEnvConfig(EnvConfig):
|
||||
robot: RobotConfig | None = None # Main robot agent (defined in `lerobot/robots`)
|
||||
teleop: TeleoperatorConfig | None = None # Teleoperator agent, e.g., gamepad or leader arm, (defined in `lerobot/teleoperators`)
|
||||
wrapper: EnvTransformConfig | None = None # Environment wrapper settings; check `lerobot/scripts/server/gym_manipulator.py`
|
||||
fps: int = 10 # Control frequency
|
||||
name: str = "real_robot" # Environment name
|
||||
mode: str = None # "record", "replay", or None (for training)
|
||||
repo_id: str | None = None # LeRobot dataset repository ID
|
||||
dataset_root: str | None = None # Local dataset root (optional)
|
||||
task: str = "" # Task identifier
|
||||
num_episodes: int = 10 # Number of episodes for recording
|
||||
episode: int = 0 # episode index for replay
|
||||
device: str = "cuda" # Compute device
|
||||
push_to_hub: bool = True # Whether to push the recorded datasets to Hub
|
||||
pretrained_policy_name_or_path: str | None = None # For policy loading
|
||||
reward_classifier_pretrained_path: str | None = None # For reward model
|
||||
number_of_steps_after_success: int = 0 # For reward classifier, collect more positive examples after a success to train a classifier
|
||||
```
|
||||
|
||||
|
||||
### Finding Robot Workspace Bounds
|
||||
|
||||
Before collecting demonstrations, you need to determine the appropriate operational bounds for your robot.
|
||||
|
||||
This helps simplify the problem of learning on the real robot in two ways: 1) by limiting the robot's operational space to a specific region that solves the task and avoids unnecessary or unsafe exploration, and 2) by allowing training in end-effector space rather than joint space. Empirically, learning in joint space for reinforcement learning in manipulation is often a harder problem - some tasks are nearly impossible to learn in joint space but become learnable when the action space is transformed to end-effector coordinates.
|
||||
|
||||
**Using find_joint_limits.py**
|
||||
|
||||
This script helps you find the safe operational bounds for your robot's end-effector. Given that you have a follower and leader arm, you can use the script to find the bounds for the follower arm that will be applied during training.
|
||||
Bounding the action space will reduce the redundant exploration of the agent and guarantees safety.
|
||||
|
||||
```bash
|
||||
python -m lerobot.scripts.find_joint_limits \
|
||||
--robot.type=so100_follower \
|
||||
--robot.port=/dev/tty.usbmodem58760431541 \
|
||||
--robot.id=black \
|
||||
--teleop.type=so100_leader \
|
||||
--teleop.port=/dev/tty.usbmodem58760431551 \
|
||||
--teleop.id=blue
|
||||
```
|
||||
|
||||
**Workflow**
|
||||
|
||||
1. Run the script and move the robot through the space that solves the task
|
||||
2. The script will record the minimum and maximum end-effector positions and the joint angles and prints them to the console, for example:
|
||||
```
|
||||
Max ee position [0.2417 0.2012 0.1027]
|
||||
Min ee position [0.1663 -0.0823 0.0336]
|
||||
Max joint positions [-20.0, -20.0, -20.0, -20.0, -20.0, -20.0]
|
||||
Min joint positions [50.0, 50.0, 50.0, 50.0, 50.0, 50.0]
|
||||
```
|
||||
3. Use these values in the configuration of your teleoperation device (TeleoperatorConfig) under the `end_effector_bounds` field
|
||||
|
||||
**Example Configuration**
|
||||
|
||||
```json
|
||||
"end_effector_bounds": {
|
||||
"max": [0.24, 0.20, 0.10],
|
||||
"min": [0.16, -0.08, 0.03]
|
||||
}
|
||||
```
|
||||
|
||||
### Collecting Demonstrations
|
||||
|
||||
With the bounds defined, you can safely collect demonstrations for training. Training RL with off-policy algorithm allows us to use offline datasets collected in order to improve the efficiency of the learning process.
|
||||
|
||||
**Setting Up Record Mode**
|
||||
|
||||
Create a configuration file for recording demonstrations (or edit an existing one like [env_config_so100.json](https://huggingface.co/datasets/aractingi/lerobot-example-config-files/blob/main/env_config_so100.json)):
|
||||
|
||||
1. Set `mode` to `"record"`
|
||||
2. Specify a unique `repo_id` for your dataset (e.g., "username/task_name")
|
||||
3. Set `num_episodes` to the number of demonstrations you want to collect
|
||||
4. Set `crop_params_dict` to `null` initially (we'll determine crops later)
|
||||
5. Configure `robot`, `cameras`, and other hardware settings
|
||||
|
||||
Example configuration section:
|
||||
```json
|
||||
"mode": "record",
|
||||
"repo_id": "username/pick_lift_cube",
|
||||
"dataset_root": null,
|
||||
"task": "pick_and_lift",
|
||||
"num_episodes": 15,
|
||||
"episode": 0,
|
||||
"push_to_hub": true
|
||||
```
|
||||
|
||||
### Using a Teleoperation Device
|
||||
|
||||
Along with your robot, you will need a teleoperation device to control it in order to collect datasets of your task and perform interventions during the online training.
|
||||
We support using a gamepad or a keyboard or the leader arm of the robot.
|
||||
|
||||
HIL-Serl learns actions in the end-effector space of the robot. Therefore, the teleoperation will control the end-effector's x,y,z displacements.
|
||||
|
||||
For that we need to define a version of the robot that takes actions in the end-effector space. Check the robot class `SO100FollowerEndEffector` and its configuration `SO100FollowerEndEffectorConfig` for the default parameters related to the end-effector space.
|
||||
|
||||
```python
|
||||
class SO100FollowerEndEffectorConfig(SO100FollowerConfig):
|
||||
"""Configuration for the SO100FollowerEndEffector robot."""
|
||||
|
||||
# Default bounds for the end-effector position (in meters)
|
||||
end_effector_bounds: dict[str, list[float]] = field( # bounds for the end-effector in x,y,z direction
|
||||
default_factory=lambda: {
|
||||
"min": [-1.0, -1.0, -1.0], # min x, y, z
|
||||
"max": [1.0, 1.0, 1.0], # max x, y, z
|
||||
}
|
||||
)
|
||||
|
||||
max_gripper_pos: float = 50 # maximum gripper position that the gripper will be open at
|
||||
|
||||
end_effector_step_sizes: dict[str, float] = field( # maximum step size for the end-effector in x,y,z direction
|
||||
default_factory=lambda: {
|
||||
"x": 0.02,
|
||||
"y": 0.02,
|
||||
"z": 0.02,
|
||||
}
|
||||
)
|
||||
```
|
||||
|
||||
The `Teleoperator` defines the teleoperation device. You can check the list of available teleoperators in `lerobot/teleoperators`.
|
||||
|
||||
**Setting up the Gamepad**
|
||||
|
||||
The gamepad provides a very convenient way to control the robot and the episode state.
|
||||
|
||||
To setup the gamepad, you need to set the `control_mode` to `"gamepad"` and define the `teleop` section in the configuration file.
|
||||
|
||||
```json
|
||||
"teleop": {
|
||||
"type": "gamepad",
|
||||
"use_gripper": true
|
||||
},
|
||||
```
|
||||
|
||||
<p align="center">
|
||||
<img src="https://huggingface.co/datasets/huggingface/documentation-images/resolve/main/lerobot/gamepad_guide.jpg?raw=true" alt="Figure shows the control mappings on a Logitech gamepad." title="Gamepad Control Mapping" width="100%"></img>
|
||||
</p>
|
||||
<p align="center"><i>Gamepad button mapping for robot control and episode management</i></p>
|
||||
|
||||
**Setting up the SO101 leader**
|
||||
|
||||
The SO101 leader arm has reduced gears that allows it to move and track the follower arm during exploration. Therefore, taking over is much smoother than the gearless SO100.
|
||||
|
||||
To setup the SO101 leader, you need to set the `control_mode` to `"leader"` and define the `teleop` section in the configuration file.
|
||||
|
||||
```json
|
||||
"teleop": {
|
||||
"type": "so101_leader",
|
||||
"port": "/dev/tty.usbmodem585A0077921", # check your port number
|
||||
"use_degrees": true
|
||||
},
|
||||
```
|
||||
|
||||
In order to annotate the success/failure of the episode, **you will need** to use a keyboard to press `s` for success, `esc` for failure.
|
||||
During the online training, press `space` to take over the policy and `space` again to give the control back to the policy.
|
||||
|
||||
<details>
|
||||
<summary><strong>Video: SO101 leader teleoperation</strong></summary>
|
||||
|
||||
<div class="video-container">
|
||||
<video controls width="600">
|
||||
<source src="https://huggingface.co/datasets/huggingface/documentation-images/resolve/main/lerobot/so101_leader_tutorial.mp4" type="video/mp4" />
|
||||
</video>
|
||||
</div>
|
||||
|
||||
<p align="center"><i>SO101 leader teleoperation example, the leader tracks the follower, press `space` to intervene</i></p>
|
||||
</details>
|
||||
|
||||
**Recording Demonstrations**
|
||||
|
||||
Start the recording process, an example of the config file can be found [here](https://huggingface.co/datasets/aractingi/lerobot-example-config-files/blob/main/env_config_so100.json):
|
||||
|
||||
```bash
|
||||
python -m lerobot.scripts.rl.gym_manipulator --config_path src/lerobot/configs/env_config_so100.json
|
||||
```
|
||||
|
||||
During recording:
|
||||
1. The robot will reset to the initial position defined in the configuration file `fixed_reset_joint_positions`
|
||||
2. Complete the task successfully
|
||||
3. The episode ends with a reward of 1 when you press the "success" button
|
||||
4. If the time limit is reached, or the fail button is pressed, the episode ends with a reward of 0
|
||||
5. You can rerecord an episode by pressing the "rerecord" button
|
||||
6. The process automatically continues to the next episode
|
||||
7. After recording all episodes, the dataset is pushed to the Hugging Face Hub (optional) and saved locally
|
||||
|
||||
|
||||
### Processing the Dataset
|
||||
|
||||
After collecting demonstrations, process them to determine optimal camera crops.
|
||||
Reinforcement learning is sensitive to background distractions, so it is important to crop the images to the relevant workspace area.
|
||||
|
||||
Visual RL algorithms learn directly from pixel inputs, making them vulnerable to irrelevant visual information. Background elements like changing lighting, shadows, people moving, or objects outside the workspace can confuse the learning process. Good ROI selection should:
|
||||
- Include only the essential workspace where the task happens
|
||||
- Capture the robot's end-effector and all objects involved in the task
|
||||
- Exclude unnecessary background elements and distractions
|
||||
|
||||
Note: If you already know the crop parameters, you can skip this step and just set the `crop_params_dict` in the configuration file during recording.
|
||||
|
||||
**Determining Crop Parameters**
|
||||
|
||||
Use the `crop_dataset_roi.py` script to interactively select regions of interest in your camera images:
|
||||
|
||||
```bash
|
||||
python -m lerobot.scripts.rl.crop_dataset_roi --repo-id username/pick_lift_cube
|
||||
```
|
||||
|
||||
1. For each camera view, the script will display the first frame
|
||||
2. Draw a rectangle around the relevant workspace area
|
||||
3. Press 'c' to confirm the selection
|
||||
4. Repeat for all camera views
|
||||
5. The script outputs cropping parameters and creates a new cropped dataset
|
||||
|
||||
Example output:
|
||||
```
|
||||
Selected Rectangular Regions of Interest (top, left, height, width):
|
||||
observation.images.side: [180, 207, 180, 200]
|
||||
observation.images.front: [180, 250, 120, 150]
|
||||
```
|
||||
|
||||
<p align="center">
|
||||
<img src="https://huggingface.co/datasets/huggingface/documentation-images/resolve/main/lerobot/crop_dataset.gif" width="600"/>
|
||||
</p>
|
||||
|
||||
<p align="center"><i>Interactive cropping tool for selecting regions of interest</i></p>
|
||||
|
||||
|
||||
**Updating Configuration**
|
||||
|
||||
Add these crop parameters to your training configuration:
|
||||
|
||||
```json
|
||||
"crop_params_dict": {
|
||||
"observation.images.side": [180, 207, 180, 200],
|
||||
"observation.images.front": [180, 250, 120, 150]
|
||||
},
|
||||
"resize_size": [128, 128]
|
||||
```
|
||||
|
||||
**Recommended image resolution**
|
||||
|
||||
Most vision-based policies have been validated on square inputs of either **128×128** (default) or **64×64** pixels. We therefore advise setting the resize_size parameter to [128, 128] – or [64, 64] if you need to save GPU memory and bandwidth. Other resolutions are possible but have not been extensively tested.
|
||||
|
||||
|
||||
### Training a Reward Classifier
|
||||
|
||||
The reward classifier plays an important role in the HIL-SERL workflow by automating reward assignment and automatically detecting episode success. Instead of manually defining reward functions or relying on human feedback for every timestep, the reward classifier learns to predict success/failure from visual observations. This enables the RL algorithm to learn efficiently by providing consistent and automated reward signals based on the robot's camera inputs.
|
||||
|
||||
This guide explains how to train a reward classifier for human-in-the-loop reinforcement learning implementation of LeRobot. Reward classifiers learn to predict the reward value given a state which can be used in an RL setup to train a policy.
|
||||
|
||||
**Note**: Training a reward classifier is optional. You can start the first round of RL experiments by annotating the success manually with your gamepad or keyboard device.
|
||||
|
||||
The reward classifier implementation in `modeling_classifier.py` uses a pretrained vision model to process the images. It can output either a single value for binary rewards to predict success/fail cases or multiple values for multi-class settings.
|
||||
|
||||
**Collecting a Dataset for the reward classifier**
|
||||
|
||||
Before training, you need to collect a dataset with labeled examples. The `record_dataset` function in `gym_manipulator.py` enables the process of collecting a dataset of observations, actions, and rewards.
|
||||
|
||||
To collect a dataset, you need to modify some parameters in the environment configuration based on HILSerlRobotEnvConfig.
|
||||
|
||||
```bash
|
||||
python -m lerobot.scripts.rl.gym_manipulator --config_path src/lerobot/configs/reward_classifier_train_config.json
|
||||
```
|
||||
|
||||
**Key Parameters for Data Collection**
|
||||
|
||||
- **mode**: set it to `"record"` to collect a dataset
|
||||
- **repo_id**: `"hf_username/dataset_name"`, name of the dataset and repo on the hub
|
||||
- **num_episodes**: Number of episodes to record
|
||||
- **number_of_steps_after_success**: Number of additional frames to record after a success (reward=1) is detected
|
||||
- **fps**: Number of frames per second to record
|
||||
- **push_to_hub**: Whether to push the dataset to the hub
|
||||
|
||||
The `number_of_steps_after_success` parameter is crucial as it allows you to collect more positive examples. When a success is detected, the system will continue recording for the specified number of steps while maintaining the reward=1 label. Otherwise, there won't be enough states in the dataset labeled to 1 to train a good classifier.
|
||||
|
||||
Example configuration section for data collection:
|
||||
|
||||
```json
|
||||
{
|
||||
"mode": "record",
|
||||
"repo_id": "hf_username/dataset_name",
|
||||
"dataset_root": "data/your_dataset",
|
||||
"num_episodes": 20,
|
||||
"push_to_hub": true,
|
||||
"fps": 10,
|
||||
"number_of_steps_after_success": 15
|
||||
}
|
||||
```
|
||||
|
||||
**Reward Classifier Configuration**
|
||||
|
||||
The reward classifier is configured using `configuration_classifier.py`. Here are the key parameters:
|
||||
|
||||
- **model_name**: Base model architecture (e.g., we mainly use `"helper2424/resnet10"`)
|
||||
- **model_type**: `"cnn"` or `"transformer"`
|
||||
- **num_cameras**: Number of camera inputs
|
||||
- **num_classes**: Number of output classes (typically 2 for binary success/failure)
|
||||
- **hidden_dim**: Size of hidden representation
|
||||
- **dropout_rate**: Regularization parameter
|
||||
- **learning_rate**: Learning rate for optimizer
|
||||
|
||||
Example configuration for training the [reward classifier](https://huggingface.co/datasets/aractingi/lerobot-example-config-files/blob/main/reward_classifier_train_config.json):
|
||||
|
||||
```json
|
||||
{
|
||||
"policy": {
|
||||
"type": "reward_classifier",
|
||||
"model_name": "helper2424/resnet10",
|
||||
"model_type": "cnn",
|
||||
"num_cameras": 2,
|
||||
"num_classes": 2,
|
||||
"hidden_dim": 256,
|
||||
"dropout_rate": 0.1,
|
||||
"learning_rate": 1e-4,
|
||||
"device": "cuda",
|
||||
"use_amp": true,
|
||||
"input_features": {
|
||||
"observation.images.front": {
|
||||
"type": "VISUAL",
|
||||
"shape": [3, 128, 128]
|
||||
},
|
||||
"observation.images.side": {
|
||||
"type": "VISUAL",
|
||||
"shape": [3, 128, 128]
|
||||
}
|
||||
}
|
||||
}
|
||||
}
|
||||
```
|
||||
|
||||
**Training the Classifier**
|
||||
|
||||
To train the classifier, use the `train.py` script with your configuration:
|
||||
|
||||
```bash
|
||||
python -m lerobot.scripts.train --config_path path/to/reward_classifier_train_config.json
|
||||
```
|
||||
|
||||
**Deploying and Testing the Model**
|
||||
|
||||
To use your trained reward classifier, configure the `HILSerlRobotEnvConfig` to use your model:
|
||||
|
||||
```python
|
||||
env_config = HILSerlRobotEnvConfig(
|
||||
reward_classifier_pretrained_path="path_to_your_pretrained_trained_model",
|
||||
# Other environment parameters
|
||||
)
|
||||
```
|
||||
or set the argument in the json config file.
|
||||
|
||||
```json
|
||||
{
|
||||
"reward_classifier_pretrained_path": "path_to_your_pretrained_model"
|
||||
}
|
||||
```
|
||||
|
||||
Run `gym_manipulator.py` to test the model.
|
||||
```bash
|
||||
python -m lerobot.scripts.rl.gym_manipulator --config_path path/to/env_config.json
|
||||
```
|
||||
|
||||
The reward classifier will automatically provide rewards based on the visual input from the robot's cameras.
|
||||
|
||||
**Example Workflow for training the reward classifier**
|
||||
|
||||
1. **Create the configuration files**:
|
||||
Create the necessary json configuration files for the reward classifier and the environment. Check the examples [here](https://huggingface.co/datasets/aractingi/lerobot-example-config-files/tree/main).
|
||||
|
||||
2. **Collect a dataset**:
|
||||
```bash
|
||||
python -m lerobot.scripts.rl.gym_manipulator --config_path src/lerobot/configs/env_config.json
|
||||
```
|
||||
|
||||
3. **Train the classifier**:
|
||||
```bash
|
||||
python -m lerobot.scripts.train --config_path src/lerobot/configs/reward_classifier_train_config.json
|
||||
```
|
||||
|
||||
4. **Test the classifier**:
|
||||
```bash
|
||||
python -m lerobot.scripts.rl.gym_manipulator --config_path src/lerobot/configs/env_config.json
|
||||
```
|
||||
|
||||
### Training with Actor-Learner
|
||||
|
||||
The LeRobot system uses a distributed actor-learner architecture for training. This architecture decouples robot interactions from the learning process, allowing them to run concurrently without blocking each other. The actor server handles robot observations and actions, sending interaction data to the learner server. The learner server performs gradient descent and periodically updates the actor's policy weights. You will need to start two processes: a learner and an actor.
|
||||
|
||||
**Configuration Setup**
|
||||
|
||||
Create a training configuration file (example available [here](https://huggingface.co/datasets/aractingi/lerobot-example-config-files/blob/main/train_config_hilserl_so100.json)). The training config is based on the main `TrainRLServerPipelineConfig` class in `lerobot/configs/train.py`.
|
||||
|
||||
1. Configure the policy settings (`type="sac"`, `device`, etc.)
|
||||
2. Set `dataset` to your cropped dataset
|
||||
3. Configure environment settings with crop parameters
|
||||
4. Check the other parameters related to SAC in [configuration_sac.py](https://github.com/huggingface/lerobot/blob/19bb621a7d0a31c20cd3cc08b1dbab68d3031454/lerobot/policies/sac/configuration_sac.py#L79).
|
||||
5. Verify that the `policy` config is correct with the right `input_features` and `output_features` for your task.
|
||||
|
||||
**Starting the Learner**
|
||||
|
||||
First, start the learner server process:
|
||||
|
||||
```bash
|
||||
python -m lerobot.scripts.rl.learner --config_path src/lerobot/configs/train_config_hilserl_so100.json
|
||||
```
|
||||
|
||||
The learner:
|
||||
- Initializes the policy network
|
||||
- Prepares replay buffers
|
||||
- Opens a `gRPC` server to communicate with actors
|
||||
- Processes transitions and updates the policy
|
||||
|
||||
**Starting the Actor**
|
||||
|
||||
In a separate terminal, start the actor process with the same configuration:
|
||||
|
||||
```bash
|
||||
python -m lerobot.scripts.rl.actor --config_path src/lerobot/configs/train_config_hilserl_so100.json
|
||||
```
|
||||
|
||||
The actor:
|
||||
- Connects to the learner via `gRPC`
|
||||
- Initializes the environment
|
||||
- Execute rollouts of the policy to collect experience
|
||||
- Sends transitions to the learner
|
||||
- Receives updated policy parameters
|
||||
|
||||
**Training Flow**
|
||||
|
||||
The training proceeds automatically:
|
||||
|
||||
1. The actor executes the policy in the environment
|
||||
2. Transitions are collected and sent to the learner
|
||||
3. The learner updates the policy based on these transitions
|
||||
4. Updated policy parameters are sent back to the actor
|
||||
5. The process continues until the specified step limit is reached
|
||||
|
||||
**Human in the Loop**
|
||||
|
||||
- The key to learning efficiently is to have human interventions to provide corrective feedback and completing the task to aide the policy learning and exploration.
|
||||
- To perform human interventions, you can press the upper right trigger button on the gamepad (or the `space` key on the keyboard). This will pause the policy actions and allow you to take over.
|
||||
- A successful experiment is one where the human has to intervene at the start but then reduces the amount of interventions as the policy improves. You can monitor the intervention rate in the `wandb` dashboard.
|
||||
|
||||
<p align="center">
|
||||
<img src="https://huggingface.co/datasets/huggingface/documentation-images/resolve/main/lerobot/hil_effect.png?raw=true" alt="Figure shows the control mappings on a Logitech gamepad." title="Gamepad Control Mapping" width="100%"></img>
|
||||
</p>
|
||||
|
||||
<p align="center"><i>Example showing how human interventions help guide policy learning over time</i></p>
|
||||
|
||||
- The figure shows the plot of the episodic reward over interaction step. The figure shows the effect of human interventions on the policy learning.
|
||||
- The orange curve is an experiment without any human interventions. While the pink and blue curves are experiments with human interventions.
|
||||
- We can observe that the number of steps where the policy starts achieving the maximum reward is cut by a quarter when human interventions are present.
|
||||
|
||||
**Monitoring and Debugging**
|
||||
|
||||
If you have `wandb.enable` set to `true` in your configuration, you can monitor training progress in real-time through the [Weights & Biases](https://wandb.ai/site/) dashboard.
|
||||
|
||||
### Guide to Human Interventions
|
||||
The learning process is very sensitive to the intervention strategy. It will takes a few runs to understand how to intervene effectively. Some tips and hints:
|
||||
- Allow the policy to explore for a few episodes at the start of training.
|
||||
- Avoid intervening for long periods of time. Try to intervene in situation to correct the robot's behaviour when it goes off track.
|
||||
- Once the policy starts achieving the task, even if its not perfect, you can limit your interventions to simple quick actions like a simple grasping commands.
|
||||
|
||||
The ideal behaviour is that your intervention rate should drop gradually during training as shown in the figure below.
|
||||
|
||||
<p align="center">
|
||||
<img src="https://huggingface.co/datasets/huggingface/documentation-images/resolve/main/lerobot/intervention_rate_tutorial_rl.png?raw=true" alt="Intervention rate" title="Intervention rate during training" width="100%"></img>
|
||||
</p>
|
||||
|
||||
<p align="center"><i>Plot of the intervention rate during a training run on a pick and lift cube task</i></p>
|
||||
|
||||
### Key hyperparameters to tune
|
||||
|
||||
Some configuration values have a disproportionate impact on training stability and speed:
|
||||
|
||||
- **`temperature_init`** (`policy.temperature_init`) – initial entropy temperature in SAC. Higher values encourage more exploration; lower values make the policy more deterministic early on. A good starting point is `1e-2`. We observed that setting it too high can make human interventions ineffective and slow down learning.
|
||||
- **`policy_parameters_push_frequency`** (`policy.actor_learner_config.policy_parameters_push_frequency`) – interval in *seconds* between two weight pushes from the learner to the actor. The default is `4 s`. Decrease to **1-2 s** to provide fresher weights (at the cost of more network traffic); increase only if your connection is slow, as this will reduce sample efficiency.
|
||||
- **`storage_device`** (`policy.storage_device`) – device on which the learner keeps the policy parameters. If you have spare GPU memory, set this to `"cuda"` (instead of the default `"cpu"`). Keeping the weights on-GPU removes CPU→GPU transfer overhead and can significantly increase the number of learner updates per second.
|
||||
|
||||
|
||||
Congrats 🎉, you have finished this tutorial!
|
||||
|
||||
> [!TIP]
|
||||
> If you have any questions or need help, please reach out on [Discord](https://discord.com/invite/s3KuuzsPFb).
|
||||
|
||||
Paper citation:
|
||||
```
|
||||
@article{luo2024precise,
|
||||
title={Precise and Dexterous Robotic Manipulation via Human-in-the-Loop Reinforcement Learning},
|
||||
author={Luo, Jianlan and Xu, Charles and Wu, Jeffrey and Levine, Sergey},
|
||||
journal={arXiv preprint arXiv:2410.21845},
|
||||
year={2024}
|
||||
}
|
||||
```
|
||||
120
docs/source/hilserl_sim.mdx
Normal file
@@ -0,0 +1,120 @@
|
||||
# Train RL in Simulation
|
||||
|
||||
This guide explains how to use the `gym_hil` simulation environments as an alternative to real robots when working with the LeRobot framework for Human-In-the-Loop (HIL) reinforcement learning.
|
||||
|
||||
`gym_hil` is a package that provides Gymnasium-compatible simulation environments specifically designed for Human-In-the-Loop reinforcement learning. These environments allow you to:
|
||||
|
||||
- Train policies in simulation to test the RL stack before training on real robots
|
||||
|
||||
- Collect demonstrations in sim using external devices like gamepads or keyboards
|
||||
- Perform human interventions during policy learning
|
||||
|
||||
Currently, the main environment is a Franka Panda robot simulation based on MuJoCo, with tasks like picking up a cube.
|
||||
|
||||
|
||||
## Installation
|
||||
|
||||
First, install the `gym_hil` package within the LeRobot environment:
|
||||
|
||||
```bash
|
||||
pip install -e ".[hilserl]"
|
||||
```
|
||||
|
||||
## What do I need?
|
||||
|
||||
- A gamepad or keyboard to control the robot
|
||||
- A Nvidia GPU
|
||||
|
||||
|
||||
|
||||
## Configuration
|
||||
|
||||
To use `gym_hil` with LeRobot, you need to create a configuration file. An example is provided [here](https://huggingface.co/datasets/aractingi/lerobot-example-config-files/blob/main/gym_hil_env.json). Key configuration sections include:
|
||||
|
||||
### Environment Type and Task
|
||||
|
||||
```json
|
||||
{
|
||||
"type": "hil",
|
||||
"name": "franka_sim",
|
||||
"task": "PandaPickCubeGamepad-v0",
|
||||
"device": "cuda"
|
||||
}
|
||||
```
|
||||
|
||||
Available tasks:
|
||||
- `PandaPickCubeBase-v0`: Basic environment
|
||||
- `PandaPickCubeGamepad-v0`: With gamepad control
|
||||
- `PandaPickCubeKeyboard-v0`: With keyboard control
|
||||
|
||||
### Gym Wrappers Configuration
|
||||
|
||||
```json
|
||||
"wrapper": {
|
||||
"gripper_penalty": -0.02,
|
||||
"control_time_s": 15.0,
|
||||
"use_gripper": true,
|
||||
"fixed_reset_joint_positions": [0.0, 0.195, 0.0, -2.43, 0.0, 2.62, 0.785],
|
||||
"end_effector_step_sizes": {
|
||||
"x": 0.025,
|
||||
"y": 0.025,
|
||||
"z": 0.025
|
||||
},
|
||||
"control_mode": "gamepad"
|
||||
}
|
||||
```
|
||||
|
||||
Important parameters:
|
||||
- `gripper_penalty`: Penalty for excessive gripper movement
|
||||
- `use_gripper`: Whether to enable gripper control
|
||||
- `end_effector_step_sizes`: Size of the steps in the x,y,z axes of the end-effector
|
||||
- `control_mode`: Set to `"gamepad"` to use a gamepad controller
|
||||
|
||||
## Running with HIL RL of LeRobot
|
||||
|
||||
### Basic Usage
|
||||
|
||||
To run the environment, set mode to null:
|
||||
|
||||
```python
|
||||
python -m lerobot.scripts.rl.gym_manipulator --config_path path/to/gym_hil_env.json
|
||||
```
|
||||
|
||||
### Recording a Dataset
|
||||
|
||||
To collect a dataset, set the mode to `record` whilst defining the repo_id and number of episodes to record:
|
||||
|
||||
```python
|
||||
python -m lerobot.scripts.rl.gym_manipulator --config_path path/to/gym_hil_env.json
|
||||
```
|
||||
|
||||
### Training a Policy
|
||||
|
||||
To train a policy, checkout the configuration example available [here](https://huggingface.co/datasets/aractingi/lerobot-example-config-files/blob/main/train_gym_hil_env.json) and run the actor and learner servers:
|
||||
|
||||
```python
|
||||
python -m lerobot.scripts.rl.actor --config_path path/to/train_gym_hil_env.json
|
||||
```
|
||||
|
||||
In a different terminal, run the learner server:
|
||||
|
||||
```python
|
||||
python -m lerobot.scripts.rl.learner --config_path path/to/train_gym_hil_env.json
|
||||
```
|
||||
|
||||
The simulation environment provides a safe and repeatable way to develop and test your Human-In-the-Loop reinforcement learning components before deploying to real robots.
|
||||
|
||||
Congrats 🎉, you have finished this tutorial!
|
||||
|
||||
> [!TIP]
|
||||
> If you have any questions or need help, please reach out on [Discord](https://discord.com/invite/s3KuuzsPFb).
|
||||
|
||||
Paper citation:
|
||||
```
|
||||
@article{luo2024precise,
|
||||
title={Precise and Dexterous Robotic Manipulation via Human-in-the-Loop Reinforcement Learning},
|
||||
author={Luo, Jianlan and Xu, Charles and Wu, Jeffrey and Levine, Sergey},
|
||||
journal={arXiv preprint arXiv:2410.21845},
|
||||
year={2024}
|
||||
}
|
||||
```
|
||||
541
docs/source/il_robots.mdx
Normal file
@@ -0,0 +1,541 @@
|
||||
# Imitation Learning on Real-World Robots
|
||||
|
||||
This tutorial will explain how to train a neural network to control a real robot autonomously.
|
||||
|
||||
**You'll learn:**
|
||||
1. How to record and visualize your dataset.
|
||||
2. How to train a policy using your data and prepare it for evaluation.
|
||||
3. How to evaluate your policy and visualize the results.
|
||||
|
||||
By following these steps, you'll be able to replicate tasks, such as picking up a Lego block and placing it in a bin with a high success rate, as shown in the video below.
|
||||
|
||||
<details>
|
||||
<summary><strong>Video: pickup lego block task</strong></summary>
|
||||
|
||||
<div class="video-container">
|
||||
<video controls width="600">
|
||||
<source src="https://huggingface.co/datasets/huggingface/documentation-images/resolve/main/lerobot/lerobot_task.mp4" type="video/mp4" />
|
||||
</video>
|
||||
</div>
|
||||
|
||||
</details>
|
||||
|
||||
This tutorial isn’t tied to a specific robot: we walk you through the commands and API snippets you can adapt for any supported platform.
|
||||
|
||||
During data collection, you’ll use a “teloperation” device, such as a leader arm or keyboard to teleoperate the robot and record its motion trajectories.
|
||||
|
||||
Once you’ve gathered enough trajectories, you’ll train a neural network to imitate these trajectories and deploy the trained model so your robot can perform the task autonomously.
|
||||
|
||||
If you run into any issues at any point, jump into our [Discord community](https://discord.com/invite/s3KuuzsPFb) for support.
|
||||
|
||||
## Set up and Calibrate
|
||||
|
||||
If you haven't yet set up and calibrated your robot and teleop device, please do so by following the robot-specific tutorial.
|
||||
|
||||
## Teleoperate
|
||||
|
||||
In this example, we’ll demonstrate how to teleoperate the SO101 robot. For each command, we also provide a corresponding API example.
|
||||
|
||||
Note that the `id` associated with a robot is used to store the calibration file. It's important to use the same `id` when teleoperating, recording, and evaluating when using the same setup.
|
||||
|
||||
<hfoptions id="teleoperate_so101">
|
||||
<hfoption id="Command">
|
||||
```bash
|
||||
python -m lerobot.teleoperate \
|
||||
--robot.type=so101_follower \
|
||||
--robot.port=/dev/tty.usbmodem58760431541 \
|
||||
--robot.id=my_awesome_follower_arm \
|
||||
--teleop.type=so101_leader \
|
||||
--teleop.port=/dev/tty.usbmodem58760431551 \
|
||||
--teleop.id=my_awesome_leader_arm
|
||||
```
|
||||
</hfoption>
|
||||
<hfoption id="API example">
|
||||
```python
|
||||
from lerobot.teleoperators.so101_leader import SO101LeaderConfig, SO101Leader
|
||||
from lerobot.robots.so101_follower import SO101FollowerConfig, SO101Follower
|
||||
|
||||
robot_config = SO101FollowerConfig(
|
||||
port="/dev/tty.usbmodem58760431541",
|
||||
id="my_red_robot_arm",
|
||||
)
|
||||
|
||||
teleop_config = SO101LeaderConfig(
|
||||
port="/dev/tty.usbmodem58760431551",
|
||||
id="my_blue_leader_arm",
|
||||
)
|
||||
|
||||
robot = SO101Follower(robot_config)
|
||||
teleop_device = SO101Leader(teleop_config)
|
||||
robot.connect()
|
||||
teleop_device.connect()
|
||||
|
||||
while True:
|
||||
action = teleop_device.get_action()
|
||||
robot.send_action(action)
|
||||
```
|
||||
</hfoption>
|
||||
</hfoptions>
|
||||
|
||||
The teleoperate command will automatically:
|
||||
1. Identify any missing calibrations and initiate the calibration procedure.
|
||||
2. Connect the robot and teleop device and start teleoperation.
|
||||
|
||||
## Cameras
|
||||
|
||||
To add cameras to your setup, follow this [Guide](./cameras#setup-cameras).
|
||||
|
||||
## Teleoperate with cameras
|
||||
|
||||
With `rerun`, you can teleoperate again while simultaneously visualizing the camera feeds and joint positions. In this example, we’re using the Koch arm.
|
||||
|
||||
<hfoptions id="teleoperate_koch_camera">
|
||||
<hfoption id="Command">
|
||||
```bash
|
||||
python -m lerobot.teleoperate \
|
||||
--robot.type=koch_follower \
|
||||
--robot.port=/dev/tty.usbmodem58760431541 \
|
||||
--robot.id=my_awesome_follower_arm \
|
||||
--robot.cameras="{ front: {type: opencv, index_or_path: 0, width: 1920, height: 1080, fps: 30}}" \
|
||||
--teleop.type=koch_leader \
|
||||
--teleop.port=/dev/tty.usbmodem58760431551 \
|
||||
--teleop.id=my_awesome_leader_arm \
|
||||
--display_data=true
|
||||
```
|
||||
</hfoption>
|
||||
<hfoption id="API example">
|
||||
```python
|
||||
from lerobot.cameras.opencv.configuration_opencv import OpenCVCameraConfig
|
||||
from lerobot.teleoperators.koch_leader import KochLeaderConfig, KochLeader
|
||||
from lerobot.robots.koch_follower import KochFollowerConfig, KochFollower
|
||||
|
||||
camera_config = {
|
||||
"front": OpenCVCameraConfig(index_or_path=0, width=1920, height=1080, fps=30)
|
||||
}
|
||||
|
||||
robot_config = KochFollowerConfig(
|
||||
port="/dev/tty.usbmodem585A0076841",
|
||||
id="my_red_robot_arm",
|
||||
cameras=camera_config
|
||||
)
|
||||
|
||||
teleop_config = KochLeaderConfig(
|
||||
port="/dev/tty.usbmodem58760431551",
|
||||
id="my_blue_leader_arm",
|
||||
)
|
||||
|
||||
robot = KochFollower(robot_config)
|
||||
teleop_device = KochLeader(teleop_config)
|
||||
robot.connect()
|
||||
teleop_device.connect()
|
||||
|
||||
while True:
|
||||
observation = robot.get_observation()
|
||||
action = teleop_device.get_action()
|
||||
robot.send_action(action)
|
||||
```
|
||||
</hfoption>
|
||||
</hfoptions>
|
||||
|
||||
## Record a dataset
|
||||
|
||||
Once you're familiar with teleoperation, you can record your first dataset.
|
||||
|
||||
We use the Hugging Face hub features for uploading your dataset. If you haven't previously used the Hub, make sure you can login via the cli using a write-access token, this token can be generated from the [Hugging Face settings](https://huggingface.co/settings/tokens).
|
||||
|
||||
Add your token to the CLI by running this command:
|
||||
```bash
|
||||
huggingface-cli login --token ${HUGGINGFACE_TOKEN} --add-to-git-credential
|
||||
```
|
||||
|
||||
Then store your Hugging Face repository name in a variable:
|
||||
```bash
|
||||
HF_USER=$(huggingface-cli whoami | head -n 1)
|
||||
echo $HF_USER
|
||||
```
|
||||
|
||||
Now you can record a dataset. To record 5 episodes and upload your dataset to the hub, adapt the code below for your robot and execute the command or API example.
|
||||
|
||||
<hfoptions id="record">
|
||||
<hfoption id="Command">
|
||||
```bash
|
||||
python -m lerobot.record \
|
||||
--robot.type=so101_follower \
|
||||
--robot.port=/dev/tty.usbmodem585A0076841 \
|
||||
--robot.id=my_awesome_follower_arm \
|
||||
--robot.cameras="{ front: {type: opencv, index_or_path: 0, width: 1920, height: 1080, fps: 30}}" \
|
||||
--teleop.type=so101_leader \
|
||||
--teleop.port=/dev/tty.usbmodem58760431551 \
|
||||
--teleop.id=my_awesome_leader_arm \
|
||||
--display_data=true \
|
||||
--dataset.repo_id=${HF_USER}/record-test \
|
||||
--dataset.num_episodes=5 \
|
||||
--dataset.single_task="Grab the black cube"
|
||||
```
|
||||
</hfoption>
|
||||
<hfoption id="API example">
|
||||
```python
|
||||
from lerobot.cameras.opencv.configuration_opencv import OpenCVCameraConfig
|
||||
from lerobot.datasets.lerobot_dataset import LeRobotDataset
|
||||
from lerobot.datasets.utils import hw_to_dataset_features
|
||||
from lerobot.robots.so100_follower import SO100Follower, SO100FollowerConfig
|
||||
from lerobot.teleoperators.so100_leader.config_so100_leader import SO100LeaderConfig
|
||||
from lerobot.teleoperators.so100_leader.so100_leader import SO100Leader
|
||||
from lerobot.utils.control_utils import init_keyboard_listener
|
||||
from lerobot.utils.utils import log_say
|
||||
from lerobot.utils.visualization_utils import _init_rerun
|
||||
from lerobot.record import record_loop
|
||||
|
||||
NUM_EPISODES = 5
|
||||
FPS = 30
|
||||
EPISODE_TIME_SEC = 60
|
||||
RESET_TIME_SEC = 10
|
||||
TASK_DESCRIPTION = "My task description"
|
||||
|
||||
# Create the robot and teleoperator configurations
|
||||
camera_config = {"front": OpenCVCameraConfig(index_or_path=0, width=640, height=480, fps=FPS)}
|
||||
robot_config = SO100FollowerConfig(
|
||||
port="/dev/tty.usbmodem58760434471", id="my_awesome_follower_arm", cameras=camera_config
|
||||
)
|
||||
teleop_config = SO100LeaderConfig(port="/dev/tty.usbmodem585A0077581", id="my_awesome_leader_arm")
|
||||
|
||||
# Initialize the robot and teleoperator
|
||||
robot = SO100Follower(robot_config)
|
||||
teleop = SO100Leader(teleop_config)
|
||||
|
||||
# Configure the dataset features
|
||||
action_features = hw_to_dataset_features(robot.action_features, "action")
|
||||
obs_features = hw_to_dataset_features(robot.observation_features, "observation")
|
||||
dataset_features = {**action_features, **obs_features}
|
||||
|
||||
# Create the dataset
|
||||
dataset = LeRobotDataset.create(
|
||||
repo_id="<hf_username>/<dataset_repo_id>",
|
||||
fps=FPS,
|
||||
features=dataset_features,
|
||||
robot_type=robot.name,
|
||||
use_videos=True,
|
||||
image_writer_threads=4,
|
||||
)
|
||||
|
||||
# Initialize the keyboard listener and rerun visualization
|
||||
_, events = init_keyboard_listener()
|
||||
_init_rerun(session_name="recording")
|
||||
|
||||
# Connect the robot and teleoperator
|
||||
robot.connect()
|
||||
teleop.connect()
|
||||
|
||||
episode_idx = 0
|
||||
while episode_idx < NUM_EPISODES and not events["stop_recording"]:
|
||||
log_say(f"Recording episode {episode_idx + 1} of {NUM_EPISODES}")
|
||||
|
||||
record_loop(
|
||||
robot=robot,
|
||||
events=events,
|
||||
fps=FPS,
|
||||
teleop=teleop,
|
||||
dataset=dataset,
|
||||
control_time_s=EPISODE_TIME_SEC,
|
||||
single_task=TASK_DESCRIPTION,
|
||||
display_data=True,
|
||||
)
|
||||
|
||||
# Reset the environment if not stopping or re-recording
|
||||
if not events["stop_recording"] and (episode_idx < NUM_EPISODES - 1 or events["rerecord_episode"]):
|
||||
log_say("Reset the environment")
|
||||
record_loop(
|
||||
robot=robot,
|
||||
events=events,
|
||||
fps=FPS,
|
||||
teleop=teleop,
|
||||
control_time_s=RESET_TIME_SEC,
|
||||
single_task=TASK_DESCRIPTION,
|
||||
display_data=True,
|
||||
)
|
||||
|
||||
if events["rerecord_episode"]:
|
||||
log_say("Re-recording episode")
|
||||
events["rerecord_episode"] = False
|
||||
events["exit_early"] = False
|
||||
dataset.clear_episode_buffer()
|
||||
continue
|
||||
|
||||
dataset.save_episode()
|
||||
episode_idx += 1
|
||||
|
||||
# Clean up
|
||||
log_say("Stop recording")
|
||||
robot.disconnect()
|
||||
teleop.disconnect()
|
||||
dataset.push_to_hub()
|
||||
```
|
||||
</hfoption>
|
||||
</hfoptions>
|
||||
|
||||
#### Dataset upload
|
||||
Locally, your dataset is stored in this folder: `~/.cache/huggingface/lerobot/{repo-id}`. At the end of data recording, your dataset will be uploaded on your Hugging Face page (e.g. https://huggingface.co/datasets/cadene/so101_test) that you can obtain by running:
|
||||
```bash
|
||||
echo https://huggingface.co/datasets/${HF_USER}/so101_test
|
||||
```
|
||||
Your dataset will be automatically tagged with `LeRobot` for the community to find it easily, and you can also add custom tags (in this case `tutorial` for example).
|
||||
|
||||
You can look for other LeRobot datasets on the hub by searching for `LeRobot` [tags](https://huggingface.co/datasets?other=LeRobot).
|
||||
|
||||
#### Record function
|
||||
|
||||
The `record` function provides a suite of tools for capturing and managing data during robot operation:
|
||||
|
||||
##### 1. Data Storage
|
||||
- Data is stored using the `LeRobotDataset` format and is stored on disk during recording.
|
||||
- By default, the dataset is pushed to your Hugging Face page after recording.
|
||||
- To disable uploading, use `--dataset.push_to_hub=False`.
|
||||
|
||||
##### 2. Checkpointing and Resuming
|
||||
- Checkpoints are automatically created during recording.
|
||||
- If an issue occurs, you can resume by re-running the same command with `--resume=true`.
|
||||
- To start recording from scratch, **manually delete** the dataset directory.
|
||||
|
||||
##### 3. Recording Parameters
|
||||
Set the flow of data recording using command-line arguments:
|
||||
- `--dataset.episode_time_s=60`
|
||||
Duration of each data recording episode (default: **60 seconds**).
|
||||
- `--dataset.reset_time_s=60`
|
||||
Duration for resetting the environment after each episode (default: **60 seconds**).
|
||||
- `--dataset.num_episodes=50`
|
||||
Total number of episodes to record (default: **50**).
|
||||
|
||||
##### 4. Keyboard Controls During Recording
|
||||
Control the data recording flow using keyboard shortcuts:
|
||||
- Press **Right Arrow (`→`)**: Early stop the current episode or reset time and move to the next.
|
||||
- Press **Left Arrow (`←`)**: Cancel the current episode and re-record it.
|
||||
- Press **Escape (`ESC`)**: Immediately stop the session, encode videos, and upload the dataset.
|
||||
|
||||
#### Tips for gathering data
|
||||
|
||||
Once you're comfortable with data recording, you can create a larger dataset for training. A good starting task is grasping an object at different locations and placing it in a bin. We suggest recording at least 50 episodes, with 10 episodes per location. Keep the cameras fixed and maintain consistent grasping behavior throughout the recordings. Also make sure the object you are manipulating is visible on the camera's. A good rule of thumb is you should be able to do the task yourself by only looking at the camera images.
|
||||
|
||||
In the following sections, you’ll train your neural network. After achieving reliable grasping performance, you can start introducing more variations during data collection, such as additional grasp locations, different grasping techniques, and altering camera positions.
|
||||
|
||||
Avoid adding too much variation too quickly, as it may hinder your results.
|
||||
|
||||
If you want to dive deeper into this important topic, you can check out the [blog post](https://huggingface.co/blog/lerobot-datasets#what-makes-a-good-dataset) we wrote on what makes a good dataset.
|
||||
|
||||
|
||||
#### Troubleshooting:
|
||||
- On Linux, if the left and right arrow keys and escape key don't have any effect during data recording, make sure you've set the `$DISPLAY` environment variable. See [pynput limitations](https://pynput.readthedocs.io/en/latest/limitations.html#linux).
|
||||
|
||||
## Visualize a dataset
|
||||
|
||||
If you uploaded your dataset to the hub with `--control.push_to_hub=true`, you can [visualize your dataset online](https://huggingface.co/spaces/lerobot/visualize_dataset) by copy pasting your repo id given by:
|
||||
```bash
|
||||
echo ${HF_USER}/so101_test
|
||||
```
|
||||
|
||||
## Replay an episode
|
||||
|
||||
A useful feature is the `replay` function, which allows you to replay any episode that you've recorded or episodes from any dataset out there. This function helps you test the repeatability of your robot's actions and assess transferability across robots of the same model.
|
||||
|
||||
You can replay the first episode on your robot with either the command below or with the API example:
|
||||
|
||||
<hfoptions id="replay">
|
||||
<hfoption id="Command">
|
||||
```bash
|
||||
python -m lerobot.replay \
|
||||
--robot.type=so101_follower \
|
||||
--robot.port=/dev/tty.usbmodem58760431541 \
|
||||
--robot.id=my_awesome_follower_arm \
|
||||
--dataset.repo_id=${HF_USER}/record-test \
|
||||
--dataset.episode=0 # choose the episode you want to replay
|
||||
```
|
||||
</hfoption>
|
||||
<hfoption id="API example">
|
||||
```python
|
||||
import time
|
||||
|
||||
from lerobot.datasets.lerobot_dataset import LeRobotDataset
|
||||
from lerobot.robots.so100_follower.config_so100_follower import SO100FollowerConfig
|
||||
from lerobot.robots.so100_follower.so100_follower import SO100Follower
|
||||
from lerobot.utils.robot_utils import busy_wait
|
||||
from lerobot.utils.utils import log_say
|
||||
|
||||
episode_idx = 0
|
||||
|
||||
robot_config = SO100FollowerConfig(port="/dev/tty.usbmodem58760434471", id="my_awesome_follower_arm")
|
||||
|
||||
robot = SO100Follower(robot_config)
|
||||
robot.connect()
|
||||
|
||||
dataset = LeRobotDataset("<hf_username>/<dataset_repo_id>", episodes=[episode_idx])
|
||||
actions = dataset.hf_dataset.select_columns("action")
|
||||
|
||||
log_say(f"Replaying episode {episode_idx}")
|
||||
for idx in range(dataset.num_frames):
|
||||
t0 = time.perf_counter()
|
||||
|
||||
action = {
|
||||
name: float(actions[idx]["action"][i]) for i, name in enumerate(dataset.features["action"]["names"])
|
||||
}
|
||||
robot.send_action(action)
|
||||
|
||||
busy_wait(1.0 / dataset.fps - (time.perf_counter() - t0))
|
||||
|
||||
robot.disconnect()
|
||||
```
|
||||
</hfoption>
|
||||
</hfoptions>
|
||||
|
||||
Your robot should replicate movements similar to those you recorded. For example, check out [this video](https://x.com/RemiCadene/status/1793654950905680090) where we use `replay` on a Aloha robot from [Trossen Robotics](https://www.trossenrobotics.com).
|
||||
|
||||
## Train a policy
|
||||
|
||||
To train a policy to control your robot, use the [`python -m lerobot.scripts.train`](../src/lerobot/scripts/train.py) script. A few arguments are required. Here is an example command:
|
||||
```bash
|
||||
python -m lerobot.scripts.train \
|
||||
--dataset.repo_id=${HF_USER}/so101_test \
|
||||
--policy.type=act \
|
||||
--output_dir=outputs/train/act_so101_test \
|
||||
--job_name=act_so101_test \
|
||||
--policy.device=cuda \
|
||||
--wandb.enable=true \
|
||||
--policy.repo_id=${HF_USER}/my_policy
|
||||
```
|
||||
|
||||
Let's explain the command:
|
||||
1. We provided the dataset as argument with `--dataset.repo_id=${HF_USER}/so101_test`.
|
||||
2. We provided the policy with `policy.type=act`. This loads configurations from [`configuration_act.py`](../src/lerobot/policies/act/configuration_act.py). Importantly, this policy will automatically adapt to the number of motor states, motor actions and cameras of your robot (e.g. `laptop` and `phone`) which have been saved in your dataset.
|
||||
4. We provided `policy.device=cuda` since we are training on a Nvidia GPU, but you could use `policy.device=mps` to train on Apple silicon.
|
||||
5. We provided `wandb.enable=true` to use [Weights and Biases](https://docs.wandb.ai/quickstart) for visualizing training plots. This is optional but if you use it, make sure you are logged in by running `wandb login`.
|
||||
|
||||
Training should take several hours. You will find checkpoints in `outputs/train/act_so101_test/checkpoints`.
|
||||
|
||||
To resume training from a checkpoint, below is an example command to resume from `last` checkpoint of the `act_so101_test` policy:
|
||||
```bash
|
||||
python -m lerobot.scripts.train \
|
||||
--config_path=outputs/train/act_so101_test/checkpoints/last/pretrained_model/train_config.json \
|
||||
--resume=true
|
||||
```
|
||||
|
||||
If you do not want to push your model to the hub after training use `--policy.push_to_hub=false`.
|
||||
|
||||
Additionally you can provide extra `tags` or specify a `license` for your model or make the model repo `private` by adding this: `--policy.private=true --policy.tags=\[ppo,rl\] --policy.license=mit`
|
||||
|
||||
#### Train using Collab
|
||||
If your local computer doesn't have a powerful GPU you could utilize Google Collab to train your model by following the [ACT training notebook](./notebooks#training-act).
|
||||
|
||||
#### Upload policy checkpoints
|
||||
|
||||
Once training is done, upload the latest checkpoint with:
|
||||
```bash
|
||||
huggingface-cli upload ${HF_USER}/act_so101_test \
|
||||
outputs/train/act_so101_test/checkpoints/last/pretrained_model
|
||||
```
|
||||
|
||||
You can also upload intermediate checkpoints with:
|
||||
```bash
|
||||
CKPT=010000
|
||||
huggingface-cli upload ${HF_USER}/act_so101_test${CKPT} \
|
||||
outputs/train/act_so101_test/checkpoints/${CKPT}/pretrained_model
|
||||
```
|
||||
|
||||
## Run inference and evaluate your policy
|
||||
|
||||
You can use the `record` script from [`lerobot/record.py`](https://github.com/huggingface/lerobot/blob/main/lerobot/record.py) with a policy checkpoint as input, to run inference and evaluate your policy. For instance, run this command or API example to run inference and record 10 evaluation episodes:
|
||||
|
||||
<hfoptions id="eval">
|
||||
<hfoption id="Command">
|
||||
```bash
|
||||
python -m lerobot.record \
|
||||
--robot.type=so100_follower \
|
||||
--robot.port=/dev/ttyACM1 \
|
||||
--robot.cameras="{ up: {type: opencv, index_or_path: /dev/video10, width: 640, height: 480, fps: 30}, side: {type: intelrealsense, serial_number_or_name: 233522074606, width: 640, height: 480, fps: 30}}" \
|
||||
--robot.id=my_awesome_follower_arm \
|
||||
--display_data=false \
|
||||
--dataset.repo_id=${HF_USER}/eval_so100 \
|
||||
--dataset.single_task="Put lego brick into the transparent box" \
|
||||
# <- Teleop optional if you want to teleoperate in between episodes \
|
||||
# --teleop.type=so100_leader \
|
||||
# --teleop.port=/dev/ttyACM0 \
|
||||
# --teleop.id=my_awesome_leader_arm \
|
||||
--policy.path=${HF_USER}/my_policy
|
||||
```
|
||||
</hfoption>
|
||||
<hfoption id="API example">
|
||||
```python
|
||||
from lerobot.cameras.opencv.configuration_opencv import OpenCVCameraConfig
|
||||
from lerobot.datasets.lerobot_dataset import LeRobotDataset
|
||||
from lerobot.datasets.utils import hw_to_dataset_features
|
||||
from lerobot.policies.act.modeling_act import ACTPolicy
|
||||
from lerobot.robots.so100_follower.config_so100_follower import SO100FollowerConfig
|
||||
from lerobot.robots.so100_follower.so100_follower import SO100Follower
|
||||
from lerobot.utils.control_utils import init_keyboard_listener
|
||||
from lerobot.utils.utils import log_say
|
||||
from lerobot.utils.visualization_utils import _init_rerun
|
||||
from lerobot.record import record_loop
|
||||
|
||||
NUM_EPISODES = 5
|
||||
FPS = 30
|
||||
EPISODE_TIME_SEC = 60
|
||||
TASK_DESCRIPTION = "My task description"
|
||||
|
||||
# Create the robot configuration
|
||||
camera_config = {"front": OpenCVCameraConfig(index_or_path=0, width=640, height=480, fps=FPS)}
|
||||
robot_config = SO100FollowerConfig(
|
||||
port="/dev/tty.usbmodem58760434471", id="my_awesome_follower_arm", cameras=camera_config
|
||||
)
|
||||
|
||||
# Initialize the robot
|
||||
robot = SO100Follower(robot_config)
|
||||
|
||||
# Initialize the policy
|
||||
policy = ACTPolicy.from_pretrained("<hf_username>/<my_policy_repo_id>")
|
||||
|
||||
# Configure the dataset features
|
||||
action_features = hw_to_dataset_features(robot.action_features, "action")
|
||||
obs_features = hw_to_dataset_features(robot.observation_features, "observation")
|
||||
dataset_features = {**action_features, **obs_features}
|
||||
|
||||
# Create the dataset
|
||||
dataset = LeRobotDataset.create(
|
||||
repo_id="<hf_username>/eval_<dataset_repo_id>",
|
||||
fps=FPS,
|
||||
features=dataset_features,
|
||||
robot_type=robot.name,
|
||||
use_videos=True,
|
||||
image_writer_threads=4,
|
||||
)
|
||||
|
||||
# Initialize the keyboard listener and rerun visualization
|
||||
_, events = init_keyboard_listener()
|
||||
_init_rerun(session_name="recording")
|
||||
|
||||
# Connect the robot
|
||||
robot.connect()
|
||||
|
||||
for episode_idx in range(NUM_EPISODES):
|
||||
log_say(f"Running inference, recording eval episode {episode_idx + 1} of {NUM_EPISODES}")
|
||||
|
||||
# Run the policy inference loop
|
||||
record_loop(
|
||||
robot=robot,
|
||||
events=events,
|
||||
fps=FPS,
|
||||
policy=policy,
|
||||
dataset=dataset,
|
||||
control_time_s=EPISODE_TIME_SEC,
|
||||
single_task=TASK_DESCRIPTION,
|
||||
display_data=True,
|
||||
)
|
||||
|
||||
dataset.save_episode()
|
||||
|
||||
# Clean up
|
||||
robot.disconnect()
|
||||
dataset.push_to_hub()
|
||||
```
|
||||
</hfoption>
|
||||
</hfoptions>
|
||||
|
||||
As you can see, it's almost the same command as previously used to record your training dataset. Two things changed:
|
||||
1. There is an additional `--control.policy.path` argument which indicates the path to your policy checkpoint with (e.g. `outputs/train/eval_act_so101_test/checkpoints/last/pretrained_model`). You can also use the model repository if you uploaded a model checkpoint to the hub (e.g. `${HF_USER}/act_so101_test`).
|
||||
2. The name of dataset begins by `eval` to reflect that you are running inference (e.g. `${HF_USER}/eval_act_so101_test`).
|
||||
152
docs/source/il_sim.mdx
Normal file
@@ -0,0 +1,152 @@
|
||||
# Imitation Learning in Sim
|
||||
|
||||
This tutorial will explain how to train a neural network to control a robot in simulation with imitation learning.
|
||||
|
||||
**You'll learn:**
|
||||
1. How to record a dataset in simulation with [gym-hil](https://github.com/huggingface/gym-hil) and visualize the dataset.
|
||||
2. How to train a policy using your data.
|
||||
3. How to evaluate your policy in simulation and visualize the results.
|
||||
|
||||
For the simulation environment we use the same [repo](https://github.com/huggingface/gym-hil) that is also being used by the Human-In-the-Loop (HIL) reinforcement learning algorithm.
|
||||
This environment is based on [MuJoCo](https://mujoco.org) and allows you to record datasets in LeRobotDataset format.
|
||||
Teleoperation is easiest with a controller like the Logitech F710, but you can also use your keyboard if you are up for the challenge.
|
||||
|
||||
## Installation
|
||||
|
||||
First, install the `gym_hil` package within the LeRobot environment, go to your LeRobot folder and run this command:
|
||||
|
||||
```bash
|
||||
pip install -e ".[hilserl]"
|
||||
```
|
||||
|
||||
## Teleoperate and Record a Dataset
|
||||
|
||||
To use `gym_hil` with LeRobot, you need to use a configuration file. An example config file can be found [here](https://huggingface.co/datasets/aractingi/lerobot-example-config-files/blob/main/env_config_gym_hil_il.json).
|
||||
|
||||
To teleoperate and collect a dataset, we need to modify this config file and you should add your `repo_id` here: `"repo_id": "il_gym",` and `"num_episodes": 30,` and make sure you set `mode` to `record`, "mode": "record".
|
||||
|
||||
If you do not have a Nvidia GPU also change `"device": "cuda"` parameter in the config file (for example to `mps` for MacOS).
|
||||
|
||||
By default the config file assumes you use a controller. To use your keyboard please change the envoirment specified at `"task"` in the config file and set it to `"PandaPickCubeKeyboard-v0"`.
|
||||
|
||||
Then we can run this command to start:
|
||||
|
||||
<hfoptions id="teleop_sim">
|
||||
<hfoption id="Linux">
|
||||
|
||||
```bash
|
||||
python -m lerobot.scripts.rl.gym_manipulator --config_path path/to/env_config_gym_hil_il.json
|
||||
```
|
||||
|
||||
</hfoption>
|
||||
<hfoption id="MacOS">
|
||||
|
||||
```bash
|
||||
mjpython -m lerobot.scripts.rl.gym_manipulator --config_path path/to/env_config_gym_hil_il.json
|
||||
```
|
||||
|
||||
</hfoption>
|
||||
</hfoptions>
|
||||
|
||||
Once rendered you can teleoperate the robot with the gamepad or keyboard, below you can find the gamepad/keyboard controls.
|
||||
|
||||
Note that to teleoperate the robot you have to hold the "Human Take Over Pause Policy" Button `RB` to enable control!
|
||||
|
||||
**Gamepad Controls**
|
||||
|
||||
<p align="center">
|
||||
<img src="https://huggingface.co/datasets/huggingface/documentation-images/resolve/main/lerobot/gamepad_guide.jpg?raw=true" alt="Figure shows the control mappings on a Logitech gamepad." title="Gamepad Control Mapping" width="100%"></img>
|
||||
</p>
|
||||
<p align="center"><i>Gamepad button mapping for robot control and episode management</i></p>
|
||||
|
||||
**Keyboard controls**
|
||||
|
||||
For keyboard controls use the `spacebar` to enable control and the following keys to move the robot:
|
||||
```bash
|
||||
Arrow keys: Move in X-Y plane
|
||||
Shift and Shift_R: Move in Z axis
|
||||
Right Ctrl and Left Ctrl: Open and close gripper
|
||||
ESC: Exit
|
||||
```
|
||||
|
||||
## Visualize a dataset
|
||||
|
||||
If you uploaded your dataset to the hub you can [visualize your dataset online](https://huggingface.co/spaces/lerobot/visualize_dataset) by copy pasting your repo id.
|
||||
|
||||
<p align="center">
|
||||
<img src="https://huggingface.co/datasets/huggingface/documentation-images/resolve/main/lerobot/dataset_visualizer_sim.png" alt="Figure shows the dataset visualizer" title="Dataset visualization" width="100%"></img>
|
||||
</p>
|
||||
<p align="center"><i>Dataset visualizer</i></p>
|
||||
|
||||
|
||||
## Train a policy
|
||||
|
||||
To train a policy to control your robot, use the [`python -m lerobot.scripts.train`](../src/lerobot/scripts/train.py) script. A few arguments are required. Here is an example command:
|
||||
```bash
|
||||
python -m lerobot.scripts.train \
|
||||
--dataset.repo_id=${HF_USER}/il_gym \
|
||||
--policy.type=act \
|
||||
--output_dir=outputs/train/il_sim_test \
|
||||
--job_name=il_sim_test \
|
||||
--policy.device=cuda \
|
||||
--wandb.enable=true
|
||||
```
|
||||
|
||||
Let's explain the command:
|
||||
1. We provided the dataset as argument with `--dataset.repo_id=${HF_USER}/il_gym`.
|
||||
2. We provided the policy with `policy.type=act`. This loads configurations from [`configuration_act.py`](../src/lerobot/policies/act/configuration_act.py). Importantly, this policy will automatically adapt to the number of motor states, motor actions and cameras of your robot (e.g. `laptop` and `phone`) which have been saved in your dataset.
|
||||
4. We provided `policy.device=cuda` since we are training on a Nvidia GPU, but you could use `policy.device=mps` to train on Apple silicon.
|
||||
5. We provided `wandb.enable=true` to use [Weights and Biases](https://docs.wandb.ai/quickstart) for visualizing training plots. This is optional but if you use it, make sure you are logged in by running `wandb login`.
|
||||
|
||||
Training should take several hours, 100k steps (which is the default) will take about 1h on Nvidia A100. You will find checkpoints in `outputs/train/il_sim_test/checkpoints`.
|
||||
|
||||
#### Train using Collab
|
||||
If your local computer doesn't have a powerful GPU you could utilize Google Collab to train your model by following the [ACT training notebook](./notebooks#training-act).
|
||||
|
||||
#### Upload policy checkpoints
|
||||
|
||||
Once training is done, upload the latest checkpoint with:
|
||||
```bash
|
||||
huggingface-cli upload ${HF_USER}/il_sim_test \
|
||||
outputs/train/il_sim_test/checkpoints/last/pretrained_model
|
||||
```
|
||||
|
||||
You can also upload intermediate checkpoints with:
|
||||
```bash
|
||||
CKPT=010000
|
||||
huggingface-cli upload ${HF_USER}/il_sim_test${CKPT} \
|
||||
outputs/train/il_sim_test/checkpoints/${CKPT}/pretrained_model
|
||||
```
|
||||
|
||||
## Evaluate your policy in Sim
|
||||
|
||||
To evaluate your policy we have to use the config file that can be found [here](https://huggingface.co/datasets/aractingi/lerobot-example-config-files/blob/main/eval_config_gym_hil.json).
|
||||
|
||||
Make sure to replace the `repo_id` with the dataset you trained on, for example `pepijn223/il_sim_dataset` and replace the `pretrained_policy_name_or_path` with your model id, for example `pepijn223/il_sim_model`
|
||||
|
||||
Then you can run this command to visualize your trained policy
|
||||
|
||||
<hfoptions id="eval_policy">
|
||||
<hfoption id="Linux">
|
||||
|
||||
```bash
|
||||
python -m lerobot.scripts.rl.eval_policy --config_path=path/to/eval_config_gym_hil.json
|
||||
```
|
||||
|
||||
</hfoption>
|
||||
<hfoption id="MacOS">
|
||||
|
||||
```bash
|
||||
mjpython -m lerobot.scripts.rl.eval_policy --config_path=path/to/eval_config_gym_hil.json
|
||||
```
|
||||
|
||||
</hfoption>
|
||||
</hfoptions>
|
||||
|
||||
> [!WARNING]
|
||||
> While the main workflow of training ACT in simulation is straightforward, there is significant room for exploring how to set up the task, define the initial state of the environment, and determine the type of data required during collection to learn the most effective policy. If your trained policy doesn't perform well, investigate the quality of the dataset it was trained on using our visualizers, as well as the action values and various hyperparameters related to ACT and the simulation.
|
||||
|
||||
Congrats 🎉, you have finished this tutorial. If you want to continue with using LeRobot in simulation follow this [Tutorial on reinforcement learning in sim with HIL-SERL](https://huggingface.co/docs/lerobot/hilserl_sim)
|
||||
|
||||
> [!TIP]
|
||||
> If you have any questions or need help, please reach out on [Discord](https://discord.com/invite/s3KuuzsPFb).
|
||||
@@ -2,6 +2,8 @@
|
||||
|
||||
## Install LeRobot
|
||||
|
||||
Currently only available from source.
|
||||
|
||||
Download our source code:
|
||||
```bash
|
||||
git clone https://github.com/huggingface/lerobot.git
|
||||
@@ -13,28 +15,6 @@ Create a virtual environment with Python 3.10, using [`Miniconda`](https://docs.
|
||||
conda create -y -n lerobot python=3.10
|
||||
```
|
||||
|
||||
Now restart the shell by running:
|
||||
<hfoptions id="shell_restart">
|
||||
<hfoption id="Windows">
|
||||
|
||||
```bash
|
||||
source ~/.bashrc
|
||||
```
|
||||
</hfoption>
|
||||
<hfoption id="Mac">
|
||||
|
||||
```bash
|
||||
source ~/.bash_profile
|
||||
```
|
||||
</hfoption>
|
||||
<hfoption id="zshell">
|
||||
|
||||
```bash
|
||||
source ~/.zshrc
|
||||
```
|
||||
</hfoption>
|
||||
</hfoptions>
|
||||
|
||||
Then activate your conda environment, you have to do this each time you open a shell to use lerobot:
|
||||
```bash
|
||||
conda activate lerobot
|
||||
@@ -51,14 +31,14 @@ conda install ffmpeg -c conda-forge
|
||||
> ```bash
|
||||
> conda install ffmpeg=7.1.1 -c conda-forge
|
||||
> ```
|
||||
> - _[On Linux only]_ Install [ffmpeg build dependencies](https://trac.ffmpeg.org/wiki/CompilationGuide/Ubuntu#GettheDependencies) and [compile ffmpeg from source with libsvtav1](https://trac.ffmpeg.org/wiki/CompilationGuide/Ubuntu#libsvtav1), and make sure you use the corresponding ffmpeg binary to your install with `which ffmpeg`.
|
||||
> - _[On Linux only]_ If you want to bring your own ffmpeg: Install [ffmpeg build dependencies](https://trac.ffmpeg.org/wiki/CompilationGuide/Ubuntu#GettheDependencies) and [compile ffmpeg from source with libsvtav1](https://trac.ffmpeg.org/wiki/CompilationGuide/Ubuntu#libsvtav1), and make sure you use the corresponding ffmpeg binary to your install with `which ffmpeg`.
|
||||
|
||||
Install 🤗 LeRobot:
|
||||
```bash
|
||||
cd lerobot && pip install ".[feetech]"
|
||||
pip install -e .
|
||||
```
|
||||
|
||||
## Troubleshooting
|
||||
### Troubleshooting
|
||||
If you encounter build errors, you may need to install additional dependencies: `cmake`, `build-essential`, and `ffmpeg libs`.
|
||||
To install these for linux run:
|
||||
```bash
|
||||
@@ -66,19 +46,27 @@ sudo apt-get install cmake build-essential python-dev pkg-config libavformat-dev
|
||||
```
|
||||
For other systems, see: [Compiling PyAV](https://pyav.org/docs/develop/overview/installation.html#bring-your-own-ffmpeg)
|
||||
|
||||
## Sim
|
||||
For simulations, 🤗 LeRobot comes with gymnasium environments that can be installed as extras:
|
||||
- [aloha](https://github.com/huggingface/gym-aloha)
|
||||
- [xarm](https://github.com/huggingface/gym-xarm)
|
||||
- [pusht](https://github.com/huggingface/gym-pusht)
|
||||
## Optional dependencies
|
||||
|
||||
For instance, to install 🤗 LeRobot with aloha and pusht, use:
|
||||
LeRobot provides optional extras for specific functionalities. Multiple extras can be combined (e.g., `.[aloha,feetech]`). For all available extras, refer to `pyproject.toml`.
|
||||
|
||||
### Simulations
|
||||
Install environment packages: `aloha` ([gym-aloha](https://github.com/huggingface/gym-aloha)), `xarm` ([gym-xarm](https://github.com/huggingface/gym-xarm)), or `pusht` ([gym-pusht](https://github.com/huggingface/gym-pusht))
|
||||
Example:
|
||||
```bash
|
||||
pip install -e ".[aloha, pusht]"
|
||||
pip install -e ".[aloha]" # or "[pusht]" for example
|
||||
```
|
||||
|
||||
## W&B
|
||||
### Motor Control
|
||||
For Koch v1.1 install the Dynamixel SDK, for SO100/SO101/Moss install the Feetech SDK.
|
||||
```bash
|
||||
pip install -e ".[feetech]" # or "[dynamixel]" for example
|
||||
```
|
||||
|
||||
### Experiment Tracking
|
||||
To use [Weights and Biases](https://docs.wandb.ai/quickstart) for experiment tracking, log in with
|
||||
```bash
|
||||
wandb login
|
||||
```
|
||||
|
||||
You can now assemble your robot if it's not ready yet, look for your robot type on the left. Then follow the link below to use Lerobot with your robot.
|
||||
|
||||
318
docs/source/integrate_hardware.mdx
Normal file
@@ -0,0 +1,318 @@
|
||||
# Bring Your Own Hardware
|
||||
|
||||
This tutorial will explain how to integrate your own robot design into the LeRobot ecosystem and have it access all of our tools (data collection, control pipelines, policy training and inference).
|
||||
|
||||
To that end, we provide the [`Robot`](https://github.com/huggingface/lerobot/blob/main/lerobot/robots/robot.py) base class in the LeRobot which specifies a standard interface for physical robot integration. Let's see how to implement it.
|
||||
|
||||
## Prerequisites
|
||||
|
||||
- Your own robot which exposes a communication interface (e.g. serial, CAN, TCP)
|
||||
- A way to read sensor data and send motor commands programmatically, e.g. manufacturer's SDK or API, or your own protocol implementation.
|
||||
- LeRobot installed in your environment. Follow our [Installation Guide](./installation).
|
||||
|
||||
## Choose your motors
|
||||
|
||||
If you're using Feetech or Dynamixel motors, LeRobot provides built-in bus interfaces:
|
||||
|
||||
- [`FeetechMotorsBus`](https://github.com/huggingface/lerobot/blob/main/lerobot/motors/feetech/feetech.py) – for controlling Feetech servos
|
||||
- [`DynamixelMotorsBus`](https://github.com/huggingface/lerobot/blob/main/lerobot/motors/dynamixel/dynamixel.py) – for controlling Dynamixel servos
|
||||
|
||||
Please refer to the [`MotorsBus`](https://github.com/huggingface/lerobot/blob/main/lerobot/motors/motors_bus.py) abstract class to learn about its API.
|
||||
For a good example of how it can be used, you can have a look at our own [SO101 follower implementation](https://github.com/huggingface/lerobot/blob/main/lerobot/robots/so101_follower/so101_follower.py)
|
||||
|
||||
Use these if compatible. Otherwise, you'll need to find or write a Python interface (not covered in this tutorial):
|
||||
- Find an existing SDK in Python (or use bindings to C/C++)
|
||||
- Or implement a basic communication wrapper (e.g., via pyserial, socket, or CANopen)
|
||||
|
||||
You're not alone—many community contributions use custom boards or firmware!
|
||||
|
||||
For Feetech and Dynamixel, we currently support these servos:
|
||||
- Feetech:
|
||||
- STS & SMS series (protocol 0): `sts3215`, `sts3250`, `sm8512bl`
|
||||
- SCS series (protocol 1): `scs0009`
|
||||
- Dynamixel (protocol 2.0 only): `xl330-m077`, `xl330-m288`, `xl430-w250`, `xm430-w350`, `xm540-w270`, `xc430-w150`
|
||||
|
||||
If you are using Feetech or Dynamixel servos that are not in this list, you can add those in the [Feetech table](https://github.com/huggingface/lerobot/blob/main/lerobot/motors/feetech/tables.py) or [Dynamixel table](https://github.com/huggingface/lerobot/blob/main/lerobot/motors/dynamixel/tables.py). Depending on the model, this will require you to add model-specific information. In most cases though, there shouldn't be a lot of additions to do.
|
||||
|
||||
In the next sections, we'll use a `FeetechMotorsBus` as the motors interface for the examples. Replace it and adapt to your motors if necessary.
|
||||
|
||||
## Step 1: Subclass the `Robot` Interface
|
||||
|
||||
You’ll first need to specify the config class and a string identifier (`name`) for your robot. If your robot has special needs that you'd like to be able to change easily, it should go here (e.g. port/address, baudrate).
|
||||
|
||||
Here, we'll add the port name and one camera by default for our robot:
|
||||
```python
|
||||
from dataclasses import dataclass, field
|
||||
|
||||
from lerobot.cameras import CameraConfig
|
||||
from lerobot.cameras.opencv import OpenCVCameraConfig
|
||||
from lerobot.robots import RobotConfig
|
||||
|
||||
|
||||
@RobotConfig.register_subclass("my_cool_robot")
|
||||
@dataclass
|
||||
class MyCoolRobotConfig(RobotConfig):
|
||||
port: str
|
||||
cameras: dict[str, CameraConfig] = field(
|
||||
default_factory={
|
||||
"cam_1": OpenCVCameraConfig(
|
||||
index_or_path=2,
|
||||
fps=30,
|
||||
width=480,
|
||||
height=640,
|
||||
),
|
||||
}
|
||||
)
|
||||
```
|
||||
|
||||
Have a look at our [Cameras tutorial](./cameras) to understand how to detect and add your camera.
|
||||
|
||||
Next, we'll create our actual robot class which inherits from `Robot`. This abstract class defines a contract you must follow for your robot to be usable with the rest of the LeRobot tools.
|
||||
|
||||
Here we'll create a simple 5-DoF robot with one camera. It could be a simple arm but notice that the `Robot` abstract class does not assume anything on your robot's form factor. You can let you imagination run wild when designing new robots!
|
||||
|
||||
```python
|
||||
from lerobot.cameras import make_cameras_from_configs
|
||||
from lerobot.motors import Motor, MotorNormMode
|
||||
from lerobot.motors.feetech import FeetechMotorsBus
|
||||
from lerobot.robots import Robot
|
||||
|
||||
class MyCoolRobot(Robot):
|
||||
config_class = MyCoolRobotConfig
|
||||
name = "my_cool_robot"
|
||||
|
||||
def __init__(self, config: MyCoolRobotConfig):
|
||||
super().__init__(config)
|
||||
self.bus = FeetechMotorsBus(
|
||||
port=self.config.port,
|
||||
motors={
|
||||
"joint_1": Motor(1, "sts3250", MotorNormMode.RANGE_M100_100),
|
||||
"joint_2": Motor(2, "sts3215", MotorNormMode.RANGE_M100_100),
|
||||
"joint_3": Motor(3, "sts3215", MotorNormMode.RANGE_M100_100),
|
||||
"joint_4": Motor(4, "sts3215", MotorNormMode.RANGE_M100_100),
|
||||
"joint_5": Motor(5, "sts3215", MotorNormMode.RANGE_M100_100),
|
||||
},
|
||||
calibration=self.calibration,
|
||||
)
|
||||
self.cameras = make_cameras_from_configs(config.cameras)
|
||||
```
|
||||
|
||||
## Step 2: Define Observation and Action Features
|
||||
|
||||
These two properties define the *interface contract* between your robot and tools that consume it (such as data collection or learning pipelines).
|
||||
|
||||
> [!WARNING]
|
||||
> Note that these properties must be callable even if the robot is not yet connected, so avoid relying on runtime hardware state to define them.
|
||||
|
||||
### `observation_features`
|
||||
|
||||
This property should return a dictionary describing the structure of sensor outputs from your robot. The keys match what `get_observation()` returns, and the values describe either the shape (for arrays/images) or the type (for simple values).
|
||||
|
||||
Example for our 5-DoF arm with one camera:
|
||||
```python
|
||||
@property
|
||||
def _motors_ft(self) -> dict[str, type]:
|
||||
return {
|
||||
"joint_1.pos": float,
|
||||
"joint_2.pos": float,
|
||||
"joint_3.pos": float,
|
||||
"joint_4.pos": float,
|
||||
"joint_5.pos": float,
|
||||
}
|
||||
|
||||
@property
|
||||
def _cameras_ft(self) -> dict[str, tuple]:
|
||||
return {
|
||||
cam: (self.cameras[cam].height, self.cameras[cam].width, 3) for cam in self.cameras
|
||||
}
|
||||
|
||||
@property
|
||||
def observation_features(self) -> dict:
|
||||
return {**self._motors_ft, **self._cameras_ft}
|
||||
```
|
||||
In this case, observations consist of a simple dict storing each motor's position and a camera image.
|
||||
|
||||
### `action_features`
|
||||
|
||||
This property describes the commands your robot expects via `send_action()`. Again, keys must match the expected input format, and values define the shape/type of each command.
|
||||
|
||||
Here, we simply use the same joints proprioceptive features (`self._motors_ft`) as with `observation_features`: the action sent will simply the goal position for each motor.
|
||||
```python
|
||||
def action_features(self) -> dict:
|
||||
return self._motors_ft
|
||||
```
|
||||
|
||||
## Step 3: Handle Connection and Disconnection
|
||||
|
||||
These methods should handle opening and closing communication with your hardware (e.g. serial ports, CAN interfaces, USB devices, cameras).
|
||||
|
||||
### `is_connected`
|
||||
|
||||
This property should simply reflect that communication with the robot's hardware is established. When this property is `True`, it should be possible to read and write to the hardware using `get_observation()` and `send_action()`.
|
||||
|
||||
```python
|
||||
@property
|
||||
def is_connected(self) -> bool:
|
||||
return self.bus.is_connected and all(cam.is_connected for cam in self.cameras.values())
|
||||
```
|
||||
|
||||
### `connect()`
|
||||
|
||||
This method should establish communication with the hardware. Moreover, if your robot needs calibration and is not calibrated, it should start a calibration procedure by default. If your robot needs some specific configuration, this should also be called here.
|
||||
|
||||
```python
|
||||
def connect(self, calibrate: bool = True) -> None:
|
||||
self.bus.connect()
|
||||
if not self.is_calibrated and calibrate:
|
||||
self.calibrate()
|
||||
|
||||
for cam in self.cameras.values():
|
||||
cam.connect()
|
||||
|
||||
self.configure()
|
||||
```
|
||||
|
||||
### `disconnect()`
|
||||
|
||||
This method should gracefully terminate communication with the hardware: free any related resources (threads or processes), close ports, etc.
|
||||
|
||||
Here, we already handle this in our `MotorsBus` and `Camera` classes so we just need to call their own `disconnect()` methods:
|
||||
```python
|
||||
def disconnect(self) -> None:
|
||||
self.bus.disconnect()
|
||||
for cam in self.cameras.values():
|
||||
cam.disconnect()
|
||||
```
|
||||
|
||||
## Step 4: Support Calibration and Configuration
|
||||
|
||||
LeRobot supports saving and loading calibration data automatically. This is useful for joint offsets, zero positions, or sensor alignment.
|
||||
|
||||
> Note that depending on your hardware, this may not apply. If that's the case, you can simply leave these methods as no-ops:
|
||||
> ```python
|
||||
> @property
|
||||
> def is_calibrated(self) -> bool:
|
||||
> return True
|
||||
>
|
||||
> def calibrate(self) -> None:
|
||||
> pass
|
||||
> ```
|
||||
|
||||
### `is_calibrated`
|
||||
|
||||
This should reflect whether your robot has the required calibration loaded.
|
||||
|
||||
```python
|
||||
@property
|
||||
def is_calibrated(self) -> bool:
|
||||
return self.bus.is_calibrated
|
||||
```
|
||||
|
||||
### `calibrate()`
|
||||
|
||||
The goal of the calibration is twofold:
|
||||
- Know the physical range of motion of each motors in order to only send commands within this range.
|
||||
- Normalize raw motors positions to sensible continuous values (e.g. percentages, degrees) instead of arbitrary discrete value dependant on the specific motor used that will not replicate elsewhere.
|
||||
|
||||
It should implement the logic for calibration (if relevant) and update the `self.calibration` dictionary. If you are using Feetech or Dynamixel motors, our bus interfaces already include methods to help with this.
|
||||
|
||||
```python
|
||||
def calibrate(self) -> None:
|
||||
self.bus.disable_torque()
|
||||
for motor in self.bus.motors:
|
||||
self.bus.write("Operating_Mode", motor, OperatingMode.POSITION.value)
|
||||
|
||||
input(f"Move {self} to the middle of its range of motion and press ENTER....")
|
||||
homing_offsets = self.bus.set_half_turn_homings()
|
||||
|
||||
print(
|
||||
"Move all joints sequentially through their entire ranges "
|
||||
"of motion.\nRecording positions. Press ENTER to stop..."
|
||||
)
|
||||
range_mins, range_maxes = self.bus.record_ranges_of_motion()
|
||||
|
||||
self.calibration = {}
|
||||
for motor, m in self.bus.motors.items():
|
||||
self.calibration[motor] = MotorCalibration(
|
||||
id=m.id,
|
||||
drive_mode=0,
|
||||
homing_offset=homing_offsets[motor],
|
||||
range_min=range_mins[motor],
|
||||
range_max=range_maxes[motor],
|
||||
)
|
||||
|
||||
self.bus.write_calibration(self.calibration)
|
||||
self._save_calibration()
|
||||
print("Calibration saved to", self.calibration_fpath)
|
||||
```
|
||||
|
||||
### `configure()`
|
||||
|
||||
Use this to set up any configuration for your hardware (servos control modes, controller gains, etc.). This should usually be run at connection time and be idempotent.
|
||||
|
||||
```python
|
||||
def configure(self) -> None:
|
||||
with self.bus.torque_disabled():
|
||||
self.bus.configure_motors()
|
||||
for motor in self.bus.motors:
|
||||
self.bus.write("Operating_Mode", motor, OperatingMode.POSITION.value)
|
||||
self.bus.write("P_Coefficient", motor, 16)
|
||||
self.bus.write("I_Coefficient", motor, 0)
|
||||
self.bus.write("D_Coefficient", motor, 32)
|
||||
```
|
||||
|
||||
## Step 5: Implement Sensors Reading and Action Sending
|
||||
|
||||
These are the most important runtime functions: the core I/O loop.
|
||||
|
||||
### `get_observation()`
|
||||
|
||||
Returns a dictionary of sensor values from the robot. These typically include motor states, camera frames, various sensors, etc. In the LeRobot framework, these observations are what will be fed to a policy in order to predict the actions to take. The dictionary keys and structure must match `observation_features`.
|
||||
|
||||
```python
|
||||
def get_observation(self) -> dict[str, Any]:
|
||||
if not self.is_connected:
|
||||
raise ConnectionError(f"{self} is not connected.")
|
||||
|
||||
# Read arm position
|
||||
obs_dict = self.bus.sync_read("Present_Position")
|
||||
obs_dict = {f"{motor}.pos": val for motor, val in obs_dict.items()}
|
||||
|
||||
# Capture images from cameras
|
||||
for cam_key, cam in self.cameras.items():
|
||||
obs_dict[cam_key] = cam.async_read()
|
||||
|
||||
return obs_dict
|
||||
```
|
||||
|
||||
### `send_action()`
|
||||
|
||||
Takes a dictionary that matches `action_features`, and sends it to your hardware. You can add safety limits (clipping, smoothing) and return what was actually sent.
|
||||
|
||||
For simplicity, we won't be adding any modification of the actions in our example here.
|
||||
|
||||
```python
|
||||
def send_action(self, action: dict[str, Any]) -> dict[str, Any]:
|
||||
goal_pos = {key.removesuffix(".pos"): val for key, val in action.items()}
|
||||
|
||||
# Send goal position to the arm
|
||||
self.bus.sync_write("Goal_Position", goal_pos)
|
||||
|
||||
return action
|
||||
```
|
||||
|
||||
## Adding a Teleoperator
|
||||
|
||||
For implementing teleoperation devices, we also provide a [`Teleoperator`](https://github.com/huggingface/lerobot/blob/main/lerobot/teleoperators/teleoperator.py) base class. This class is very similar to the `Robot` base class and also doesn't assume anything on form factor.
|
||||
|
||||
The main differences are in the I/O functions: a teleoperator allows you to produce action via `get_action` and can receive feedback actions via `send_feedback`. Feedback could be anything controllable on the teleoperation device that could help the person controlling it understand the consequences of the actions sent. Think motion/force feedback on a leader arm, vibrations on a gamepad controller for example. To implement a teleoperator, you can follow this same tutorial and adapt it for these two methods.
|
||||
|
||||
## Wrapping Up
|
||||
|
||||
Once your robot class is complete, you can leverage the LeRobot ecosystem:
|
||||
|
||||
- Control your robot with available teleoperators or integrate directly your teleoperating device
|
||||
- Record training data and visualize it
|
||||
- Integrate it into RL or imitation learning pipelines
|
||||
|
||||
Don't hesitate to reach out to the community for help on our [Discord](https://discord.gg/s3KuuzsPFb) 🤗
|
||||
1
docs/source/koch.mdx
Symbolic link
@@ -0,0 +1 @@
|
||||
../../src/lerobot/robots/koch_follower/koch.mdx
|
||||
1
docs/source/lekiwi.mdx
Symbolic link
@@ -0,0 +1 @@
|
||||
../../src/lerobot/robots/lekiwi/lekiwi.mdx
|
||||
29
docs/source/notebooks.mdx
Normal file
@@ -0,0 +1,29 @@
|
||||
# 🤗 LeRobot Notebooks
|
||||
|
||||
This repository contains example notebooks for using LeRobot. These notebooks demonstrate how to train policies on real or simulation datasets using standardized policies.
|
||||
|
||||
---
|
||||
|
||||
### Training ACT
|
||||
|
||||
[ACT](https://huggingface.co/papers/2304.13705) (Action Chunking Transformer) is a transformer-based policy architecture for imitation learning that processes robot states and camera inputs to generate smooth, chunked action sequences.
|
||||
|
||||
We provide a ready-to-run Google Colab notebook to help you train ACT policies using datasets from the Hugging Face Hub, with optional logging to Weights & Biases.
|
||||
|
||||
| Notebook | Colab |
|
||||
|:---------|:------|
|
||||
| [Train ACT with LeRobot](https://github.com/huggingface/notebooks/blob/main/lerobot/training-act.ipynb) | [](https://colab.research.google.com/github/huggingface/notebooks/blob/main/lerobot/training-act.ipynb) |
|
||||
|
||||
Expected training time for 100k steps: ~1.5 hours on an NVIDIA A100 GPU with batch size of `64`.
|
||||
|
||||
### Training SmolVLA
|
||||
|
||||
[SmolVLA](https://huggingface.co/papers/2506.01844) is a small but efficient Vision-Language-Action model. It is compact in size with 450 M-parameter and is developed by Hugging Face.
|
||||
|
||||
We provide a ready-to-run Google Colab notebook to help you train SmolVLA policies using datasets from the Hugging Face Hub, with optional logging to Weights & Biases.
|
||||
|
||||
| Notebook | Colab |
|
||||
| :-------------------------------------------------------------------------------------------------------------- | :------------------------------------------------------------------------------------------------------------------------------------------------------------------------------------ |
|
||||
| [Train SmolVLA with LeRobot](https://github.com/huggingface/notebooks/blob/main/lerobot/training-smolvla.ipynb) | [](https://colab.research.google.com/github/huggingface/notebooks/blob/main/lerobot/training-smolvla.ipynb) |
|
||||
|
||||
Expected training time for 20k steps: ~5 hours on an NVIDIA A100 GPU with batch size of `64`.
|
||||
97
docs/source/smolvla.mdx
Normal file
@@ -0,0 +1,97 @@
|
||||
# Finetune SmolVLA
|
||||
|
||||
SmolVLA is Hugging Face’s lightweight foundation model for robotics. Designed for easy fine-tuning on LeRobot datasets, it helps accelerate your development!
|
||||
|
||||
<p align="center">
|
||||
<img src="https://cdn-uploads.huggingface.co/production/uploads/640e21ef3c82bd463ee5a76d/aooU0a3DMtYmy_1IWMaIM.png" alt="SmolVLA architecture." width="500"/>
|
||||
<br/>
|
||||
<em>Figure 1. SmolVLA takes as input (i) multiple cameras views, (ii) the robot’s current sensorimotor state, and (iii) a natural language instruction, encoded into contextual features used to condition the action expert when generating an action chunk.</em>
|
||||
</p>
|
||||
|
||||
## Set Up Your Environment
|
||||
|
||||
1. Install LeRobot by following our [Installation Guide](./installation).
|
||||
2. Install SmolVLA dependencies by running:
|
||||
|
||||
```bash
|
||||
pip install -e ".[smolvla]"
|
||||
```
|
||||
|
||||
## Collect a dataset
|
||||
|
||||
SmolVLA is a base model, so fine-tuning on your own data is required for optimal performance in your setup.
|
||||
We recommend recording ~50 episodes of your task as a starting point. Follow our guide to get started: [Recording a Dataset](https://huggingface.co/docs/lerobot/getting_started_real_world_robot#record-a-dataset)
|
||||
|
||||
<Tip>
|
||||
|
||||
In your dataset, make sure to have enough demonstrations per each variation (e.g. the cube position on the table if it is cube pick-place task) you are introducing.
|
||||
|
||||
We recommend checking out the dataset linked below for reference that was used in the [SmolVLA paper](https://huggingface.co/papers/2506.01844):
|
||||
|
||||
🔗 [SVLA SO100 PickPlace](https://huggingface.co/spaces/lerobot/visualize_dataset?path=%2Flerobot%2Fsvla_so100_pickplace%2Fepisode_0)
|
||||
|
||||
In this dataset, we recorded 50 episodes across 5 distinct cube positions. For each position, we collected 10 episodes of pick-and-place interactions. This structure, repeating each variation several times, helped the model generalize better. We tried similar dataset with 25 episodes, and it was not enough leading to a bad performance. So, the data quality and quantity is definitely a key.
|
||||
After you have your dataset available on the Hub, you are good to go to use our finetuning script to adapt SmolVLA to your application.
|
||||
</Tip>
|
||||
|
||||
## Finetune SmolVLA on your data
|
||||
|
||||
Use [`smolvla_base`](https://hf.co/lerobot/smolvla_base), our pretrained 450M model, and fine-tune it on your data.
|
||||
Training the model for 20k steps will roughly take ~4 hrs on a single A100 GPU. You should tune the number of steps based on performance and your use-case.
|
||||
|
||||
If you don't have a gpu device, you can train using our notebook on [](https://colab.research.google.com/github/huggingface/notebooks/blob/main/lerobot/training-smolvla.ipynb)
|
||||
|
||||
Pass your dataset to the training script using `--dataset.repo_id`. If you want to test your installation, run the following command where we use one of the datasets we collected for the [SmolVLA Paper](https://huggingface.co/papers/2506.01844).
|
||||
|
||||
```bash
|
||||
cd lerobot && python -m lerobot.scripts.train \
|
||||
--policy.path=lerobot/smolvla_base \
|
||||
--dataset.repo_id=${HF_USER}/mydataset \
|
||||
--batch_size=64 \
|
||||
--steps=20000 \
|
||||
--output_dir=outputs/train/my_smolvla \
|
||||
--job_name=my_smolvla_training \
|
||||
--policy.device=cuda \
|
||||
--wandb.enable=true
|
||||
```
|
||||
|
||||
<Tip>
|
||||
You can start with a small batch size and increase it incrementally, if the GPU allows it, as long as loading times remain short.
|
||||
</Tip>
|
||||
|
||||
Fine-tuning is an art. For a complete overview of the options for finetuning, run
|
||||
|
||||
```bash
|
||||
python -m lerobot.scripts.train --help
|
||||
```
|
||||
|
||||
<p align="center">
|
||||
<img src="https://cdn-uploads.huggingface.co/production/uploads/640e21ef3c82bd463ee5a76d/S-3vvVCulChREwHDkquoc.gif" alt="Comparison of SmolVLA across task variations." width="500"/>
|
||||
<br/>
|
||||
<em>Figure 2: Comparison of SmolVLA across task variations. From left to right: (1) pick-place cube counting, (2) pick-place cube counting, (3) pick-place cube counting under perturbations, and (4) generalization on pick-and-place of the lego block with real-world SO101.</em>
|
||||
</p>
|
||||
|
||||
|
||||
## Evaluate the finetuned model and run it in real-time
|
||||
|
||||
Similarly for when recording an episode, it is recommended that you are logged in to the HuggingFace Hub. You can follow the corresponding steps: [Record a dataset](./getting_started_real_world_robot#record-a-dataset).
|
||||
Once you are logged in, you can run inference in your setup by doing:
|
||||
|
||||
```bash
|
||||
python -m lerobot.record \
|
||||
--robot.type=so101_follower \
|
||||
--robot.port=/dev/ttyACM0 \ # <- Use your port
|
||||
--robot.id=my_blue_follower_arm \ # <- Use your robot id
|
||||
--robot.cameras="{ front: {type: opencv, index_or_path: 8, width: 640, height: 480, fps: 30}}" \ # <- Use your cameras
|
||||
--dataset.single_task="Grasp a lego block and put it in the bin." \ # <- Use the same task description you used in your dataset recording
|
||||
--dataset.repo_id=${HF_USER}/eval_DATASET_NAME_test \ # <- This will be the dataset name on HF Hub
|
||||
--dataset.episode_time_s=50 \
|
||||
--dataset.num_episodes=10 \
|
||||
# <- Teleop optional if you want to teleoperate in between episodes \
|
||||
# --teleop.type=so100_leader \
|
||||
# --teleop.port=/dev/ttyACM0 \
|
||||
# --teleop.id=my_red_leader_arm \
|
||||
--policy.path=HF_USER/FINETUNE_MODEL_NAME # <- Use your fine-tuned model
|
||||
```
|
||||
|
||||
Depending on your evaluation setup, you can configure the duration and the number of episodes to record for your evaluation suite.
|
||||
1
docs/source/so100.mdx
Symbolic link
@@ -0,0 +1 @@
|
||||
../../src/lerobot/robots/so100_follower/so100.mdx
|
||||
1
docs/source/so101.mdx
Symbolic link
@@ -0,0 +1 @@
|
||||
../../src/lerobot/robots/so101_follower/so101.mdx
|
||||
@@ -32,7 +32,7 @@ import torch
|
||||
from huggingface_hub import HfApi
|
||||
|
||||
import lerobot
|
||||
from lerobot.common.datasets.lerobot_dataset import LeRobotDataset, LeRobotDatasetMetadata
|
||||
from lerobot.datasets.lerobot_dataset import LeRobotDataset, LeRobotDatasetMetadata
|
||||
|
||||
# We ported a number of existing datasets ourselves, use this to see the list:
|
||||
print("List of available datasets:")
|
||||
|
||||
@@ -30,7 +30,7 @@ import imageio
|
||||
import numpy
|
||||
import torch
|
||||
|
||||
from lerobot.common.policies.diffusion.modeling_diffusion import DiffusionPolicy
|
||||
from lerobot.policies.diffusion.modeling_diffusion import DiffusionPolicy
|
||||
|
||||
# Create a directory to store the video of the evaluation
|
||||
output_directory = Path("outputs/eval/example_pusht_diffusion")
|
||||
|
||||
@@ -22,11 +22,11 @@ from pathlib import Path
|
||||
|
||||
import torch
|
||||
|
||||
from lerobot.common.datasets.lerobot_dataset import LeRobotDataset, LeRobotDatasetMetadata
|
||||
from lerobot.common.datasets.utils import dataset_to_policy_features
|
||||
from lerobot.common.policies.diffusion.configuration_diffusion import DiffusionConfig
|
||||
from lerobot.common.policies.diffusion.modeling_diffusion import DiffusionPolicy
|
||||
from lerobot.configs.types import FeatureType
|
||||
from lerobot.datasets.lerobot_dataset import LeRobotDataset, LeRobotDatasetMetadata
|
||||
from lerobot.datasets.utils import dataset_to_policy_features
|
||||
from lerobot.policies.diffusion.configuration_diffusion import DiffusionConfig
|
||||
from lerobot.policies.diffusion.modeling_diffusion import DiffusionPolicy
|
||||
|
||||
|
||||
def main():
|
||||
|
||||
@@ -4,7 +4,7 @@ This tutorial will explain the training script, how to use it, and particularly
|
||||
|
||||
## The training script
|
||||
|
||||
LeRobot offers a training script at [`lerobot/scripts/train.py`](../lerobot/scripts/train.py). At a high level it does the following:
|
||||
LeRobot offers a training script at [`lerobot/scripts/train.py`](../src/lerobot/scripts/train.py). At a high level it does the following:
|
||||
|
||||
- Initialize/load a configuration for the following steps using.
|
||||
- Instantiates a dataset.
|
||||
@@ -21,7 +21,7 @@ In the training script, the main function `train` expects a `TrainPipelineConfig
|
||||
def train(cfg: TrainPipelineConfig):
|
||||
```
|
||||
|
||||
You can inspect the `TrainPipelineConfig` defined in [`lerobot/configs/train.py`](../lerobot/configs/train.py) (which is heavily commented and meant to be a reference to understand any option)
|
||||
You can inspect the `TrainPipelineConfig` defined in [`lerobot/configs/train.py`](../src/lerobot/configs/train.py) (which is heavily commented and meant to be a reference to understand any option)
|
||||
|
||||
When running the script, inputs for the command line are parsed thanks to the `@parser.wrap()` decorator and an instance of this class is automatically generated. Under the hood, this is done with [Draccus](https://github.com/dlwh/draccus) which is a tool dedicated to this purpose. If you're familiar with Hydra, Draccus can similarly load configurations from config files (.json, .yaml) and also override their values through command line inputs. Unlike Hydra, these configurations are pre-defined in the code through dataclasses rather than being defined entirely in config files. This allows for more rigorous serialization/deserialization, typing, and to manipulate configuration as objects directly in the code and not as dictionaries or namespaces (which enables nice features in an IDE such as autocomplete, jump-to-def, etc.)
|
||||
|
||||
@@ -50,9 +50,9 @@ By default, every field takes its default value specified in the dataclass. If a
|
||||
|
||||
## Specifying values from the CLI
|
||||
|
||||
Let's say that we want to train [Diffusion Policy](../lerobot/common/policies/diffusion) on the [pusht](https://huggingface.co/datasets/lerobot/pusht) dataset, using the [gym_pusht](https://github.com/huggingface/gym-pusht) environment for evaluation. The command to do so would look like this:
|
||||
Let's say that we want to train [Diffusion Policy](../src/lerobot/policies/diffusion) on the [pusht](https://huggingface.co/datasets/lerobot/pusht) dataset, using the [gym_pusht](https://github.com/huggingface/gym-pusht) environment for evaluation. The command to do so would look like this:
|
||||
```bash
|
||||
python lerobot/scripts/train.py \
|
||||
python -m lerobot.scripts.train \
|
||||
--dataset.repo_id=lerobot/pusht \
|
||||
--policy.type=diffusion \
|
||||
--env.type=pusht
|
||||
@@ -60,12 +60,12 @@ python lerobot/scripts/train.py \
|
||||
|
||||
Let's break this down:
|
||||
- To specify the dataset, we just need to specify its `repo_id` on the hub which is the only required argument in the `DatasetConfig`. The rest of the fields have default values and in this case we are fine with those so we can just add the option `--dataset.repo_id=lerobot/pusht`.
|
||||
- To specify the policy, we can just select diffusion policy using `--policy` appended with `.type`. Here, `.type` is a special argument which allows us to select config classes inheriting from `draccus.ChoiceRegistry` and that have been decorated with the `register_subclass()` method. To have a better explanation of this feature, have a look at this [Draccus demo](https://github.com/dlwh/draccus?tab=readme-ov-file#more-flexible-configuration-with-choice-types). In our code, we use this mechanism mainly to select policies, environments, robots, and some other components like optimizers. The policies available to select are located in [lerobot/common/policies](../lerobot/common/policies)
|
||||
- Similarly, we select the environment with `--env.type=pusht`. The different environment configs are available in [`lerobot/common/envs/configs.py`](../lerobot/common/envs/configs.py)
|
||||
- To specify the policy, we can just select diffusion policy using `--policy` appended with `.type`. Here, `.type` is a special argument which allows us to select config classes inheriting from `draccus.ChoiceRegistry` and that have been decorated with the `register_subclass()` method. To have a better explanation of this feature, have a look at this [Draccus demo](https://github.com/dlwh/draccus?tab=readme-ov-file#more-flexible-configuration-with-choice-types). In our code, we use this mechanism mainly to select policies, environments, robots, and some other components like optimizers. The policies available to select are located in [lerobot/policies](../src/lerobot/policies)
|
||||
- Similarly, we select the environment with `--env.type=pusht`. The different environment configs are available in [`lerobot/envs/configs.py`](../src/lerobot/envs/configs.py)
|
||||
|
||||
Let's see another example. Let's say you've been training [ACT](../lerobot/common/policies/act) on [lerobot/aloha_sim_insertion_human](https://huggingface.co/datasets/lerobot/aloha_sim_insertion_human) using the [gym-aloha](https://github.com/huggingface/gym-aloha) environment for evaluation with:
|
||||
Let's see another example. Let's say you've been training [ACT](../src/lerobot/policies/act) on [lerobot/aloha_sim_insertion_human](https://huggingface.co/datasets/lerobot/aloha_sim_insertion_human) using the [gym-aloha](https://github.com/huggingface/gym-aloha) environment for evaluation with:
|
||||
```bash
|
||||
python lerobot/scripts/train.py \
|
||||
python -m lerobot.scripts.train \
|
||||
--policy.type=act \
|
||||
--dataset.repo_id=lerobot/aloha_sim_insertion_human \
|
||||
--env.type=aloha \
|
||||
@@ -74,9 +74,9 @@ python lerobot/scripts/train.py \
|
||||
> Notice we added `--output_dir` to explicitly tell where to write outputs from this run (checkpoints, training state, configs etc.). This is not mandatory and if you don't specify it, a default directory will be created from the current date and time, env.type and policy.type. This will typically look like `outputs/train/2025-01-24/16-10-05_aloha_act`.
|
||||
|
||||
We now want to train a different policy for aloha on another task. We'll change the dataset and use [lerobot/aloha_sim_transfer_cube_human](https://huggingface.co/datasets/lerobot/aloha_sim_transfer_cube_human) instead. Of course, we also need to change the task of the environment as well to match this other task.
|
||||
Looking at the [`AlohaEnv`](../lerobot/common/envs/configs.py) config, the task is `"AlohaInsertion-v0"` by default, which corresponds to the task we trained on in the command above. The [gym-aloha](https://github.com/huggingface/gym-aloha?tab=readme-ov-file#description) environment also has the `AlohaTransferCube-v0` task which corresponds to this other task we want to train on. Putting this together, we can train this new policy on this different task using:
|
||||
Looking at the [`AlohaEnv`](../src/lerobot/envs/configs.py) config, the task is `"AlohaInsertion-v0"` by default, which corresponds to the task we trained on in the command above. The [gym-aloha](https://github.com/huggingface/gym-aloha?tab=readme-ov-file#description) environment also has the `AlohaTransferCube-v0` task which corresponds to this other task we want to train on. Putting this together, we can train this new policy on this different task using:
|
||||
```bash
|
||||
python lerobot/scripts/train.py \
|
||||
python -m lerobot.scripts.train \
|
||||
--policy.type=act \
|
||||
--dataset.repo_id=lerobot/aloha_sim_transfer_cube_human \
|
||||
--env.type=aloha \
|
||||
@@ -111,7 +111,7 @@ Now, let's assume that we want to reproduce the run just above. That run has pro
|
||||
|
||||
We can then simply load the config values from this file using:
|
||||
```bash
|
||||
python lerobot/scripts/train.py \
|
||||
python -m lerobot.scripts.train \
|
||||
--config_path=outputs/train/act_aloha_transfer/checkpoints/last/pretrained_model/ \
|
||||
--output_dir=outputs/train/act_aloha_transfer_2
|
||||
```
|
||||
@@ -119,7 +119,7 @@ python lerobot/scripts/train.py \
|
||||
|
||||
Similarly to Hydra, we can still override some parameters in the CLI if we want to, e.g.:
|
||||
```bash
|
||||
python lerobot/scripts/train.py \
|
||||
python -m lerobot.scripts.train \
|
||||
--config_path=outputs/train/act_aloha_transfer/checkpoints/last/pretrained_model/ \
|
||||
--output_dir=outputs/train/act_aloha_transfer_2
|
||||
--policy.n_action_steps=80
|
||||
@@ -128,7 +128,7 @@ python lerobot/scripts/train.py \
|
||||
|
||||
`--config_path` can also accept the repo_id of a repo on the hub that contains a `train_config.json` file, e.g. running:
|
||||
```bash
|
||||
python lerobot/scripts/train.py --config_path=lerobot/diffusion_pusht
|
||||
python -m lerobot.scripts.train --config_path=lerobot/diffusion_pusht
|
||||
```
|
||||
will start a training run with the same configuration used for training [lerobot/diffusion_pusht](https://huggingface.co/lerobot/diffusion_pusht)
|
||||
|
||||
@@ -139,7 +139,7 @@ Being able to resume a training run is important in case it crashed or aborted f
|
||||
|
||||
Let's reuse the command from the previous run and add a few more options:
|
||||
```bash
|
||||
python lerobot/scripts/train.py \
|
||||
python -m lerobot.scripts.train \
|
||||
--policy.type=act \
|
||||
--dataset.repo_id=lerobot/aloha_sim_transfer_cube_human \
|
||||
--env.type=aloha \
|
||||
@@ -155,7 +155,7 @@ INFO 2025-01-24 16:10:56 ts/train.py:263 Checkpoint policy after step 100
|
||||
```
|
||||
Now let's simulate a crash by killing the process (hit `ctrl`+`c`). We can then simply resume this run from the last checkpoint available with:
|
||||
```bash
|
||||
python lerobot/scripts/train.py \
|
||||
python -m lerobot.scripts.train \
|
||||
--config_path=outputs/train/run_resumption/checkpoints/last/pretrained_model/ \
|
||||
--resume=true
|
||||
```
|
||||
@@ -164,7 +164,7 @@ You should see from the logging that your training picks up from where it left o
|
||||
Another reason for which you might want to resume a run is simply to extend training and add more training steps. The number of training steps is set by the option `--steps`, which is 100 000 by default.
|
||||
You could double the number of steps of the previous run with:
|
||||
```bash
|
||||
python lerobot/scripts/train.py \
|
||||
python -m lerobot.scripts.train \
|
||||
--config_path=outputs/train/run_resumption/checkpoints/last/pretrained_model/ \
|
||||
--resume=true \
|
||||
--steps=200000
|
||||
@@ -195,7 +195,7 @@ In addition to the features currently in Draccus, we've added a special `.path`
|
||||
|
||||
For example, we could fine-tune a [policy pre-trained on the aloha transfer task](https://huggingface.co/lerobot/act_aloha_sim_transfer_cube_human) on the aloha insertion task. We can achieve this with:
|
||||
```bash
|
||||
python lerobot/scripts/train.py \
|
||||
python -m lerobot.scripts.train \
|
||||
--policy.path=lerobot/act_aloha_sim_transfer_cube_human \
|
||||
--dataset.repo_id=lerobot/aloha_sim_insertion_human \
|
||||
--env.type=aloha \
|
||||
@@ -236,7 +236,7 @@ We'll summarize here the main use cases to remember from this tutorial.
|
||||
|
||||
#### Train a policy from scratch – CLI
|
||||
```bash
|
||||
python lerobot/scripts/train.py \
|
||||
python -m lerobot.scripts.train \
|
||||
--policy.type=act \ # <- select 'act' policy
|
||||
--env.type=pusht \ # <- select 'pusht' environment
|
||||
--dataset.repo_id=lerobot/pusht # <- train on this dataset
|
||||
@@ -244,14 +244,14 @@ python lerobot/scripts/train.py \
|
||||
|
||||
#### Train a policy from scratch - config file + CLI
|
||||
```bash
|
||||
python lerobot/scripts/train.py \
|
||||
python -m lerobot.scripts.train \
|
||||
--config_path=path/to/pretrained_model \ # <- can also be a repo_id
|
||||
--policy.n_action_steps=80 # <- you may still override values
|
||||
```
|
||||
|
||||
#### Resume/continue a training run
|
||||
```bash
|
||||
python lerobot/scripts/train.py \
|
||||
python -m lerobot.scripts.train \
|
||||
--config_path=checkpoint/pretrained_model/ \
|
||||
--resume=true \
|
||||
--steps=200000 # <- you can change some training parameters
|
||||
@@ -259,7 +259,7 @@ python lerobot/scripts/train.py \
|
||||
|
||||
#### Fine-tuning
|
||||
```bash
|
||||
python lerobot/scripts/train.py \
|
||||
python -m lerobot.scripts.train \
|
||||
--policy.path=lerobot/act_aloha_sim_transfer_cube_human \ # <- can also be a local path to a checkpoint
|
||||
--dataset.repo_id=lerobot/aloha_sim_insertion_human \
|
||||
--env.type=aloha \
|
||||
|
||||
@@ -1,998 +0,0 @@
|
||||
# Getting Started with Real-World Robots
|
||||
|
||||
This tutorial will guide you through the process of setting up and training a neural network to autonomously control a real robot.
|
||||
|
||||
**What You'll Learn:**
|
||||
1. How to order and assemble your robot.
|
||||
2. How to connect, configure, and calibrate your robot.
|
||||
3. How to record and visualize your dataset.
|
||||
4. How to train a policy using your data and prepare it for evaluation.
|
||||
5. How to evaluate your policy and visualize the results.
|
||||
|
||||
By following these steps, you'll be able to replicate tasks like picking up a Lego block and placing it in a bin with a high success rate, as demonstrated in [this video](https://x.com/RemiCadene/status/1814680760592572934).
|
||||
|
||||
This tutorial is specifically made for the affordable [Koch v1.1](https://github.com/jess-moss/koch-v1-1) robot, but it contains additional information to be easily adapted to various types of robots like [Aloha bimanual robot](https://aloha-2.github.io) by changing some configurations. The Koch v1.1 consists of a leader arm and a follower arm, each with 6 motors. It can work with one or several cameras to record the scene, which serve as visual sensors for the robot.
|
||||
|
||||
During the data collection phase, you will control the follower arm by moving the leader arm. This process is known as "teleoperation." This technique is used to collect robot trajectories. Afterward, you'll train a neural network to imitate these trajectories and deploy the network to enable your robot to operate autonomously.
|
||||
|
||||
If you encounter any issues at any step of the tutorial, feel free to seek help on [Discord](https://discord.com/invite/s3KuuzsPFb) or don't hesitate to iterate with us on the tutorial by creating issues or pull requests. Thanks!
|
||||
|
||||
## 1. Order and Assemble your Koch v1.1
|
||||
|
||||
Follow the sourcing and assembling instructions provided on the [Koch v1.1 Github page](https://github.com/jess-moss/koch-v1-1). This will guide you through setting up both the follower and leader arms, as shown in the image below.
|
||||
|
||||
<div style="text-align:center;">
|
||||
<img src="../media/tutorial/koch_v1_1_leader_follower.webp?raw=true" alt="Koch v1.1 leader and follower arms" title="Koch v1.1 leader and follower arms" width="50%">
|
||||
</div>
|
||||
|
||||
For a visual walkthrough of the assembly process, you can refer to [this video tutorial](https://youtu.be/8nQIg9BwwTk).
|
||||
|
||||
## 2. Configure motors, calibrate arms, teleoperate your Koch v1.1
|
||||
|
||||
First, install the additional dependencies required for robots built with dynamixel motors like Koch v1.1 by running one of the following commands (make sure gcc is installed).
|
||||
|
||||
Using `pip`:
|
||||
```bash
|
||||
pip install -e ".[dynamixel]"
|
||||
```
|
||||
|
||||
Using `poetry`:
|
||||
```bash
|
||||
poetry sync --extras "dynamixel"
|
||||
```
|
||||
|
||||
Using `uv`:
|
||||
```bash
|
||||
uv sync --extra "dynamixel"
|
||||
```
|
||||
|
||||
You are now ready to plug the 5V power supply to the motor bus of the leader arm (the smaller one) since all its motors only require 5V.
|
||||
|
||||
Then plug the 12V power supply to the motor bus of the follower arm. It has two motors that need 12V, and the rest will be powered with 5V through the voltage convertor.
|
||||
|
||||
Finally, connect both arms to your computer via USB. Note that the USB doesn't provide any power, and both arms need to be plugged in with their associated power supply to be detected by your computer.
|
||||
|
||||
Now you are ready to configure your motors for the first time, as detailed in the sections below. In the upcoming sections, you'll learn about our classes and functions by running some python code in an interactive session, or by copy-pasting it in a python file.
|
||||
|
||||
If you have already configured your motors the first time, you can streamline the process by directly running the teleoperate script (which is detailed further in the tutorial):
|
||||
|
||||
> **NOTE:** To visualize the data, enable `--control.display_data=true`. This streams the data using `rerun`.
|
||||
|
||||
```bash
|
||||
python lerobot/scripts/control_robot.py \
|
||||
--robot.type=koch \
|
||||
--control.type=teleoperate
|
||||
```
|
||||
|
||||
It will automatically:
|
||||
1. Identify any missing calibrations and initiate the calibration procedure.
|
||||
2. Connect the robot and start teleoperation.
|
||||
|
||||
### a. Control your motors with DynamixelMotorsBus
|
||||
|
||||
You can use the [`DynamixelMotorsBus`](../lerobot/common/robot_devices/motors/dynamixel.py) to communicate with the motors connected as a chain to the corresponding USB bus. This class leverages the Python [Dynamixel SDK](https://emanual.robotis.com/docs/en/software/dynamixel/dynamixel_sdk/sample_code/python_read_write_protocol_2_0/#python-read-write-protocol-20) to facilitate reading from and writing to the motors.
|
||||
|
||||
**First Configuration of your motors**
|
||||
|
||||
You will need to unplug each motor in turn and run a command the identify the motor. The motor will save its own identification, so you only need to do this once. Start by unplugging all of the motors.
|
||||
|
||||
Do the Leader arm first, as all of its motors are of the same type. Plug in your first motor on your leader arm and run this script to set its ID to 1.
|
||||
```bash
|
||||
python lerobot/scripts/configure_motor.py \
|
||||
--port /dev/tty.usbmodem58760432961 \
|
||||
--brand dynamixel \
|
||||
--model xl330-m288 \
|
||||
--baudrate 1000000 \
|
||||
--id 1
|
||||
```
|
||||
|
||||
Then unplug your first motor and plug the second motor and set its ID to 2.
|
||||
```bash
|
||||
python lerobot/scripts/configure_motor.py \
|
||||
--port /dev/tty.usbmodem58760432961 \
|
||||
--brand dynamixel \
|
||||
--model xl330-m288 \
|
||||
--baudrate 1000000 \
|
||||
--id 2
|
||||
```
|
||||
|
||||
Redo the process for all your motors until ID 6.
|
||||
|
||||
The process for the follower arm is almost the same, but the follower arm has two types of motors. For the first two motors, make sure you set the model to `xl430-w250`. _Important: configuring follower motors requires plugging and unplugging power. Make sure you use the 5V power for the XL330s and the 12V power for the XL430s!_
|
||||
|
||||
After all of your motors are configured properly, you're ready to plug them all together in a daisy-chain as shown in the original video.
|
||||
|
||||
**Instantiate the DynamixelMotorsBus**
|
||||
|
||||
To begin, create two instances of the [`DynamixelMotorsBus`](../lerobot/common/robot_devices/motors/dynamixel.py), one for each arm, using their corresponding USB ports (e.g. `DynamixelMotorsBus(port="/dev/tty.usbmodem575E0031751"`).
|
||||
|
||||
To find the correct ports for each arm, run the utility script twice:
|
||||
```bash
|
||||
python lerobot/scripts/find_motors_bus_port.py
|
||||
```
|
||||
|
||||
Example output when identifying the leader arm's port (e.g., `/dev/tty.usbmodem575E0031751` on Mac, or possibly `/dev/ttyACM0` on Linux):
|
||||
```
|
||||
Finding all available ports for the MotorBus.
|
||||
['/dev/tty.usbmodem575E0032081', '/dev/tty.usbmodem575E0031751']
|
||||
Remove the usb cable from your DynamixelMotorsBus and press Enter when done.
|
||||
|
||||
[...Disconnect leader arm and press Enter...]
|
||||
|
||||
The port of this DynamixelMotorsBus is /dev/tty.usbmodem575E0031751
|
||||
Reconnect the usb cable.
|
||||
```
|
||||
|
||||
Example output when identifying the follower arm's port (e.g., `/dev/tty.usbmodem575E0032081`, or possibly `/dev/ttyACM1` on Linux):
|
||||
```
|
||||
Finding all available ports for the MotorBus.
|
||||
['/dev/tty.usbmodem575E0032081', '/dev/tty.usbmodem575E0031751']
|
||||
Remove the usb cable from your DynamixelMotorsBus and press Enter when done.
|
||||
|
||||
[...Disconnect follower arm and press Enter...]
|
||||
|
||||
The port of this DynamixelMotorsBus is /dev/tty.usbmodem575E0032081
|
||||
Reconnect the usb cable.
|
||||
```
|
||||
|
||||
Troubleshooting: On Linux, you might need to give access to the USB ports by running this command with your ports:
|
||||
```bash
|
||||
sudo chmod 666 /dev/tty.usbmodem575E0032081
|
||||
sudo chmod 666 /dev/tty.usbmodem575E0031751
|
||||
```
|
||||
|
||||
*Listing and Configuring Motors*
|
||||
|
||||
Next, you'll need to list the motors for each arm, including their name, index, and model. Initially, each motor is assigned the factory default index `1`. Since each motor requires a unique index to function correctly when connected in a chain on a common bus, you'll need to assign different indices. It's recommended to use an ascending index order, starting from `1` (e.g., `1, 2, 3, 4, 5, 6`). These indices will be saved in the persistent memory of each motor during the first connection.
|
||||
|
||||
To assign indices to the motors, run this code in an interactive Python session. Replace the `port` values with the ones you identified earlier:
|
||||
```python
|
||||
from lerobot.common.robot_devices.motors.configs import DynamixelMotorsBusConfig
|
||||
from lerobot.common.robot_devices.motors.dynamixel import DynamixelMotorsBus
|
||||
|
||||
leader_config = DynamixelMotorsBusConfig(
|
||||
port="/dev/tty.usbmodem575E0031751",
|
||||
motors={
|
||||
# name: (index, model)
|
||||
"shoulder_pan": (1, "xl330-m077"),
|
||||
"shoulder_lift": (2, "xl330-m077"),
|
||||
"elbow_flex": (3, "xl330-m077"),
|
||||
"wrist_flex": (4, "xl330-m077"),
|
||||
"wrist_roll": (5, "xl330-m077"),
|
||||
"gripper": (6, "xl330-m077"),
|
||||
},
|
||||
)
|
||||
|
||||
follower_config = DynamixelMotorsBusConfig(
|
||||
port="/dev/tty.usbmodem575E0032081",
|
||||
motors={
|
||||
# name: (index, model)
|
||||
"shoulder_pan": (1, "xl430-w250"),
|
||||
"shoulder_lift": (2, "xl430-w250"),
|
||||
"elbow_flex": (3, "xl330-m288"),
|
||||
"wrist_flex": (4, "xl330-m288"),
|
||||
"wrist_roll": (5, "xl330-m288"),
|
||||
"gripper": (6, "xl330-m288"),
|
||||
},
|
||||
)
|
||||
|
||||
leader_arm = DynamixelMotorsBus(leader_config)
|
||||
follower_arm = DynamixelMotorsBus(follower_config)
|
||||
```
|
||||
|
||||
IMPORTANTLY: Now that you have your ports, update [`KochRobotConfig`](../lerobot/common/robot_devices/robots/configs.py). You will find something like:
|
||||
```python
|
||||
@RobotConfig.register_subclass("koch")
|
||||
@dataclass
|
||||
class KochRobotConfig(ManipulatorRobotConfig):
|
||||
calibration_dir: str = ".cache/calibration/koch"
|
||||
# `max_relative_target` limits the magnitude of the relative positional target vector for safety purposes.
|
||||
# Set this to a positive scalar to have the same value for all motors, or a list that is the same length as
|
||||
# the number of motors in your follower arms.
|
||||
max_relative_target: int | None = None
|
||||
|
||||
leader_arms: dict[str, MotorsBusConfig] = field(
|
||||
default_factory=lambda: {
|
||||
"main": DynamixelMotorsBusConfig(
|
||||
port="/dev/tty.usbmodem585A0085511", <-- UPDATE HERE
|
||||
motors={
|
||||
# name: (index, model)
|
||||
"shoulder_pan": [1, "xl330-m077"],
|
||||
"shoulder_lift": [2, "xl330-m077"],
|
||||
"elbow_flex": [3, "xl330-m077"],
|
||||
"wrist_flex": [4, "xl330-m077"],
|
||||
"wrist_roll": [5, "xl330-m077"],
|
||||
"gripper": [6, "xl330-m077"],
|
||||
},
|
||||
),
|
||||
}
|
||||
)
|
||||
|
||||
follower_arms: dict[str, MotorsBusConfig] = field(
|
||||
default_factory=lambda: {
|
||||
"main": DynamixelMotorsBusConfig(
|
||||
port="/dev/tty.usbmodem585A0076891", <-- UPDATE HERE
|
||||
motors={
|
||||
# name: (index, model)
|
||||
"shoulder_pan": [1, "xl430-w250"],
|
||||
"shoulder_lift": [2, "xl430-w250"],
|
||||
"elbow_flex": [3, "xl330-m288"],
|
||||
"wrist_flex": [4, "xl330-m288"],
|
||||
"wrist_roll": [5, "xl330-m288"],
|
||||
"gripper": [6, "xl330-m288"],
|
||||
},
|
||||
),
|
||||
}
|
||||
)
|
||||
```
|
||||
|
||||
**Connect and Configure your Motors**
|
||||
|
||||
Before you can start using your motors, you'll need to configure them to ensure proper communication. When you first connect the motors, the [`DynamixelMotorsBus`](../lerobot/common/robot_devices/motors/dynamixel.py) automatically detects any mismatch between the current motor indices (factory set to `1`) and the specified indices (e.g., `1, 2, 3, 4, 5, 6`). This triggers a configuration procedure that requires you to unplug the power cord and motors, then reconnect each motor sequentially, starting from the one closest to the bus.
|
||||
|
||||
For a visual guide, refer to the [video tutorial of the configuration procedure](https://youtu.be/U78QQ9wCdpY).
|
||||
|
||||
To connect and configure the leader arm, run the following code in the same Python interactive session as earlier in the tutorial:
|
||||
```python
|
||||
leader_arm.connect()
|
||||
```
|
||||
|
||||
When you connect the leader arm for the first time, you might see an output similar to this:
|
||||
```
|
||||
Read failed due to communication error on port /dev/tty.usbmodem575E0032081 for group_key ID_shoulder_pan_shoulder_lift_elbow_flex_wrist_flex_wrist_roll_gripper: [TxRxResult] There is no status packet!
|
||||
|
||||
/!\ A configuration issue has been detected with your motors:
|
||||
If this is the first time you are using these motors, press enter to configure your motors... but before verify that all the cables are connected the proper way. If you find an issue, before making a modification, kill the python process, unplug the power cord to not damage the motors, rewire correctly, then plug the power again and relaunch the script.
|
||||
|
||||
Motor indices detected: {9600: [1]}
|
||||
|
||||
1. Unplug the power cord
|
||||
2. Plug/unplug minimal number of cables to only have the first 1 motor(s) (['shoulder_pan']) connected.
|
||||
3. Re-plug the power cord
|
||||
Press Enter to continue...
|
||||
|
||||
*Follow the procedure*
|
||||
|
||||
Setting expected motor indices: [1, 2, 3, 4, 5, 6]
|
||||
```
|
||||
|
||||
Once the leader arm is configured, repeat the process for the follower arm by running:
|
||||
```python
|
||||
follower_arm.connect()
|
||||
```
|
||||
|
||||
Congratulations! Both arms are now properly configured and connected. You won't need to go through the configuration procedure again in the future.
|
||||
|
||||
**Troubleshooting**:
|
||||
|
||||
If the configuration process fails, you may need to do the configuration process via the Dynamixel Wizard.
|
||||
|
||||
Known failure modes:
|
||||
- Calling `arm.connect()` raises `OSError: No motor found, but one new motor expected. Verify power cord is plugged in and retry` on Ubuntu 22.
|
||||
|
||||
Steps:
|
||||
1. Visit https://emanual.robotis.com/docs/en/software/dynamixel/dynamixel_wizard2/#connect-dynamixel.
|
||||
2. Follow the software installation instructions in section 3 of the web page.
|
||||
3. Launch the software.
|
||||
4. Configure the device scanning options in the menu under `Tools` > `Options` > `Scan`. Check only Protocol 2.0, select only the USB port identifier of interest, select all baudrates, set the ID range to `[0, 10]`. _While this step was not strictly necessary, it greatly speeds up scanning_.
|
||||
5. For each motor in turn:
|
||||
- Disconnect the power to the driver board.
|
||||
- Connect **only** the motor of interest to the driver board, making sure to disconnect it from any other motors.
|
||||
- Reconnect the power to the driver board.
|
||||
- From the software menu select `Device` > `Scan` and let the scan run. A device should appear.
|
||||
- If the device has an asterisk (*) near it, it means the firmware is indeed outdated. From the software menu, select `Tools` > `Firmware Update`. Follow the prompts.
|
||||
- The main panel should have table with various parameters of the device (refer to the web page, section 5). Select the row with `ID`, and then set the desired ID on the bottom right panel by selecting and clicking `Save`.
|
||||
- Just like you did with the ID, also set the `Baud Rate` to 1 Mbps.
|
||||
6. Check everything has been done right:
|
||||
- Rewire the arms in their final configuration and power both of them.
|
||||
- Scan for devices. All 12 motors should appear.
|
||||
- Select the motors one by one and move the arm. Check that the graphical indicator near the top right shows the movement.
|
||||
|
||||
** There is a common issue with the Dynamixel XL430-W250 motors where the motors become undiscoverable after upgrading their firmware from Mac and Windows Dynamixel Wizard2 applications. When this occurs, it is required to do a firmware recovery (Select `DYNAMIXEL Firmware Recovery` and follow the prompts). There are two known workarounds to conduct this firmware reset:
|
||||
1) Install the Dynamixel Wizard on a linux machine and complete the firmware recovery
|
||||
2) Use the Dynamixel U2D2 in order to perform the reset with Windows or Mac. This U2D2 can be purchased [here](https://www.robotis.us/u2d2/).
|
||||
For either solution, open DYNAMIXEL Wizard 2.0 and select the appropriate port. You will likely be unable to see the motor in the GUI at this time. Select `Firmware Recovery`, carefully choose the correct model, and wait for the process to complete. Finally, re-scan to confirm the firmware recovery was successful.
|
||||
|
||||
**Read and Write with DynamixelMotorsBus**
|
||||
|
||||
To get familiar with how `DynamixelMotorsBus` communicates with the motors, you can start by reading data from them. Copy past this code in the same interactive python session:
|
||||
```python
|
||||
leader_pos = leader_arm.read("Present_Position")
|
||||
follower_pos = follower_arm.read("Present_Position")
|
||||
print(leader_pos)
|
||||
print(follower_pos)
|
||||
```
|
||||
|
||||
Expected output might look like:
|
||||
```
|
||||
array([2054, 523, 3071, 1831, 3049, 2441], dtype=int32)
|
||||
array([2003, 1601, 56, 2152, 3101, 2283], dtype=int32)
|
||||
```
|
||||
|
||||
Try moving the arms to various positions and observe how the values change.
|
||||
|
||||
Now let's try to enable torque in the follower arm by copy pasting this code:
|
||||
```python
|
||||
from lerobot.common.robot_devices.motors.dynamixel import TorqueMode
|
||||
|
||||
follower_arm.write("Torque_Enable", TorqueMode.ENABLED.value)
|
||||
```
|
||||
|
||||
With torque enabled, the follower arm will be locked in its current position. Do not attempt to manually move the arm while torque is enabled, as this could damage the motors.
|
||||
|
||||
Now, to get more familiar with reading and writing, let's move the arm programmatically copy pasting the following example code:
|
||||
```python
|
||||
# Get the current position
|
||||
position = follower_arm.read("Present_Position")
|
||||
|
||||
# Update first motor (shoulder_pan) position by +10 steps
|
||||
position[0] += 10
|
||||
follower_arm.write("Goal_Position", position)
|
||||
|
||||
# Update all motors position by -30 steps
|
||||
position -= 30
|
||||
follower_arm.write("Goal_Position", position)
|
||||
|
||||
# Update gripper by +30 steps
|
||||
position[-1] += 30
|
||||
follower_arm.write("Goal_Position", position[-1], "gripper")
|
||||
```
|
||||
|
||||
When you're done playing, you can try to disable the torque, but make sure you hold your robot so that it doesn't fall:
|
||||
```python
|
||||
follower_arm.write("Torque_Enable", TorqueMode.DISABLED.value)
|
||||
```
|
||||
|
||||
Finally, disconnect the arms:
|
||||
```python
|
||||
leader_arm.disconnect()
|
||||
follower_arm.disconnect()
|
||||
```
|
||||
|
||||
Alternatively, you can unplug the power cord, which will automatically disable torque and disconnect the motors.
|
||||
|
||||
*/!\ Warning*: These motors tend to overheat, especially under torque or if left plugged in for too long. Unplug after use.
|
||||
|
||||
### b. Teleoperate your Koch v1.1 with ManipulatorRobot
|
||||
|
||||
**Instantiate the ManipulatorRobot**
|
||||
|
||||
Before you can teleoperate your robot, you need to instantiate the [`ManipulatorRobot`](../lerobot/common/robot_devices/robots/manipulator.py) using the previously defined `leader_config` and `follower_config`.
|
||||
|
||||
For the Koch v1.1 robot, we only have one leader, so we refer to it as `"main"` and define it as `leader_arms={"main": leader_config}`. We do the same for the follower arm. For other robots (like the Aloha), which may have two pairs of leader and follower arms, you would define them like this: `leader_arms={"left": left_leader_config, "right": right_leader_config},`. Same thing for the follower arms.
|
||||
|
||||
|
||||
Run the following code to instantiate your manipulator robot:
|
||||
```python
|
||||
from lerobot.common.robot_devices.robots.configs import KochRobotConfig
|
||||
from lerobot.common.robot_devices.robots.manipulator import ManipulatorRobot
|
||||
|
||||
robot_config = KochRobotConfig(
|
||||
leader_arms={"main": leader_config},
|
||||
follower_arms={"main": follower_config},
|
||||
cameras={}, # We don't use any camera for now
|
||||
)
|
||||
robot = ManipulatorRobot(robot_config)
|
||||
```
|
||||
|
||||
The `KochRobotConfig` is used to set the associated settings and calibration process. For instance, we activate the torque of the gripper of the leader Koch v1.1 arm and position it at a 40 degree angle to use it as a trigger.
|
||||
|
||||
For the [Aloha bimanual robot](https://aloha-2.github.io), we would use `AlohaRobotConfig` to set different settings such as a secondary ID for shadow joints (shoulder, elbow). Specific to Aloha, LeRobot comes with default calibration files stored in `.cache/calibration/aloha_default`. Assuming the motors have been properly assembled, no manual calibration step is expected for Aloha.
|
||||
|
||||
**Calibrate and Connect the ManipulatorRobot**
|
||||
|
||||
Next, you'll need to calibrate your Koch robot to ensure that the leader and follower arms have the same position values when they are in the same physical position. This calibration is essential because it allows a neural network trained on one Koch robot to work on another.
|
||||
|
||||
When you connect your robot for the first time, the [`ManipulatorRobot`](../lerobot/common/robot_devices/robots/manipulator.py) will detect if the calibration file is missing and trigger the calibration procedure. During this process, you will be guided to move each arm to three different positions.
|
||||
|
||||
Here are the positions you'll move the follower arm to:
|
||||
|
||||
| 1. Zero position | 2. Rotated position | 3. Rest position |
|
||||
| ----------------------------------------------------------------------------------------------------------------------------------------------------------------- | -------------------------------------------------------------------------------------------------------------------------------------------------------------------------- | ----------------------------------------------------------------------------------------------------------------------------------------------------------------- |
|
||||
| <img src="../media/koch/follower_zero.webp?raw=true" alt="Koch v1.1 follower arm zero position" title="Koch v1.1 follower arm zero position" style="width:100%;"> | <img src="../media/koch/follower_rotated.webp?raw=true" alt="Koch v1.1 follower arm rotated position" title="Koch v1.1 follower arm rotated position" style="width:100%;"> | <img src="../media/koch/follower_rest.webp?raw=true" alt="Koch v1.1 follower arm rest position" title="Koch v1.1 follower arm rest position" style="width:100%;"> |
|
||||
|
||||
And here are the corresponding positions for the leader arm:
|
||||
|
||||
| 1. Zero position | 2. Rotated position | 3. Rest position |
|
||||
| ----------------------------------------------------------------------------------------------------------------------------------------------------------- | -------------------------------------------------------------------------------------------------------------------------------------------------------------------- | ----------------------------------------------------------------------------------------------------------------------------------------------------------- |
|
||||
| <img src="../media/koch/leader_zero.webp?raw=true" alt="Koch v1.1 leader arm zero position" title="Koch v1.1 leader arm zero position" style="width:100%;"> | <img src="../media/koch/leader_rotated.webp?raw=true" alt="Koch v1.1 leader arm rotated position" title="Koch v1.1 leader arm rotated position" style="width:100%;"> | <img src="../media/koch/leader_rest.webp?raw=true" alt="Koch v1.1 leader arm rest position" title="Koch v1.1 leader arm rest position" style="width:100%;"> |
|
||||
|
||||
You can watch a [video tutorial of the calibration procedure](https://youtu.be/8drnU9uRY24) for more details.
|
||||
|
||||
During calibration, we count the number of full 360-degree rotations your motors have made since they were first used. That's why we ask you to move to this arbitrary "zero" position. We don't actually "set" the zero position, so you don't need to be accurate. After calculating these "offsets" to shift the motor values around 0, we need to assess the rotation direction of each motor, which might differ. That's why we ask you to rotate all motors to roughly 90 degrees, to measure if the values changed negatively or positively.
|
||||
|
||||
Finally, the rest position ensures that the follower and leader arms are roughly aligned after calibration, preventing sudden movements that could damage the motors when starting teleoperation.
|
||||
|
||||
Importantly, once calibrated, all Koch robots will move to the same positions (e.g. zero and rotated position) when commanded.
|
||||
|
||||
Run the following code to calibrate and connect your robot:
|
||||
```python
|
||||
robot.connect()
|
||||
```
|
||||
|
||||
The output will look like this:
|
||||
```
|
||||
Connecting main follower arm
|
||||
Connecting main leader arm
|
||||
|
||||
Missing calibration file '.cache/calibration/koch/main_follower.json'
|
||||
Running calibration of koch main follower...
|
||||
Move arm to zero position
|
||||
[...]
|
||||
Move arm to rotated position
|
||||
[...]
|
||||
Move arm to rest position
|
||||
[...]
|
||||
Calibration is done! Saving calibration file '.cache/calibration/koch/main_follower.json'
|
||||
|
||||
Missing calibration file '.cache/calibration/koch/main_leader.json'
|
||||
Running calibration of koch main leader...
|
||||
Move arm to zero position
|
||||
[...]
|
||||
Move arm to rotated position
|
||||
[...]
|
||||
Move arm to rest position
|
||||
[...]
|
||||
Calibration is done! Saving calibration file '.cache/calibration/koch/main_leader.json'
|
||||
```
|
||||
|
||||
*Verifying Calibration*
|
||||
|
||||
Once calibration is complete, you can check the positions of the leader and follower arms to ensure they match. If the calibration was successful, the positions should be very similar.
|
||||
|
||||
Run this code to get the positions in degrees:
|
||||
```python
|
||||
leader_pos = robot.leader_arms["main"].read("Present_Position")
|
||||
follower_pos = robot.follower_arms["main"].read("Present_Position")
|
||||
|
||||
print(leader_pos)
|
||||
print(follower_pos)
|
||||
```
|
||||
|
||||
Example output:
|
||||
```
|
||||
array([-0.43945312, 133.94531, 179.82422, -18.984375, -1.9335938, 34.541016], dtype=float32)
|
||||
array([-0.58723712, 131.72314, 174.98743, -16.872612, 0.786213, 35.271973], dtype=float32)
|
||||
```
|
||||
|
||||
These values are in degrees, which makes them easier to interpret and debug. The zero position used during calibration should roughly correspond to 0 degrees for each motor, and the rotated position should roughly correspond to 90 degrees for each motor.
|
||||
|
||||
**Teleoperate your Koch v1.1**
|
||||
|
||||
You can easily teleoperate your robot by reading the positions from the leader arm and sending them as goal positions to the follower arm.
|
||||
|
||||
To teleoperate your robot for 30 seconds at a frequency of approximately 200Hz, run the following code:
|
||||
```python
|
||||
import tqdm
|
||||
seconds = 30
|
||||
frequency = 200
|
||||
for _ in tqdm.tqdm(range(seconds*frequency)):
|
||||
leader_pos = robot.leader_arms["main"].read("Present_Position")
|
||||
robot.follower_arms["main"].write("Goal_Position", leader_pos)
|
||||
```
|
||||
|
||||
*Using `teleop_step` for Teleoperation*
|
||||
|
||||
Alternatively, you can teleoperate the robot using the `teleop_step` method from [`ManipulatorRobot`](../lerobot/common/robot_devices/robots/manipulator.py).
|
||||
|
||||
Run this code to teleoperate:
|
||||
```python
|
||||
for _ in tqdm.tqdm(range(seconds*frequency)):
|
||||
robot.teleop_step()
|
||||
```
|
||||
|
||||
*Recording data during Teleoperation*
|
||||
|
||||
Teleoperation is particularly useful for recording data. You can use the `teleop_step(record_data=True)` to returns both the follower arm's position as `"observation.state"` and the leader arm's position as `"action"`. This function also converts the numpy arrays into PyTorch tensors. If you're working with a robot that has two leader and two follower arms (like the Aloha), the positions are concatenated.
|
||||
|
||||
Run the following code to see how slowly moving the leader arm affects the observation and action:
|
||||
```python
|
||||
leader_pos = robot.leader_arms["main"].read("Present_Position")
|
||||
follower_pos = robot.follower_arms["main"].read("Present_Position")
|
||||
observation, action = robot.teleop_step(record_data=True)
|
||||
|
||||
print(follower_pos)
|
||||
print(observation)
|
||||
print(leader_pos)
|
||||
print(action)
|
||||
```
|
||||
|
||||
Expected output:
|
||||
```
|
||||
array([7.8223, 131.1328, 165.5859, -23.4668, -0.9668, 32.4316], dtype=float32)
|
||||
{'observation.state': tensor([7.8223, 131.1328, 165.5859, -23.4668, -0.9668, 32.4316])}
|
||||
array([3.4277, 134.1211, 179.8242, -18.5449, -1.5820, 34.7168], dtype=float32)
|
||||
{'action': tensor([3.4277, 134.1211, 179.8242, -18.5449, -1.5820, 34.7168])}
|
||||
```
|
||||
|
||||
*Asynchronous Frame Recording*
|
||||
|
||||
Additionally, `teleop_step` can asynchronously record frames from multiple cameras and include them in the observation dictionary as `"observation.images.CAMERA_NAME"`. This feature will be covered in more detail in the next section.
|
||||
|
||||
*Disconnecting the Robot*
|
||||
|
||||
When you're finished, make sure to disconnect your robot by running:
|
||||
```python
|
||||
robot.disconnect()
|
||||
```
|
||||
|
||||
Alternatively, you can unplug the power cord, which will also disable torque.
|
||||
|
||||
*/!\ Warning*: These motors tend to overheat, especially under torque or if left plugged in for too long. Unplug after use.
|
||||
|
||||
### c. Add your cameras with OpenCVCamera
|
||||
|
||||
**(Optional) Use your phone as camera on Linux**
|
||||
|
||||
If you want to use your phone as a camera on Linux, follow these steps to set up a virtual camera
|
||||
|
||||
1. *Install `v4l2loopback-dkms` and `v4l-utils`*. Those packages are required to create virtual camera devices (`v4l2loopback`) and verify their settings with the `v4l2-ctl` utility from `v4l-utils`. Install them using:
|
||||
```python
|
||||
sudo apt install v4l2loopback-dkms v4l-utils
|
||||
```
|
||||
2. *Install [DroidCam](https://droidcam.app) on your phone*. This app is available for both iOS and Android.
|
||||
3. *Install [OBS Studio](https://obsproject.com)*. This software will help you manage the camera feed. Install it using [Flatpak](https://flatpak.org):
|
||||
```python
|
||||
flatpak install flathub com.obsproject.Studio
|
||||
```
|
||||
4. *Install the DroidCam OBS plugin*. This plugin integrates DroidCam with OBS Studio. Install it with:
|
||||
```python
|
||||
flatpak install flathub com.obsproject.Studio.Plugin.DroidCam
|
||||
```
|
||||
5. *Start OBS Studio*. Launch with:
|
||||
```python
|
||||
flatpak run com.obsproject.Studio
|
||||
```
|
||||
6. *Add your phone as a source*. Follow the instructions [here](https://droidcam.app/obs/usage). Be sure to set the resolution to `640x480`.
|
||||
7. *Adjust resolution settings*. In OBS Studio, go to `File > Settings > Video`. Change the `Base(Canvas) Resolution` and the `Output(Scaled) Resolution` to `640x480` by manually typing it in.
|
||||
8. *Start virtual camera*. In OBS Studio, follow the instructions [here](https://obsproject.com/kb/virtual-camera-guide).
|
||||
9. *Verify the virtual camera setup*. Use `v4l2-ctl` to list the devices:
|
||||
```python
|
||||
v4l2-ctl --list-devices
|
||||
```
|
||||
You should see an entry like:
|
||||
```
|
||||
VirtualCam (platform:v4l2loopback-000):
|
||||
/dev/video1
|
||||
```
|
||||
10. *Check the camera resolution*. Use `v4l2-ctl` to ensure that the virtual camera output resolution is `640x480`. Change `/dev/video1` to the port of your virtual camera from the output of `v4l2-ctl --list-devices`.
|
||||
```python
|
||||
v4l2-ctl -d /dev/video1 --get-fmt-video
|
||||
```
|
||||
You should see an entry like:
|
||||
```
|
||||
>>> Format Video Capture:
|
||||
>>> Width/Height : 640/480
|
||||
>>> Pixel Format : 'YUYV' (YUYV 4:2:2)
|
||||
```
|
||||
|
||||
Troubleshooting: If the resolution is not correct you will have to delete the Virtual Camera port and try again as it cannot be changed.
|
||||
|
||||
If everything is set up correctly, you can proceed with the rest of the tutorial.
|
||||
|
||||
**(Optional) Use your iPhone as a camera on MacOS**
|
||||
|
||||
To use your iPhone as a camera on macOS, enable the Continuity Camera feature:
|
||||
- Ensure your Mac is running macOS 13 or later, and your iPhone is on iOS 16 or later.
|
||||
- Sign in both devices with the same Apple ID.
|
||||
- Connect your devices with a USB cable or turn on Wi-Fi and Bluetooth for a wireless connection.
|
||||
|
||||
For more details, visit [Apple support](https://support.apple.com/en-gb/guide/mac-help/mchl77879b8a/mac).
|
||||
|
||||
Your iPhone should be detected automatically when running the camera setup script in the next section.
|
||||
|
||||
**Instantiate an OpenCVCamera**
|
||||
|
||||
The [`OpenCVCamera`](../lerobot/common/robot_devices/cameras/opencv.py) class allows you to efficiently record frames from most cameras using the [`opencv2`](https://docs.opencv.org) library. For more details on compatibility, see [Video I/O with OpenCV Overview](https://docs.opencv.org/4.x/d0/da7/videoio_overview.html).
|
||||
|
||||
To instantiate an [`OpenCVCamera`](../lerobot/common/robot_devices/cameras/opencv.py), you need a camera index (e.g. `OpenCVCamera(camera_index=0)`). When you only have one camera like a webcam of a laptop, the camera index is usually `0` but it might differ, and the camera index might change if you reboot your computer or re-plug your camera. This behavior depends on your operating system.
|
||||
|
||||
To find the camera indices, run the following utility script, which will save a few frames from each detected camera:
|
||||
```bash
|
||||
python lerobot/common/robot_devices/cameras/opencv.py \
|
||||
--images-dir outputs/images_from_opencv_cameras
|
||||
```
|
||||
|
||||
The output will look something like this if you have two cameras connected:
|
||||
```
|
||||
Mac or Windows detected. Finding available camera indices through scanning all indices from 0 to 60
|
||||
[...]
|
||||
Camera found at index 0
|
||||
Camera found at index 1
|
||||
[...]
|
||||
Connecting cameras
|
||||
OpenCVCamera(0, fps=30.0, width=1920.0, height=1080.0, color_mode=rgb)
|
||||
OpenCVCamera(1, fps=24.0, width=1920.0, height=1080.0, color_mode=rgb)
|
||||
Saving images to outputs/images_from_opencv_cameras
|
||||
Frame: 0000 Latency (ms): 39.52
|
||||
[...]
|
||||
Frame: 0046 Latency (ms): 40.07
|
||||
Images have been saved to outputs/images_from_opencv_cameras
|
||||
```
|
||||
|
||||
Check the saved images in `outputs/images_from_opencv_cameras` to identify which camera index corresponds to which physical camera (e.g. `0` for `camera_00` or `1` for `camera_01`):
|
||||
```
|
||||
camera_00_frame_000000.png
|
||||
[...]
|
||||
camera_00_frame_000047.png
|
||||
camera_01_frame_000000.png
|
||||
[...]
|
||||
camera_01_frame_000047.png
|
||||
```
|
||||
|
||||
Note: Some cameras may take a few seconds to warm up, and the first frame might be black or green.
|
||||
|
||||
Finally, run this code to instantiate and connect your camera:
|
||||
```python
|
||||
from lerobot.common.robot_devices.cameras.configs import OpenCVCameraConfig
|
||||
from lerobot.common.robot_devices.cameras.opencv import OpenCVCamera
|
||||
|
||||
config = OpenCVCameraConfig(camera_index=0)
|
||||
camera = OpenCVCamera(config)
|
||||
camera.connect()
|
||||
color_image = camera.read()
|
||||
|
||||
print(color_image.shape)
|
||||
print(color_image.dtype)
|
||||
```
|
||||
|
||||
Expected output for a laptop camera on MacBookPro:
|
||||
```
|
||||
(1080, 1920, 3)
|
||||
uint8
|
||||
```
|
||||
|
||||
Or like this if you followed our tutorial to set a virtual camera:
|
||||
```
|
||||
(480, 640, 3)
|
||||
uint8
|
||||
```
|
||||
|
||||
With certain camera, you can also specify additional parameters like frame rate, resolution, and color mode during instantiation. For instance:
|
||||
```python
|
||||
config = OpenCVCameraConfig(camera_index=0, fps=30, width=640, height=480)
|
||||
```
|
||||
|
||||
If the provided arguments are not compatible with the camera, an exception will be raised.
|
||||
|
||||
*Disconnecting the camera*
|
||||
|
||||
When you're done using the camera, disconnect it by running:
|
||||
```python
|
||||
camera.disconnect()
|
||||
```
|
||||
|
||||
**Instantiate your robot with cameras**
|
||||
|
||||
Additionally, you can set up your robot to work with your cameras.
|
||||
|
||||
Modify the following Python code with the appropriate camera names and configurations:
|
||||
```python
|
||||
robot = ManipulatorRobot(
|
||||
KochRobotConfig(
|
||||
leader_arms={"main": leader_arm},
|
||||
follower_arms={"main": follower_arm},
|
||||
calibration_dir=".cache/calibration/koch",
|
||||
cameras={
|
||||
"laptop": OpenCVCameraConfig(0, fps=30, width=640, height=480),
|
||||
"phone": OpenCVCameraConfig(1, fps=30, width=640, height=480),
|
||||
},
|
||||
)
|
||||
)
|
||||
robot.connect()
|
||||
```
|
||||
|
||||
As a result, `teleop_step(record_data=True` will return a frame for each camera following the pytorch "channel first" convention but we keep images in `uint8` with pixels in range [0,255] to easily save them.
|
||||
|
||||
Modify this code with the names of your cameras and run it:
|
||||
```python
|
||||
observation, action = robot.teleop_step(record_data=True)
|
||||
print(observation["observation.images.laptop"].shape)
|
||||
print(observation["observation.images.phone"].shape)
|
||||
print(observation["observation.images.laptop"].min().item())
|
||||
print(observation["observation.images.laptop"].max().item())
|
||||
```
|
||||
|
||||
The output should look like this:
|
||||
```
|
||||
torch.Size([3, 480, 640])
|
||||
torch.Size([3, 480, 640])
|
||||
0
|
||||
255
|
||||
```
|
||||
|
||||
### d. Use `control_robot.py` and our `teleoperate` function
|
||||
|
||||
Instead of manually running the python code in a terminal window, you can use [`lerobot/scripts/control_robot.py`](../lerobot/scripts/control_robot.py) to instantiate your robot by providing the robot configurations via command line and control your robot with various modes as explained next.
|
||||
|
||||
Try running this code to teleoperate your robot (if you dont have a camera, keep reading):
|
||||
```bash
|
||||
python lerobot/scripts/control_robot.py \
|
||||
--robot.type=koch \
|
||||
--control.type=teleoperate
|
||||
```
|
||||
|
||||
You will see a lot of lines appearing like this one:
|
||||
```
|
||||
INFO 2024-08-10 11:15:03 ol_robot.py:209 dt: 5.12 (195.1hz) dtRlead: 4.93 (203.0hz) dtWfoll: 0.19 (5239.0hz)
|
||||
```
|
||||
|
||||
It contains
|
||||
- `2024-08-10 11:15:03` which is the date and time of the call to the print function.
|
||||
- `ol_robot.py:209` which is the end of the file name and the line number where the print function is called (`lerobot/scripts/control_robot.py` line `209`).
|
||||
- `dt: 5.12 (195.1hz)` which is the "delta time" or the number of milliseconds spent between the previous call to `robot.teleop_step()` and the current one, associated with the frequency (5.12 ms equals 195.1 Hz) ; note that you can control the maximum frequency by adding fps as argument such as `--fps 30`.
|
||||
- `dtRlead: 4.93 (203.0hz)` which is the number of milliseconds it took to read the position of the leader arm using `leader_arm.read("Present_Position")`.
|
||||
- `dtWfoll: 0.22 (4446.9hz)` which is the number of milliseconds it took to set a new goal position for the follower arm using `follower_arm.write("Goal_position", leader_pos)` ; note that writing is done asynchronously so it takes less time than reading.
|
||||
|
||||
Importantly: If you don't have any camera, you can remove them dynamically with this [draccus](https://github.com/dlwh/draccus) syntax `--robot.cameras='{}'`:
|
||||
```bash
|
||||
python lerobot/scripts/control_robot.py \
|
||||
--robot.type=koch \
|
||||
--robot.cameras='{}' \
|
||||
--control.type=teleoperate
|
||||
```
|
||||
|
||||
We advise to create a new yaml file when the command becomes too long.
|
||||
|
||||
## 3. Record your Dataset and Visualize it
|
||||
|
||||
Using what you've learned previously, you can now easily record a dataset of states and actions for one episode. You can use `busy_wait` to control the speed of teleoperation and record at a fixed `fps` (frame per seconds).
|
||||
|
||||
Try this code to record 30 seconds at 60 fps:
|
||||
```python
|
||||
import time
|
||||
from lerobot.scripts.control_robot import busy_wait
|
||||
|
||||
record_time_s = 30
|
||||
fps = 60
|
||||
|
||||
states = []
|
||||
actions = []
|
||||
for _ in range(record_time_s * fps):
|
||||
start_time = time.perf_counter()
|
||||
observation, action = robot.teleop_step(record_data=True)
|
||||
|
||||
states.append(observation["observation.state"])
|
||||
actions.append(action["action"])
|
||||
|
||||
dt_s = time.perf_counter() - start_time
|
||||
busy_wait(1 / fps - dt_s)
|
||||
|
||||
# Note that observation and action are available in RAM, but
|
||||
# you could potentially store them on disk with pickle/hdf5 or
|
||||
# our optimized format `LeRobotDataset`. More on this next.
|
||||
```
|
||||
|
||||
Importantly, many utilities are still missing. For instance, if you have cameras, you will need to save the images on disk to not go out of RAM, and to do so in threads to not slow down communication with your robot. Also, you will need to store your data in a format optimized for training and web sharing like [`LeRobotDataset`](../lerobot/common/datasets/lerobot_dataset.py). More on this in the next section.
|
||||
|
||||
### a. Use the `record` function
|
||||
|
||||
You can use the `record` function from [`lerobot/scripts/control_robot.py`](../lerobot/scripts/control_robot.py) to achieve efficient data recording. It encompasses many recording utilities:
|
||||
1. Frames from cameras are saved on disk in threads, and encoded into videos at the end of each episode recording.
|
||||
2. Video streams from cameras are displayed in window so that you can verify them.
|
||||
3. Data is stored with [`LeRobotDataset`](../lerobot/common/datasets/lerobot_dataset.py) format which is pushed to your Hugging Face page (unless `--control.push_to_hub=false` is provided).
|
||||
4. Checkpoints are done during recording, so if any issue occurs, you can resume recording by re-running the same command again with `--control.resume=true`. You will need to manually delete the dataset directory if you want to start recording from scratch.
|
||||
5. Set the flow of data recording using command line arguments:
|
||||
- `--control.warmup_time_s=10` defines the number of seconds before starting data collection. It allows the robot devices to warmup and synchronize (10 seconds by default).
|
||||
- `--control.episode_time_s=60` defines the number of seconds for data recording for each episode (60 seconds by default).
|
||||
- `--control.reset_time_s=60` defines the number of seconds for resetting the environment after each episode (60 seconds by default).
|
||||
- `--control.num_episodes=50` defines the number of episodes to record (50 by default).
|
||||
6. Control the flow during data recording using keyboard keys:
|
||||
- Press right arrow `->` at any time during episode recording to early stop and go to resetting. Same during resetting, to early stop and to go to the next episode recording.
|
||||
- Press left arrow `<-` at any time during episode recording or resetting to early stop, cancel the current episode, and re-record it.
|
||||
- Press escape `ESC` at any time during episode recording to end the session early and go straight to video encoding and dataset uploading.
|
||||
7. Similarly to `teleoperate`, you can also use the command line to override anything.
|
||||
|
||||
Before trying `record`, if you want to push your dataset to the hub, make sure you've logged in using a write-access token, which can be generated from the [Hugging Face settings](https://huggingface.co/settings/tokens):
|
||||
```bash
|
||||
huggingface-cli login --token ${HUGGINGFACE_TOKEN} --add-to-git-credential
|
||||
```
|
||||
Also, store your Hugging Face repository name in a variable (e.g. `cadene` or `lerobot`). For instance, run this to use your Hugging Face user name as repository:
|
||||
```bash
|
||||
HF_USER=$(huggingface-cli whoami | head -n 1)
|
||||
echo $HF_USER
|
||||
```
|
||||
If you don't want to push to hub, use `--control.push_to_hub=false`.
|
||||
|
||||
Now run this to record 2 episodes:
|
||||
```bash
|
||||
python lerobot/scripts/control_robot.py \
|
||||
--robot.type=koch \
|
||||
--control.type=record \
|
||||
--control.single_task="Grasp a lego block and put it in the bin." \
|
||||
--control.fps=30 \
|
||||
--control.repo_id=${HF_USER}/koch_test \
|
||||
--control.tags='["tutorial"]' \
|
||||
--control.warmup_time_s=5 \
|
||||
--control.episode_time_s=30 \
|
||||
--control.reset_time_s=30 \
|
||||
--control.num_episodes=2 \
|
||||
--control.push_to_hub=true
|
||||
```
|
||||
|
||||
|
||||
This will write your dataset locally to `~/.cache/huggingface/lerobot/{repo-id}` (e.g. `data/cadene/koch_test`) and push it on the hub at `https://huggingface.co/datasets/{HF_USER}/{repo-id}`. Your dataset will be automatically tagged with `LeRobot` for the community to find it easily, and you can also add custom tags (in this case `tutorial` for example).
|
||||
|
||||
You can look for other LeRobot datasets on the hub by searching for `LeRobot` tags: https://huggingface.co/datasets?other=LeRobot
|
||||
|
||||
You will see a lot of lines appearing like this one:
|
||||
```
|
||||
INFO 2024-08-10 15:02:58 ol_robot.py:219 dt:33.34 (30.0hz) dtRlead: 5.06 (197.5hz) dtWfoll: 0.25 (3963.7hz) dtRfoll: 6.22 (160.7hz) dtRlaptop: 32.57 (30.7hz) dtRphone: 33.84 (29.5hz)
|
||||
```
|
||||
It contains:
|
||||
- `2024-08-10 15:02:58` which is the date and time of the call to the print function,
|
||||
- `ol_robot.py:219` which is the end of the file name and the line number where the print function is called (`lerobot/scripts/control_robot.py` line `219`).
|
||||
- `dt:33.34 (30.0hz)` which is the "delta time" or the number of milliseconds spent between the previous call to `robot.teleop_step(record_data=True)` and the current one, associated with the frequency (33.34 ms equals 30.0 Hz) ; note that we use `--fps 30` so we expect 30.0 Hz ; when a step takes more time, the line appears in yellow.
|
||||
- `dtRlead: 5.06 (197.5hz)` which is the delta time of reading the present position of the leader arm.
|
||||
- `dtWfoll: 0.25 (3963.7hz)` which is the delta time of writing the goal position on the follower arm ; writing is asynchronous so it takes less time than reading.
|
||||
- `dtRfoll: 6.22 (160.7hz)` which is the delta time of reading the present position on the follower arm.
|
||||
- `dtRlaptop:32.57 (30.7hz) ` which is the delta time of capturing an image from the laptop camera in the thread running asynchronously.
|
||||
- `dtRphone:33.84 (29.5hz)` which is the delta time of capturing an image from the phone camera in the thread running asynchronously.
|
||||
|
||||
Troubleshooting:
|
||||
- On Linux, if the left and right arrow keys and escape key don't have any effect during data recording, make sure you've set the `$DISPLAY` environment variable. See [pynput limitations](https://pynput.readthedocs.io/en/latest/limitations.html#linux).
|
||||
|
||||
At the end of data recording, your dataset will be uploaded on your Hugging Face page (e.g. https://huggingface.co/datasets/cadene/koch_test) that you can obtain by running:
|
||||
```bash
|
||||
echo https://huggingface.co/datasets/${HF_USER}/koch_test
|
||||
```
|
||||
|
||||
### b. Advice for recording dataset
|
||||
|
||||
Once you're comfortable with data recording, it's time to create a larger dataset for training. A good starting task is grasping an object at different locations and placing it in a bin. We suggest recording at least 50 episodes, with 10 episodes per location. Keep the cameras fixed and maintain consistent grasping behavior throughout the recordings.
|
||||
|
||||
In the following sections, you’ll train your neural network. After achieving reliable grasping performance, you can start introducing more variations during data collection, such as additional grasp locations, different grasping techniques, and altering camera positions.
|
||||
|
||||
Avoid adding too much variation too quickly, as it may hinder your results.
|
||||
|
||||
In the coming months, we plan to release a foundational model for robotics. We anticipate that fine-tuning this model will enhance generalization, reducing the need for strict consistency during data collection.
|
||||
|
||||
### c. Visualize all episodes
|
||||
|
||||
You can visualize your dataset by running:
|
||||
```bash
|
||||
python lerobot/scripts/visualize_dataset_html.py \
|
||||
--repo-id ${HF_USER}/koch_test
|
||||
```
|
||||
|
||||
Note: You might need to add `--local-files-only 1` if your dataset was not uploaded to hugging face hub.
|
||||
|
||||
This will launch a local web server that looks like this:
|
||||
<div style="text-align:center;">
|
||||
<img src="../media/tutorial/visualize_dataset_html.webp?raw=true" alt="Koch v1.1 leader and follower arms" title="Koch v1.1 leader and follower arms" width="100%">
|
||||
</div>
|
||||
|
||||
### d. Replay episode on your robot with the `replay` function
|
||||
|
||||
A useful feature of [`lerobot/scripts/control_robot.py`](../lerobot/scripts/control_robot.py) is the `replay` function, which allows to replay on your robot any episode that you've recorded or episodes from any dataset out there. This function helps you test the repeatability of your robot's actions and assess transferability across robots of the same model.
|
||||
|
||||
To replay the first episode of the dataset you just recorded, run the following command:
|
||||
```bash
|
||||
python lerobot/scripts/control_robot.py \
|
||||
--robot.type=koch \
|
||||
--control.type=replay \
|
||||
--control.fps=30 \
|
||||
--control.repo_id=${HF_USER}/koch_test \
|
||||
--control.episode=0
|
||||
```
|
||||
|
||||
Your robot should replicate movements similar to those you recorded. For example, check out [this video](https://x.com/RemiCadene/status/1793654950905680090) where we use `replay` on a Aloha robot from [Trossen Robotics](https://www.trossenrobotics.com).
|
||||
|
||||
## 4. Train a policy on your data
|
||||
|
||||
### a. Use the `train` script
|
||||
|
||||
To train a policy to control your robot, use the [`python lerobot/scripts/train.py`](../lerobot/scripts/train.py) script. A few arguments are required. Here is an example command:
|
||||
```bash
|
||||
python lerobot/scripts/train.py \
|
||||
--dataset.repo_id=${HF_USER}/koch_test \
|
||||
--policy.type=act \
|
||||
--output_dir=outputs/train/act_koch_test \
|
||||
--job_name=act_koch_test \
|
||||
--policy.device=cuda \
|
||||
--wandb.enable=true
|
||||
```
|
||||
|
||||
Let's explain it:
|
||||
1. We provided the dataset as argument with `--dataset.repo_id=${HF_USER}/koch_test`.
|
||||
2. We provided the policy with `policy.type=act`. This loads configurations from [`configuration_act.py`](../lerobot/common/policies/act/configuration_act.py). Importantly, this policy will automatically adapt to the number of motor sates, motor actions and cameras of your robot (e.g. `laptop` and `phone`) which have been saved in your dataset.
|
||||
4. We provided `policy.device=cuda` since we are training on a Nvidia GPU, but you could use `policy.device=mps` to train on Apple silicon.
|
||||
5. We provided `wandb.enable=true` to use [Weights and Biases](https://docs.wandb.ai/quickstart) for visualizing training plots. This is optional but if you use it, make sure you are logged in by running `wandb login`.
|
||||
|
||||
For more information on the `train` script see the previous tutorial: [`examples/4_train_policy_with_script.md`](../examples/4_train_policy_with_script.md)
|
||||
|
||||
### b. (Optional) Upload policy checkpoints to the hub
|
||||
|
||||
Once training is done, upload the latest checkpoint with:
|
||||
```bash
|
||||
huggingface-cli upload ${HF_USER}/act_koch_test \
|
||||
outputs/train/act_koch_test/checkpoints/last/pretrained_model
|
||||
```
|
||||
|
||||
You can also upload intermediate checkpoints with:
|
||||
```bash
|
||||
CKPT=010000
|
||||
huggingface-cli upload ${HF_USER}/act_koch_test_${CKPT} \
|
||||
outputs/train/act_koch_test/checkpoints/${CKPT}/pretrained_model
|
||||
```
|
||||
|
||||
## 5. Evaluate your policy
|
||||
|
||||
Now that you have a policy checkpoint, you can easily control your robot with it using methods from [`ManipulatorRobot`](../lerobot/common/robot_devices/robots/manipulator.py) and the policy.
|
||||
|
||||
Try this code for running inference for 60 seconds at 30 fps:
|
||||
```python
|
||||
from lerobot.common.policies.act.modeling_act import ACTPolicy
|
||||
|
||||
inference_time_s = 60
|
||||
fps = 30
|
||||
device = "cuda" # TODO: On Mac, use "mps" or "cpu"
|
||||
|
||||
ckpt_path = "outputs/train/act_koch_test/checkpoints/last/pretrained_model"
|
||||
policy = ACTPolicy.from_pretrained(ckpt_path)
|
||||
policy.to(device)
|
||||
|
||||
for _ in range(inference_time_s * fps):
|
||||
start_time = time.perf_counter()
|
||||
|
||||
# Read the follower state and access the frames from the cameras
|
||||
observation = robot.capture_observation()
|
||||
|
||||
# Convert to pytorch format: channel first and float32 in [0,1]
|
||||
# with batch dimension
|
||||
for name in observation:
|
||||
if "image" in name:
|
||||
observation[name] = observation[name].type(torch.float32) / 255
|
||||
observation[name] = observation[name].permute(2, 0, 1).contiguous()
|
||||
observation[name] = observation[name].unsqueeze(0)
|
||||
observation[name] = observation[name].to(device)
|
||||
|
||||
# Compute the next action with the policy
|
||||
# based on the current observation
|
||||
action = policy.select_action(observation)
|
||||
# Remove batch dimension
|
||||
action = action.squeeze(0)
|
||||
# Move to cpu, if not already the case
|
||||
action = action.to("cpu")
|
||||
# Order the robot to move
|
||||
robot.send_action(action)
|
||||
|
||||
dt_s = time.perf_counter() - start_time
|
||||
busy_wait(1 / fps - dt_s)
|
||||
```
|
||||
|
||||
### a. Use our `record` function
|
||||
|
||||
Ideally, when controlling your robot with your neural network, you would want to record evaluation episodes and to be able to visualize them later on, or even train on them like in Reinforcement Learning. This pretty much corresponds to recording a new dataset but with a neural network providing the actions instead of teleoperation.
|
||||
|
||||
To this end, you can use the `record` function from [`lerobot/scripts/control_robot.py`](../lerobot/scripts/control_robot.py) but with a policy checkpoint as input. For instance, run this command to record 10 evaluation episodes:
|
||||
```bash
|
||||
python lerobot/scripts/control_robot.py \
|
||||
--robot.type=koch \
|
||||
--control.type=record \
|
||||
--control.fps=30 \
|
||||
--control.repo_id=${HF_USER}/eval_act_koch_test \
|
||||
--control.tags='["tutorial"]' \
|
||||
--control.warmup_time_s=5 \
|
||||
--control.episode_time_s=30 \
|
||||
--control.reset_time_s=30 \
|
||||
--control.num_episodes=10 \
|
||||
--control.push_to_hub=true \
|
||||
--control.policy.path=outputs/train/act_koch_test/checkpoints/last/pretrained_model
|
||||
```
|
||||
|
||||
As you can see, it's almost the same command as previously used to record your training dataset. Two things changed:
|
||||
1. There is an additional `--control.policy.path` argument which indicates the path to your policy checkpoint with (e.g. `outputs/train/eval_koch_test/checkpoints/last/pretrained_model`). You can also use the model repository if you uploaded a model checkpoint to the hub (e.g. `${HF_USER}/act_koch_test`).
|
||||
2. The name of dataset begins by `eval` to reflect that you are running inference (e.g. `${HF_USER}/eval_act_koch_test`).
|
||||
|
||||
### b. Visualize evaluation afterwards
|
||||
|
||||
You can then visualize your evaluation dataset by running the same command as before but with the new inference dataset as argument:
|
||||
```bash
|
||||
python lerobot/scripts/visualize_dataset.py \
|
||||
--repo-id ${HF_USER}/eval_act_koch_test
|
||||
```
|
||||
|
||||
## 6. Next step
|
||||
|
||||
Join our [Discord](https://discord.com/invite/s3KuuzsPFb) to collaborate on data collection and help us train a fully open-source foundational models for robotics!
|
||||
@@ -22,7 +22,7 @@ from pathlib import Path
|
||||
|
||||
from torchvision.transforms import ToPILImage, v2
|
||||
|
||||
from lerobot.common.datasets.lerobot_dataset import LeRobotDataset
|
||||
from lerobot.datasets.lerobot_dataset import LeRobotDataset
|
||||
|
||||
dataset_repo_id = "lerobot/aloha_static_screw_driver"
|
||||
|
||||
|
||||
@@ -26,8 +26,8 @@ import math
|
||||
|
||||
import torch
|
||||
|
||||
from lerobot.common.datasets.lerobot_dataset import LeRobotDataset, LeRobotDatasetMetadata
|
||||
from lerobot.common.policies.diffusion.modeling_diffusion import DiffusionPolicy
|
||||
from lerobot.datasets.lerobot_dataset import LeRobotDataset, LeRobotDatasetMetadata
|
||||
from lerobot.policies.diffusion.modeling_diffusion import DiffusionPolicy
|
||||
|
||||
|
||||
def main():
|
||||
|
||||
105
examples/backward_compatibility/replay.py
Normal file
@@ -0,0 +1,105 @@
|
||||
# Copyright 2024 The HuggingFace Inc. team. All rights reserved.
|
||||
#
|
||||
# Licensed under the Apache License, Version 2.0 (the "License");
|
||||
# you may not use this file except in compliance with the License.
|
||||
# You may obtain a copy of the License at
|
||||
#
|
||||
# http://www.apache.org/licenses/LICENSE-2.0
|
||||
#
|
||||
# Unless required by applicable law or agreed to in writing, software
|
||||
# distributed under the License is distributed on an "AS IS" BASIS,
|
||||
# WITHOUT WARRANTIES OR CONDITIONS OF ANY KIND, either express or implied.
|
||||
# See the License for the specific language governing permissions and
|
||||
# limitations under the License.
|
||||
|
||||
"""
|
||||
Replays the actions of an episode from a dataset on a robot.
|
||||
|
||||
Example:
|
||||
|
||||
```shell
|
||||
python -m lerobot.replay \
|
||||
--robot.type=so100_follower \
|
||||
--robot.port=/dev/tty.usbmodem58760431541 \
|
||||
--robot.id=black \
|
||||
--dataset.repo_id=aliberts/record-test \
|
||||
--dataset.episode=2
|
||||
```
|
||||
"""
|
||||
|
||||
import logging
|
||||
import time
|
||||
from dataclasses import asdict, dataclass
|
||||
from pathlib import Path
|
||||
from pprint import pformat
|
||||
|
||||
import draccus
|
||||
|
||||
from lerobot.datasets.lerobot_dataset import LeRobotDataset
|
||||
from lerobot.robots import ( # noqa: F401
|
||||
Robot,
|
||||
RobotConfig,
|
||||
koch_follower,
|
||||
make_robot_from_config,
|
||||
so100_follower,
|
||||
so101_follower,
|
||||
)
|
||||
from lerobot.utils.robot_utils import busy_wait
|
||||
from lerobot.utils.utils import (
|
||||
init_logging,
|
||||
log_say,
|
||||
)
|
||||
|
||||
|
||||
@dataclass
|
||||
class DatasetReplayConfig:
|
||||
# Dataset identifier. By convention it should match '{hf_username}/{dataset_name}' (e.g. `lerobot/test`).
|
||||
repo_id: str
|
||||
# Episode to replay.
|
||||
episode: int
|
||||
# Root directory where the dataset will be stored (e.g. 'dataset/path').
|
||||
root: str | Path | None = None
|
||||
# Limit the frames per second. By default, uses the policy fps.
|
||||
fps: int = 30
|
||||
|
||||
|
||||
@dataclass
|
||||
class ReplayConfig:
|
||||
robot: RobotConfig
|
||||
dataset: DatasetReplayConfig
|
||||
# Use vocal synthesis to read events.
|
||||
play_sounds: bool = True
|
||||
|
||||
|
||||
@draccus.wrap()
|
||||
def replay(cfg: ReplayConfig):
|
||||
init_logging()
|
||||
logging.info(pformat(asdict(cfg)))
|
||||
|
||||
robot = make_robot_from_config(cfg.robot)
|
||||
dataset = LeRobotDataset(cfg.dataset.repo_id, root=cfg.dataset.root, episodes=[cfg.dataset.episode])
|
||||
actions = dataset.hf_dataset.select_columns("action")
|
||||
robot.connect()
|
||||
|
||||
log_say("Replaying episode", cfg.play_sounds, blocking=True)
|
||||
for idx in range(dataset.num_frames):
|
||||
start_episode_t = time.perf_counter()
|
||||
|
||||
action_array = actions[idx]["action"]
|
||||
action = {}
|
||||
for i, name in enumerate(dataset.features["action"]["names"]):
|
||||
key = f"{name.removeprefix('main_')}.pos"
|
||||
action[key] = action_array[i].item()
|
||||
|
||||
action["shoulder_lift.pos"] = -(action["shoulder_lift.pos"] - 90)
|
||||
action["elbow_flex.pos"] -= 90
|
||||
robot.send_action(action)
|
||||
|
||||
dt_s = time.perf_counter() - start_episode_t
|
||||
busy_wait(1 / dataset.fps - dt_s)
|
||||
|
||||
robot.disconnect()
|
||||
|
||||
|
||||
if __name__ == "__main__":
|
||||
replay()
|
||||
90
examples/lekiwi/evaluate.py
Normal file
@@ -0,0 +1,90 @@
|
||||
from lerobot.datasets.lerobot_dataset import LeRobotDataset
|
||||
from lerobot.datasets.utils import hw_to_dataset_features
|
||||
from lerobot.policies.act.modeling_act import ACTPolicy
|
||||
from lerobot.record import record_loop
|
||||
from lerobot.robots.lekiwi import LeKiwiClient, LeKiwiClientConfig
|
||||
from lerobot.utils.control_utils import init_keyboard_listener
|
||||
from lerobot.utils.utils import log_say
|
||||
from lerobot.utils.visualization_utils import _init_rerun
|
||||
|
||||
NUM_EPISODES = 2
|
||||
FPS = 30
|
||||
EPISODE_TIME_SEC = 60
|
||||
TASK_DESCRIPTION = "My task description"
|
||||
|
||||
# Create the robot and teleoperator configurations
|
||||
robot_config = LeKiwiClientConfig(remote_ip="172.18.134.136", id="lekiwi")
|
||||
robot = LeKiwiClient(robot_config)
|
||||
|
||||
policy = ACTPolicy.from_pretrained("<hf_username>/<policy_repo_id>")
|
||||
|
||||
# Configure the dataset features
|
||||
action_features = hw_to_dataset_features(robot.action_features, "action")
|
||||
obs_features = hw_to_dataset_features(robot.observation_features, "observation")
|
||||
dataset_features = {**action_features, **obs_features}
|
||||
|
||||
# Create the dataset
|
||||
dataset = LeRobotDataset.create(
|
||||
repo_id="<hf_username>/<eval_dataset_repo_id>",
|
||||
fps=FPS,
|
||||
features=dataset_features,
|
||||
robot_type=robot.name,
|
||||
use_videos=True,
|
||||
image_writer_threads=4,
|
||||
)
|
||||
|
||||
# To connect you already should have this script running on LeKiwi: `python -m lerobot.robots.lekiwi.lekiwi_host --robot.id=my_awesome_kiwi`
|
||||
robot.connect()
|
||||
|
||||
_init_rerun(session_name="recording")
|
||||
|
||||
listener, events = init_keyboard_listener()
|
||||
|
||||
if not robot.is_connected:
|
||||
raise ValueError("Robot is not connected!")
|
||||
|
||||
recorded_episodes = 0
|
||||
while recorded_episodes < NUM_EPISODES and not events["stop_recording"]:
|
||||
log_say(f"Running inference, recording eval episode {recorded_episodes} of {NUM_EPISODES}")
|
||||
|
||||
# Run the policy inference loop
|
||||
record_loop(
|
||||
robot=robot,
|
||||
events=events,
|
||||
fps=FPS,
|
||||
policy=policy,
|
||||
dataset=dataset,
|
||||
control_time_s=EPISODE_TIME_SEC,
|
||||
single_task=TASK_DESCRIPTION,
|
||||
display_data=True,
|
||||
)
|
||||
|
||||
# Logic for reset env
|
||||
if not events["stop_recording"] and (
|
||||
(recorded_episodes < NUM_EPISODES - 1) or events["rerecord_episode"]
|
||||
):
|
||||
log_say("Reset the environment")
|
||||
record_loop(
|
||||
robot=robot,
|
||||
events=events,
|
||||
fps=FPS,
|
||||
control_time_s=EPISODE_TIME_SEC,
|
||||
single_task=TASK_DESCRIPTION,
|
||||
display_data=True,
|
||||
)
|
||||
|
||||
if events["rerecord_episode"]:
|
||||
log_say("Re-record episode")
|
||||
events["rerecord_episode"] = False
|
||||
events["exit_early"] = False
|
||||
dataset.clear_episode_buffer()
|
||||
continue
|
||||
|
||||
dataset.save_episode()
|
||||
recorded_episodes += 1
|
||||
|
||||
# Upload to hub and clean up
|
||||
dataset.push_to_hub()
|
||||
|
||||
robot.disconnect()
|
||||
listener.stop()
|
||||
101
examples/lekiwi/record.py
Normal file
@@ -0,0 +1,101 @@
|
||||
from lerobot.datasets.lerobot_dataset import LeRobotDataset
|
||||
from lerobot.datasets.utils import hw_to_dataset_features
|
||||
from lerobot.record import record_loop
|
||||
from lerobot.robots.lekiwi.config_lekiwi import LeKiwiClientConfig
|
||||
from lerobot.robots.lekiwi.lekiwi_client import LeKiwiClient
|
||||
from lerobot.teleoperators.keyboard import KeyboardTeleop, KeyboardTeleopConfig
|
||||
from lerobot.teleoperators.so100_leader import SO100Leader, SO100LeaderConfig
|
||||
from lerobot.utils.control_utils import init_keyboard_listener
|
||||
from lerobot.utils.utils import log_say
|
||||
from lerobot.utils.visualization_utils import _init_rerun
|
||||
|
||||
NUM_EPISODES = 3
|
||||
FPS = 30
|
||||
EPISODE_TIME_SEC = 30
|
||||
RESET_TIME_SEC = 10
|
||||
TASK_DESCRIPTION = "My task description"
|
||||
|
||||
# Create the robot and teleoperator configurations
|
||||
robot_config = LeKiwiClientConfig(remote_ip="172.18.134.136", id="lekiwi")
|
||||
leader_arm_config = SO100LeaderConfig(port="/dev/tty.usbmodem585A0077581", id="my_awesome_leader_arm")
|
||||
keyboard_config = KeyboardTeleopConfig()
|
||||
|
||||
robot = LeKiwiClient(robot_config)
|
||||
leader_arm = SO100Leader(leader_arm_config)
|
||||
keyboard = KeyboardTeleop(keyboard_config)
|
||||
|
||||
# Configure the dataset features
|
||||
action_features = hw_to_dataset_features(robot.action_features, "action")
|
||||
obs_features = hw_to_dataset_features(robot.observation_features, "observation")
|
||||
dataset_features = {**action_features, **obs_features}
|
||||
|
||||
# Create the dataset
|
||||
dataset = LeRobotDataset.create(
|
||||
repo_id="<hf_username>/<dataset_repo_id>",
|
||||
fps=FPS,
|
||||
features=dataset_features,
|
||||
robot_type=robot.name,
|
||||
use_videos=True,
|
||||
image_writer_threads=4,
|
||||
)
|
||||
|
||||
# To connect you already should have this script running on LeKiwi: `python -m lerobot.robots.lekiwi.lekiwi_host --robot.id=my_awesome_kiwi`
|
||||
robot.connect()
|
||||
leader_arm.connect()
|
||||
keyboard.connect()
|
||||
|
||||
_init_rerun(session_name="lekiwi_record")
|
||||
|
||||
listener, events = init_keyboard_listener()
|
||||
|
||||
if not robot.is_connected or not leader_arm.is_connected or not keyboard.is_connected:
|
||||
raise ValueError("Robot, leader arm of keyboard is not connected!")
|
||||
|
||||
recorded_episodes = 0
|
||||
while recorded_episodes < NUM_EPISODES and not events["stop_recording"]:
|
||||
log_say(f"Recording episode {recorded_episodes}")
|
||||
|
||||
# Run the record loop
|
||||
record_loop(
|
||||
robot=robot,
|
||||
events=events,
|
||||
fps=FPS,
|
||||
dataset=dataset,
|
||||
teleop=[leader_arm, keyboard],
|
||||
control_time_s=EPISODE_TIME_SEC,
|
||||
single_task=TASK_DESCRIPTION,
|
||||
display_data=True,
|
||||
)
|
||||
|
||||
# Logic for reset env
|
||||
if not events["stop_recording"] and (
|
||||
(recorded_episodes < NUM_EPISODES - 1) or events["rerecord_episode"]
|
||||
):
|
||||
log_say("Reset the environment")
|
||||
record_loop(
|
||||
robot=robot,
|
||||
events=events,
|
||||
fps=FPS,
|
||||
teleop=[leader_arm, keyboard],
|
||||
control_time_s=RESET_TIME_SEC,
|
||||
single_task=TASK_DESCRIPTION,
|
||||
display_data=True,
|
||||
)
|
||||
|
||||
if events["rerecord_episode"]:
|
||||
log_say("Re-record episode")
|
||||
events["rerecord_episode"] = False
|
||||
events["exit_early"] = False
|
||||
dataset.clear_episode_buffer()
|
||||
continue
|
||||
|
||||
dataset.save_episode()
|
||||
recorded_episodes += 1
|
||||
|
||||
# Upload to hub and clean up
|
||||
dataset.push_to_hub()
|
||||
|
||||
robot.disconnect()
|
||||
leader_arm.disconnect()
|
||||
keyboard.disconnect()
|
||||
listener.stop()
|
||||
33
examples/lekiwi/replay.py
Normal file
@@ -0,0 +1,33 @@
|
||||
import time
|
||||
|
||||
from lerobot.datasets.lerobot_dataset import LeRobotDataset
|
||||
from lerobot.robots.lekiwi.config_lekiwi import LeKiwiClientConfig
|
||||
from lerobot.robots.lekiwi.lekiwi_client import LeKiwiClient
|
||||
from lerobot.utils.robot_utils import busy_wait
|
||||
from lerobot.utils.utils import log_say
|
||||
|
||||
EPISODE_IDX = 0
|
||||
|
||||
robot_config = LeKiwiClientConfig(remote_ip="172.18.134.136", id="lekiwi")
|
||||
robot = LeKiwiClient(robot_config)
|
||||
|
||||
dataset = LeRobotDataset("<hf_username>/<dataset_repo_id>", episodes=[EPISODE_IDX])
|
||||
actions = dataset.hf_dataset.select_columns("action")
|
||||
|
||||
robot.connect()
|
||||
|
||||
if not robot.is_connected:
|
||||
raise ValueError("Robot is not connected!")
|
||||
|
||||
log_say(f"Replaying episode {EPISODE_IDX}")
|
||||
for idx in range(dataset.num_frames):
|
||||
t0 = time.perf_counter()
|
||||
|
||||
action = {
|
||||
name: float(actions[idx]["action"][i]) for i, name in enumerate(dataset.features["action"]["names"])
|
||||
}
|
||||
robot.send_action(action)
|
||||
|
||||
busy_wait(max(1.0 / dataset.fps - (time.perf_counter() - t0), 0.0))
|
||||
|
||||
robot.disconnect()
|
||||
47
examples/lekiwi/teleoperate.py
Normal file
@@ -0,0 +1,47 @@
|
||||
import time
|
||||
|
||||
from lerobot.robots.lekiwi import LeKiwiClient, LeKiwiClientConfig
|
||||
from lerobot.teleoperators.keyboard.teleop_keyboard import KeyboardTeleop, KeyboardTeleopConfig
|
||||
from lerobot.teleoperators.so100_leader import SO100Leader, SO100LeaderConfig
|
||||
from lerobot.utils.robot_utils import busy_wait
|
||||
from lerobot.utils.visualization_utils import _init_rerun, log_rerun_data
|
||||
|
||||
FPS = 30
|
||||
|
||||
# Create the robot and teleoperator configurations
|
||||
robot_config = LeKiwiClientConfig(remote_ip="172.18.134.136", id="my_lekiwi")
|
||||
teleop_arm_config = SO100LeaderConfig(port="/dev/tty.usbmodem585A0077581", id="my_awesome_leader_arm")
|
||||
keyboard_config = KeyboardTeleopConfig(id="my_laptop_keyboard")
|
||||
|
||||
robot = LeKiwiClient(robot_config)
|
||||
leader_arm = SO100Leader(teleop_arm_config)
|
||||
keyboard = KeyboardTeleop(keyboard_config)
|
||||
|
||||
# To connect you already should have this script running on LeKiwi: `python -m lerobot.robots.lekiwi.lekiwi_host --robot.id=my_awesome_kiwi`
|
||||
robot.connect()
|
||||
leader_arm.connect()
|
||||
keyboard.connect()
|
||||
|
||||
_init_rerun(session_name="lekiwi_teleop")
|
||||
|
||||
if not robot.is_connected or not leader_arm.is_connected or not keyboard.is_connected:
|
||||
raise ValueError("Robot, leader arm of keyboard is not connected!")
|
||||
|
||||
while True:
|
||||
t0 = time.perf_counter()
|
||||
|
||||
observation = robot.get_observation()
|
||||
|
||||
arm_action = leader_arm.get_action()
|
||||
arm_action = {f"arm_{k}": v for k, v in arm_action.items()}
|
||||
|
||||
keyboard_keys = keyboard.get_action()
|
||||
base_action = robot._from_keyboard_to_base_action(keyboard_keys)
|
||||
|
||||
log_rerun_data(observation, {**arm_action, **base_action})
|
||||
|
||||
action = {**arm_action, **base_action} if len(base_action) > 0 else arm_action
|
||||
|
||||
robot.send_action(action)
|
||||
|
||||
busy_wait(max(1.0 / FPS - (time.perf_counter() - t0), 0.0))
|
||||
@@ -1,98 +0,0 @@
|
||||
# Copyright 2024 The HuggingFace Inc. team. All rights reserved.
|
||||
#
|
||||
# Licensed under the Apache License, Version 2.0 (the "License");
|
||||
# you may not use this file except in compliance with the License.
|
||||
# You may obtain a copy of the License at
|
||||
#
|
||||
# http://www.apache.org/licenses/LICENSE-2.0
|
||||
#
|
||||
# Unless required by applicable law or agreed to in writing, software
|
||||
# distributed under the License is distributed on an "AS IS" BASIS,
|
||||
# WITHOUT WARRANTIES OR CONDITIONS OF ANY KIND, either express or implied.
|
||||
# See the License for the specific language governing permissions and
|
||||
# limitations under the License.
|
||||
|
||||
import logging
|
||||
import time
|
||||
|
||||
from lerobot.common.datasets.lerobot_dataset import LeRobotDataset
|
||||
from lerobot.common.robots.lekiwi.config_lekiwi import LeKiwiClientConfig
|
||||
from lerobot.common.robots.lekiwi.lekiwi_client import OBS_STATE, LeKiwiClient
|
||||
from lerobot.common.teleoperators.keyboard import KeyboardTeleop, KeyboardTeleopConfig
|
||||
from lerobot.common.teleoperators.so100 import SO100Leader, SO100LeaderConfig
|
||||
|
||||
NB_CYCLES_CLIENT_CONNECTION = 250
|
||||
|
||||
|
||||
def main():
|
||||
logging.info("Configuring Teleop Devices")
|
||||
leader_arm_config = SO100LeaderConfig(port="/dev/tty.usbmodem58760434171")
|
||||
leader_arm = SO100Leader(leader_arm_config)
|
||||
|
||||
keyboard_config = KeyboardTeleopConfig()
|
||||
keyboard = KeyboardTeleop(keyboard_config)
|
||||
|
||||
logging.info("Configuring LeKiwi Client")
|
||||
robot_config = LeKiwiClientConfig(remote_ip="192.0.2.42", id="lekiwi")
|
||||
robot = LeKiwiClient(robot_config)
|
||||
|
||||
logging.info("Creating LeRobot Dataset")
|
||||
|
||||
# The observations that we get are expected to be in body frame (x,y,theta)
|
||||
obs_dict = {f"{OBS_STATE}." + key: value for key, value in robot.state_feature.items()}
|
||||
# The actions that we send are expected to be in wheel frame (motor encoders)
|
||||
act_dict = {"action." + key: value for key, value in robot.action_feature.items()}
|
||||
|
||||
features_dict = {
|
||||
**act_dict,
|
||||
**obs_dict,
|
||||
**robot.camera_features,
|
||||
}
|
||||
dataset = LeRobotDataset.create(
|
||||
repo_id="user/lekiwi" + str(int(time.time())),
|
||||
fps=10,
|
||||
features=features_dict,
|
||||
)
|
||||
|
||||
logging.info("Connecting Teleop Devices")
|
||||
leader_arm.connect()
|
||||
keyboard.connect()
|
||||
|
||||
logging.info("Connecting remote LeKiwi")
|
||||
robot.connect()
|
||||
|
||||
if not robot.is_connected or not leader_arm.is_connected or not keyboard.is_connected:
|
||||
logging.error("Failed to connect to all devices")
|
||||
return
|
||||
|
||||
logging.info("Starting LeKiwi teleoperation")
|
||||
i = 0
|
||||
while i < NB_CYCLES_CLIENT_CONNECTION:
|
||||
arm_action = leader_arm.get_action()
|
||||
base_action = keyboard.get_action()
|
||||
action = {**arm_action, **base_action} if len(base_action) > 0 else arm_action
|
||||
|
||||
action_sent = robot.send_action(action)
|
||||
observation = robot.get_observation()
|
||||
|
||||
frame = {**action_sent, **observation}
|
||||
frame.update({"task": "Dummy Example Task Dataset"})
|
||||
|
||||
logging.info("Saved a frame into the dataset")
|
||||
dataset.add_frame(frame)
|
||||
i += 1
|
||||
|
||||
logging.info("Disconnecting Teleop Devices and LeKiwi Client")
|
||||
robot.disconnect()
|
||||
leader_arm.disconnect()
|
||||
keyboard.disconnect()
|
||||
|
||||
logging.info("Uploading dataset to the hub")
|
||||
dataset.save_episode()
|
||||
dataset.push_to_hub()
|
||||
|
||||
logging.info("Finished LeKiwi cleanly")
|
||||
|
||||
|
||||
if __name__ == "__main__":
|
||||
main()
|
||||
@@ -1,3 +0,0 @@
|
||||
from .camera import Camera
|
||||
from .configs import CameraConfig
|
||||
from .utils import make_cameras_from_configs
|
||||
@@ -1,50 +0,0 @@
|
||||
#!/usr/bin/env python
|
||||
|
||||
# Copyright 2024 The HuggingFace Inc. team. All rights reserved.
|
||||
#
|
||||
# Licensed under the Apache License, Version 2.0 (the "License");
|
||||
# you may not use this file except in compliance with the License.
|
||||
# You may obtain a copy of the License at
|
||||
#
|
||||
# http://www.apache.org/licenses/LICENSE-2.0
|
||||
#
|
||||
# Unless required by applicable law or agreed to in writing, software
|
||||
# distributed under the License is distributed on an "AS IS" BASIS,
|
||||
# WITHOUT WARRANTIES OR CONDITIONS OF ANY KIND, either express or implied.
|
||||
# See the License for the specific language governing permissions and
|
||||
# limitations under the License.
|
||||
|
||||
import abc
|
||||
|
||||
import numpy as np
|
||||
|
||||
from .configs import CameraConfig, ColorMode
|
||||
|
||||
|
||||
# NOTE(Steven): Consider something like configure() if makes sense for both cameras
|
||||
class Camera(abc.ABC):
|
||||
def __init__(self, config: CameraConfig):
|
||||
self.fps: int | None = config.fps
|
||||
self.width: int | None = config.width
|
||||
self.height: int | None = config.height
|
||||
|
||||
@property
|
||||
@abc.abstractmethod
|
||||
def is_connected(self) -> bool:
|
||||
pass
|
||||
|
||||
@abc.abstractmethod
|
||||
def connect(self, do_warmup_read: bool = True) -> None:
|
||||
pass
|
||||
|
||||
@abc.abstractmethod
|
||||
def read(self, color_mode: ColorMode | None = None) -> np.ndarray:
|
||||
pass
|
||||
|
||||
@abc.abstractmethod
|
||||
def async_read(self, timeout_ms: float = 2000) -> np.ndarray:
|
||||
pass
|
||||
|
||||
@abc.abstractmethod
|
||||
def disconnect(self) -> None:
|
||||
pass
|
||||
@@ -1,2 +0,0 @@
|
||||
from .camera_realsense import RealSenseCamera
|
||||
from .configuration_realsense import RealSenseCameraConfig
|
||||
@@ -1,2 +0,0 @@
|
||||
from .camera_opencv import OpenCVCamera
|
||||
from .configuration_opencv import OpenCVCameraConfig
|
||||
@@ -1,43 +0,0 @@
|
||||
from dataclasses import dataclass
|
||||
from pathlib import Path
|
||||
|
||||
from ..configs import CameraConfig, ColorMode, Cv2Rotation
|
||||
|
||||
|
||||
@CameraConfig.register_subclass("opencv")
|
||||
@dataclass
|
||||
class OpenCVCameraConfig(CameraConfig):
|
||||
"""
|
||||
Example of tested options for Intel Real Sense D405:
|
||||
#NOTE(Steven): update this doc
|
||||
```python
|
||||
OpenCVCameraConfig(0, 30, 640, 480)
|
||||
OpenCVCameraConfig(0, 60, 640, 480)
|
||||
OpenCVCameraConfig(0, 90, 640, 480)
|
||||
OpenCVCameraConfig(0, 30, 1280, 720)
|
||||
```
|
||||
"""
|
||||
|
||||
index_or_path: int | Path
|
||||
color_mode: ColorMode = ColorMode.RGB
|
||||
channels: int = 3 # NOTE(Steven): Why is this a config?
|
||||
rotation: Cv2Rotation = Cv2Rotation.NO_ROTATION
|
||||
|
||||
def __post_init__(self):
|
||||
if self.color_mode not in (ColorMode.RGB, ColorMode.BGR):
|
||||
raise ValueError(
|
||||
f"`color_mode` is expected to be {ColorMode.RGB.value} or {ColorMode.BGR.value}, but {self.color_mode} is provided."
|
||||
)
|
||||
|
||||
if self.rotation not in (
|
||||
Cv2Rotation.NO_ROTATION,
|
||||
Cv2Rotation.ROTATE_90,
|
||||
Cv2Rotation.ROTATE_180,
|
||||
Cv2Rotation.ROTATE_270,
|
||||
):
|
||||
raise ValueError(
|
||||
f"`rotation` is expected to be in {(Cv2Rotation.NO_ROTATION, Cv2Rotation.ROTATE_90, Cv2Rotation.ROTATE_180, Cv2Rotation.ROTATE_270)}, but {self.rotation} is provided."
|
||||
)
|
||||
|
||||
if self.channels != 3:
|
||||
raise NotImplementedError(f"Unsupported number of channels: {self.channels}")
|
||||
@@ -1,56 +0,0 @@
|
||||
# Copyright 2024 The HuggingFace Inc. team. All rights reserved.
|
||||
#
|
||||
# Licensed under the Apache License, Version 2.0 (the "License");
|
||||
# you may not use this file except in compliance with the License.
|
||||
# You may obtain a copy of the License at
|
||||
#
|
||||
# http://www.apache.org/licenses/LICENSE-2.0
|
||||
#
|
||||
# Unless required by applicable law or agreed to in writing, software
|
||||
# distributed under the License is distributed on an "AS IS" BASIS,
|
||||
# WITHOUT WARRANTIES OR CONDITIONS OF ANY KIND, either express or implied.
|
||||
# See the License for the specific language governing permissions and
|
||||
# limitations under the License.
|
||||
|
||||
from .configs import MotorsBusConfig
|
||||
from .motors_bus import MotorsBus
|
||||
|
||||
|
||||
def make_motors_buses_from_configs(motors_bus_configs: dict[str, MotorsBusConfig]) -> list[MotorsBus]:
|
||||
motors_buses = {}
|
||||
|
||||
for key, cfg in motors_bus_configs.items():
|
||||
if cfg.type == "dynamixel":
|
||||
from .dynamixel import DynamixelMotorsBus
|
||||
|
||||
motors_buses[key] = DynamixelMotorsBus(cfg)
|
||||
|
||||
elif cfg.type == "feetech":
|
||||
from lerobot.common.motors.feetech.feetech import FeetechMotorsBus
|
||||
|
||||
motors_buses[key] = FeetechMotorsBus(cfg)
|
||||
|
||||
else:
|
||||
raise ValueError(f"The motor type '{cfg.type}' is not valid.")
|
||||
|
||||
return motors_buses
|
||||
|
||||
|
||||
def make_motors_bus(motor_type: str, **kwargs) -> MotorsBus:
|
||||
if motor_type == "dynamixel":
|
||||
from .configs import DynamixelMotorsBusConfig
|
||||
from .dynamixel import DynamixelMotorsBus
|
||||
|
||||
config = DynamixelMotorsBusConfig(**kwargs)
|
||||
return DynamixelMotorsBus(config)
|
||||
|
||||
elif motor_type == "feetech":
|
||||
from feetech import FeetechMotorsBus
|
||||
|
||||
from .configs import FeetechMotorsBusConfig
|
||||
|
||||
config = FeetechMotorsBusConfig(**kwargs)
|
||||
return FeetechMotorsBus(config)
|
||||
|
||||
else:
|
||||
raise ValueError(f"The motor type '{motor_type}' is not valid.")
|
||||
@@ -1,118 +0,0 @@
|
||||
#!/usr/bin/env python
|
||||
|
||||
# Copyright 2024 The HuggingFace Inc. team. All rights reserved.
|
||||
#
|
||||
# Licensed under the Apache License, Version 2.0 (the "License");
|
||||
# you may not use this file except in compliance with the License.
|
||||
# You may obtain a copy of the License at
|
||||
#
|
||||
# http://www.apache.org/licenses/LICENSE-2.0
|
||||
#
|
||||
# Unless required by applicable law or agreed to in writing, software
|
||||
# distributed under the License is distributed on an "AS IS" BASIS,
|
||||
# WITHOUT WARRANTIES OR CONDITIONS OF ANY KIND, either express or implied.
|
||||
# See the License for the specific language governing permissions and
|
||||
# limitations under the License.
|
||||
import abc
|
||||
from dataclasses import asdict, dataclass
|
||||
from pathlib import Path
|
||||
|
||||
import draccus
|
||||
import torch
|
||||
from safetensors.torch import load_file, save_file
|
||||
|
||||
from lerobot.common.constants import (
|
||||
OPTIMIZER_PARAM_GROUPS,
|
||||
OPTIMIZER_STATE,
|
||||
)
|
||||
from lerobot.common.datasets.utils import flatten_dict, unflatten_dict, write_json
|
||||
from lerobot.common.utils.io_utils import deserialize_json_into_object
|
||||
|
||||
|
||||
@dataclass
|
||||
class OptimizerConfig(draccus.ChoiceRegistry, abc.ABC):
|
||||
lr: float
|
||||
weight_decay: float
|
||||
grad_clip_norm: float
|
||||
|
||||
@property
|
||||
def type(self) -> str:
|
||||
return self.get_choice_name(self.__class__)
|
||||
|
||||
@classmethod
|
||||
def default_choice_name(cls) -> str | None:
|
||||
return "adam"
|
||||
|
||||
@abc.abstractmethod
|
||||
def build(self) -> torch.optim.Optimizer:
|
||||
raise NotImplementedError
|
||||
|
||||
|
||||
@OptimizerConfig.register_subclass("adam")
|
||||
@dataclass
|
||||
class AdamConfig(OptimizerConfig):
|
||||
lr: float = 1e-3
|
||||
betas: tuple[float, float] = (0.9, 0.999)
|
||||
eps: float = 1e-8
|
||||
weight_decay: float = 0.0
|
||||
grad_clip_norm: float = 10.0
|
||||
|
||||
def build(self, params: dict) -> torch.optim.Optimizer:
|
||||
kwargs = asdict(self)
|
||||
kwargs.pop("grad_clip_norm")
|
||||
return torch.optim.Adam(params, **kwargs)
|
||||
|
||||
|
||||
@OptimizerConfig.register_subclass("adamw")
|
||||
@dataclass
|
||||
class AdamWConfig(OptimizerConfig):
|
||||
lr: float = 1e-3
|
||||
betas: tuple[float, float] = (0.9, 0.999)
|
||||
eps: float = 1e-8
|
||||
weight_decay: float = 1e-2
|
||||
grad_clip_norm: float = 10.0
|
||||
|
||||
def build(self, params: dict) -> torch.optim.Optimizer:
|
||||
kwargs = asdict(self)
|
||||
kwargs.pop("grad_clip_norm")
|
||||
return torch.optim.AdamW(params, **kwargs)
|
||||
|
||||
|
||||
@OptimizerConfig.register_subclass("sgd")
|
||||
@dataclass
|
||||
class SGDConfig(OptimizerConfig):
|
||||
lr: float = 1e-3
|
||||
momentum: float = 0.0
|
||||
dampening: float = 0.0
|
||||
nesterov: bool = False
|
||||
weight_decay: float = 0.0
|
||||
grad_clip_norm: float = 10.0
|
||||
|
||||
def build(self, params: dict) -> torch.optim.Optimizer:
|
||||
kwargs = asdict(self)
|
||||
kwargs.pop("grad_clip_norm")
|
||||
return torch.optim.SGD(params, **kwargs)
|
||||
|
||||
|
||||
def save_optimizer_state(optimizer: torch.optim.Optimizer, save_dir: Path) -> None:
|
||||
state = optimizer.state_dict()
|
||||
param_groups = state.pop("param_groups")
|
||||
flat_state = flatten_dict(state)
|
||||
save_file(flat_state, save_dir / OPTIMIZER_STATE)
|
||||
write_json(param_groups, save_dir / OPTIMIZER_PARAM_GROUPS)
|
||||
|
||||
|
||||
def load_optimizer_state(optimizer: torch.optim.Optimizer, save_dir: Path) -> torch.optim.Optimizer:
|
||||
current_state_dict = optimizer.state_dict()
|
||||
flat_state = load_file(save_dir / OPTIMIZER_STATE)
|
||||
state = unflatten_dict(flat_state)
|
||||
loaded_state_dict = {"state": {int(k): v for k, v in state["state"].items()}}
|
||||
|
||||
if "param_groups" in current_state_dict:
|
||||
param_groups = deserialize_json_into_object(
|
||||
save_dir / OPTIMIZER_PARAM_GROUPS, current_state_dict["param_groups"]
|
||||
)
|
||||
loaded_state_dict["param_groups"] = param_groups
|
||||
|
||||
optimizer.load_state_dict(loaded_state_dict)
|
||||
return optimizer
|
||||
@@ -1,28 +0,0 @@
|
||||
import abc
|
||||
from dataclasses import dataclass
|
||||
from pathlib import Path
|
||||
|
||||
import draccus
|
||||
|
||||
|
||||
@dataclass(kw_only=True)
|
||||
class RobotConfig(draccus.ChoiceRegistry, abc.ABC):
|
||||
# Allows to distinguish between different robots of the same type
|
||||
id: str | None = None
|
||||
# Directory to store calibration file
|
||||
calibration_dir: Path | None = None
|
||||
|
||||
def __post_init__(self):
|
||||
if hasattr(self, "cameras"):
|
||||
cameras = self.cameras
|
||||
if cameras:
|
||||
for cam_name, cam_config in cameras.items():
|
||||
for attr in ["width", "height", "fps"]:
|
||||
if getattr(cam_config, attr) is None:
|
||||
raise ValueError(
|
||||
f"Camera config for '{cam_name}' has None value for required attribute '{attr}'"
|
||||
)
|
||||
|
||||
@property
|
||||
def type(self) -> str:
|
||||
return self.get_choice_name(self.__class__)
|
||||
@@ -1,328 +0,0 @@
|
||||
# Using the [Koch v1.1](https://github.com/jess-moss/koch-v1-1) with LeRobot
|
||||
|
||||
## Table of Contents
|
||||
|
||||
- [A. Order and Assemble the parts](#a-order-and-assemble-the-parts)
|
||||
- [B. Install LeRobot](#b-install-lerobot)
|
||||
- [C. Configure the Motors](#c-configure-the-motors)
|
||||
- [D. Calibrate](#d-calibrate)
|
||||
- [E. Teleoperate](#e-teleoperate)
|
||||
- [F. Record a dataset](#f-record-a-dataset)
|
||||
- [G. Visualize a dataset](#g-visualize-a-dataset)
|
||||
- [H. Replay an episode](#h-replay-an-episode)
|
||||
- [I. Train a policy](#i-train-a-policy)
|
||||
- [J. Evaluate your policy](#j-evaluate-your-policy)
|
||||
- [K. More Information](#k-more-information)
|
||||
|
||||
## A. Order and Assemble the parts
|
||||
|
||||
Follow the sourcing and assembling instructions provided on the [Koch v1.1 Github page](https://github.com/jess-moss/koch-v1-1). This will guide you through setting up both the follower and leader arms, as shown in the image below.
|
||||
|
||||
<div style="text-align:center;">
|
||||
<img src="../media/tutorial/koch_v1_1_leader_follower.webp?raw=true" alt="Koch v1.1 leader and follower arms" title="Koch v1.1 leader and follower arms" width="50%">
|
||||
</div>
|
||||
|
||||
For a visual walkthrough of the assembly process, you can refer to [this video tutorial](https://youtu.be/8nQIg9BwwTk).
|
||||
|
||||
> [!IMPORTANT]
|
||||
> Since the production of this video, we simplified the configuration phase (detailed in [section C](#c-configure-the-motors)) of the motors.
|
||||
> Because of this, two things differ from the instructions in that video:
|
||||
> - Don't plug all the motors cables right away and wait for being instructed to do so in [section C](#c-configure-the-motors).
|
||||
> - Don't screw in the controller board (PCB) to the base right away and wait for being instructed to do so in [section C](#c-configure-the-motors).
|
||||
|
||||
|
||||
## B. Install LeRobot
|
||||
|
||||
> [!TIP]
|
||||
> We use the Command Prompt (cmd) quite a lot. If you are not comfortable using the cmd or want to brush up using the command line you can have a look here: [Command line crash course](https://developer.mozilla.org/en-US/docs/Learn_web_development/Getting_started/Environment_setup/Command_line)
|
||||
|
||||
Follow instructions on our [README](https://github.com/huggingface/lerobot) to install LeRobot.
|
||||
|
||||
In addition to these instructions, you need to install the dynamixel sdk:
|
||||
```bash
|
||||
pip install -e ".[dynamixel]"
|
||||
```
|
||||
|
||||
## C. Configure the motors
|
||||
|
||||
### 1. Find the USB ports associated to each arm
|
||||
|
||||
For each controller board (Waveshare Serial Bus Servo Driver Board, one for the leader arm and one for the follower), connect it first to your computer through usb. To then find the internal port its connected to -which we will need later on- run the utility script:
|
||||
```bash
|
||||
python -m lerobot.find_port
|
||||
```
|
||||
|
||||
> [!NOTE]
|
||||
> Note: On Linux, you might need to give access to the USB ports by running:
|
||||
> ```bash
|
||||
> sudo chmod 666 /dev/ttyACM0
|
||||
> sudo chmod 666 /dev/ttyACM1
|
||||
> ```
|
||||
|
||||
This will first display all currently available ports on your computer. As prompted by the script, unplug the controller board usb cable from your computer. The script will then detect which port has been disconnected and will display it.
|
||||
|
||||
|
||||
Example output when identifying the leader arm's port (e.g., `/dev/tty.usbmodem575E0031751` on Mac, or possibly `/dev/ttyACM0` on Linux):
|
||||
```
|
||||
Finding all available ports for the MotorBus.
|
||||
['/dev/tty.usbmodem575E0032081', '/dev/tty.usbmodem575E0031751']
|
||||
Remove the usb cable from your MotorsBus and press Enter when done.
|
||||
|
||||
[...Disconnect leader arm and press Enter...]
|
||||
|
||||
The port of this MotorsBus is /dev/tty.usbmodem575E0031751
|
||||
Reconnect the usb cable.
|
||||
```
|
||||
|
||||
You can now reconnect the usb cable to your computer.
|
||||
|
||||
### 2. Set the motors ids and baudrate
|
||||
|
||||
Each motor is identified by a unique id on the bus. When brand new, motors usually come with a default id of `1`. For the communication to work properly between the motors and the controller, we first need to set a unique, different id to each motor. Additionally, the speed at which data is transmitted on the bus is determined by the baudrate. In order to talk to each other, the controller and all the motors need to be configured with the same baudrate.
|
||||
|
||||
To that end, we first need to connect to each motor individually with the controller in order to set these. Since we will write these parameters in the non-volatile section of the motors' internal memory (EEPROM), we'll only need to do this once.
|
||||
|
||||
> [!NOTE]
|
||||
> Note: If you are repurposing motors from another robot, you will probably also need to perform this step as the ids and baudrate likely won't match.
|
||||
|
||||
Connect the usb cable from your computer and the 5V power supply to the leader arm's controller board. Then, run the following command with the port you got from the previous step. You'll also need to give your leader arm a name with the `id` parameter.
|
||||
|
||||
```bash
|
||||
python -m lerobot.setup_motors \
|
||||
--device.type=so100_leader \
|
||||
--device.port=/dev/tty.usbmodem575E0031751 # <- paste here the port found at previous step
|
||||
```
|
||||
|
||||
Note that the command above is equivalent to running the following script:
|
||||
<details>
|
||||
<summary>Setup script</summary>
|
||||
|
||||
```python
|
||||
from lerobot.common.teleoperators.koch import KochLeader, KochLeaderConfig
|
||||
|
||||
config = KochLeaderConfig(
|
||||
port="/dev/tty.usbmodem575E0031751",
|
||||
)
|
||||
leader = KochLeader(config)
|
||||
leader.setup_motors()
|
||||
```
|
||||
</details>
|
||||
|
||||
|
||||
You should see the following instruction
|
||||
```
|
||||
Connect the controller board to the 'gripper' motor only and press enter.
|
||||
```
|
||||
|
||||
As instructed, plug the gripper's motor. Make sure it's the only motor connected to the board, and that the motor itself is not yet daisy chained to any other motor. As you press `[Enter]`, the script will automatically set the id and baudrate for that motor.
|
||||
|
||||
|
||||
<details>
|
||||
<summary>Troubleshooting</summary>
|
||||
|
||||
If you get an error at that point, check your cables and make sure they are plugged-in properly:
|
||||
- Power supply
|
||||
- USB cable between from your computer to the controller board
|
||||
- The 3-pin cable from the controller board to the motor.
|
||||
|
||||
If you are using a Waveshare controller board, make sure that the two jumpers are set on the `B` channel (USB).
|
||||
</details>
|
||||
|
||||
You should then see the following message:
|
||||
```
|
||||
'gripper' motor id set to 6
|
||||
```
|
||||
|
||||
Followed by the next instruction:
|
||||
```
|
||||
Connect the controller board to the 'wrist_roll' motor only and press enter.
|
||||
```
|
||||
|
||||
You can disconnect the 3-pin cable from the controller board but you can leave it connected to the gripper motor on the other end as it will already be in the right place. Now, plug-in another 3-pin cable to the wrist roll motor and connect it to the controller board. As with the previous motor, make sure it is the only motor connected to the board and that the motor itself isn't connected to any other one.
|
||||
|
||||
Repeat the operation for each motor as instructed.
|
||||
|
||||
> [!TIP]
|
||||
> Check your cabling at each step before pressing Enter. For instance, the power supply cable is not solidly anchored to the board and might disconnect easily as you manipulate the board.
|
||||
|
||||
When you are done, the script will simply finish, at which point the motors are ready to be used. You can now plug the 3-pin cable from each motor to the next one, and the cable from the first motor (the 'shoulder pan' with id=1) to the controller board, which can now be attached to the base of the arm.
|
||||
|
||||
## D. Calibrate
|
||||
|
||||
Next, you'll need to calibrate your SO-100 robot to ensure that the leader and follower arms have the same position values when they are in the same physical position. This calibration is essential because it allows a neural network trained on one SO-100 robot to work on another.
|
||||
|
||||
#### a. Manual calibration of follower arm
|
||||
|
||||
> [!IMPORTANT]
|
||||
> Contrarily to step 6 of the [assembly video](https://youtu.be/FioA2oeFZ5I?t=724) which illustrates the auto calibration, we will actually do manual calibration of follower for now.
|
||||
|
||||
You will need to move the follower arm to these positions sequentially:
|
||||
|
||||
| 1. Zero position | 2. Rotated position | 3. Rest position |
|
||||
| ------------------------------------------------------------------------------------------------------------------------------------------------------------ | --------------------------------------------------------------------------------------------------------------------------------------------------------------------- | ------------------------------------------------------------------------------------------------------------------------------------------------------------ |
|
||||
| <img src="../media/so100/follower_zero.webp?raw=true" alt="SO-100 follower arm zero position" title="SO-100 follower arm zero position" style="width:100%;"> | <img src="../media/so100/follower_rotated.webp?raw=true" alt="SO-100 follower arm rotated position" title="SO-100 follower arm rotated position" style="width:100%;"> | <img src="../media/so100/follower_rest.webp?raw=true" alt="SO-100 follower arm rest position" title="SO-100 follower arm rest position" style="width:100%;"> |
|
||||
|
||||
Make sure both arms are connected and run this script to launch manual calibration:
|
||||
```bash
|
||||
python lerobot/scripts/control_robot.py \
|
||||
--robot.type=so100 \
|
||||
--robot.cameras='{}' \
|
||||
--control.type=calibrate \
|
||||
--control.arms='["main_follower"]'
|
||||
```
|
||||
|
||||
#### b. Manual calibration of leader arm
|
||||
Follow step 6 of the [assembly video](https://youtu.be/FioA2oeFZ5I?t=724) which illustrates the manual calibration. You will need to move the leader arm to these positions sequentially:
|
||||
|
||||
| 1. Zero position | 2. Rotated position | 3. Rest position |
|
||||
| ------------------------------------------------------------------------------------------------------------------------------------------------------ | --------------------------------------------------------------------------------------------------------------------------------------------------------------- | ------------------------------------------------------------------------------------------------------------------------------------------------------ |
|
||||
| <img src="../media/so100/leader_zero.webp?raw=true" alt="SO-100 leader arm zero position" title="SO-100 leader arm zero position" style="width:100%;"> | <img src="../media/so100/leader_rotated.webp?raw=true" alt="SO-100 leader arm rotated position" title="SO-100 leader arm rotated position" style="width:100%;"> | <img src="../media/so100/leader_rest.webp?raw=true" alt="SO-100 leader arm rest position" title="SO-100 leader arm rest position" style="width:100%;"> |
|
||||
|
||||
Run this script to launch manual calibration:
|
||||
```bash
|
||||
python lerobot/scripts/control_robot.py \
|
||||
--robot.type=so100 \
|
||||
--robot.cameras='{}' \
|
||||
--control.type=calibrate \
|
||||
--control.arms='["main_leader"]'
|
||||
```
|
||||
|
||||
## E. Teleoperate
|
||||
|
||||
**Simple teleop**
|
||||
Then you are ready to teleoperate your robot! Run this simple script (it won't connect and display the cameras):
|
||||
```bash
|
||||
python lerobot/scripts/control_robot.py \
|
||||
--robot.type=so100 \
|
||||
--robot.cameras='{}' \
|
||||
--control.type=teleoperate
|
||||
```
|
||||
|
||||
|
||||
#### a. Teleop with displaying cameras
|
||||
Follow [this guide to setup your cameras](https://github.com/huggingface/lerobot/blob/main/examples/7_get_started_with_real_robot.md#c-add-your-cameras-with-opencvcamera). Then you will be able to display the cameras on your computer while you are teleoperating by running the following code. This is useful to prepare your setup before recording your first dataset.
|
||||
|
||||
> **NOTE:** To visualize the data, enable `--control.display_data=true`. This streams the data using `rerun`.
|
||||
|
||||
```bash
|
||||
python lerobot/scripts/control_robot.py \
|
||||
--robot.type=so100 \
|
||||
--control.type=teleoperate
|
||||
```
|
||||
|
||||
## F. Record a dataset
|
||||
|
||||
Once you're familiar with teleoperation, you can record your first dataset with SO-100.
|
||||
|
||||
If you want to use the Hugging Face hub features for uploading your dataset and you haven't previously done it, make sure you've logged in using a write-access token, which can be generated from the [Hugging Face settings](https://huggingface.co/settings/tokens):
|
||||
```bash
|
||||
huggingface-cli login --token ${HUGGINGFACE_TOKEN} --add-to-git-credential
|
||||
```
|
||||
|
||||
Store your Hugging Face repository name in a variable to run these commands:
|
||||
```bash
|
||||
HF_USER=$(huggingface-cli whoami | head -n 1)
|
||||
echo $HF_USER
|
||||
```
|
||||
|
||||
Record 2 episodes and upload your dataset to the hub:
|
||||
```bash
|
||||
python lerobot/scripts/control_robot.py \
|
||||
--robot.type=so100 \
|
||||
--control.type=record \
|
||||
--control.fps=30 \
|
||||
--control.single_task="Grasp a lego block and put it in the bin." \
|
||||
--control.repo_id=${HF_USER}/so100_test \
|
||||
--control.tags='["so100","tutorial"]' \
|
||||
--control.warmup_time_s=5 \
|
||||
--control.episode_time_s=30 \
|
||||
--control.reset_time_s=30 \
|
||||
--control.num_episodes=2 \
|
||||
--control.push_to_hub=true
|
||||
```
|
||||
|
||||
Note: You can resume recording by adding `--control.resume=true`.
|
||||
|
||||
## G. Visualize a dataset
|
||||
|
||||
If you uploaded your dataset to the hub with `--control.push_to_hub=true`, you can [visualize your dataset online](https://huggingface.co/spaces/lerobot/visualize_dataset) by copy pasting your repo id given by:
|
||||
```bash
|
||||
echo ${HF_USER}/so100_test
|
||||
```
|
||||
|
||||
If you didn't upload with `--control.push_to_hub=false`, you can also visualize it locally with (a window can be opened in the browser `http://127.0.0.1:9090` with the visualization tool):
|
||||
```bash
|
||||
python lerobot/scripts/visualize_dataset_html.py \
|
||||
--repo-id ${HF_USER}/so100_test \
|
||||
--local-files-only 1
|
||||
```
|
||||
|
||||
## H. Replay an episode
|
||||
|
||||
Now try to replay the first episode on your robot:
|
||||
```bash
|
||||
python lerobot/scripts/control_robot.py \
|
||||
--robot.type=so100 \
|
||||
--control.type=replay \
|
||||
--control.fps=30 \
|
||||
--control.repo_id=${HF_USER}/so100_test \
|
||||
--control.episode=0
|
||||
```
|
||||
|
||||
## I. Train a policy
|
||||
|
||||
To train a policy to control your robot, use the [`python lerobot/scripts/train.py`](../lerobot/scripts/train.py) script. A few arguments are required. Here is an example command:
|
||||
```bash
|
||||
python lerobot/scripts/train.py \
|
||||
--dataset.repo_id=${HF_USER}/so100_test \
|
||||
--policy.type=act \
|
||||
--output_dir=outputs/train/act_so100_test \
|
||||
--job_name=act_so100_test \
|
||||
--policy.device=cuda \
|
||||
--wandb.enable=true
|
||||
```
|
||||
|
||||
Let's explain it:
|
||||
1. We provided the dataset as argument with `--dataset.repo_id=${HF_USER}/so100_test`.
|
||||
2. We provided the policy with `policy.type=act`. This loads configurations from [`configuration_act.py`](../lerobot/common/policies/act/configuration_act.py). Importantly, this policy will automatically adapt to the number of motor sates, motor actions and cameras of your robot (e.g. `laptop` and `phone`) which have been saved in your dataset.
|
||||
4. We provided `policy.device=cuda` since we are training on a Nvidia GPU, but you could use `policy.device=mps` to train on Apple silicon.
|
||||
5. We provided `wandb.enable=true` to use [Weights and Biases](https://docs.wandb.ai/quickstart) for visualizing training plots. This is optional but if you use it, make sure you are logged in by running `wandb login`.
|
||||
|
||||
Training should take several hours. You will find checkpoints in `outputs/train/act_so100_test/checkpoints`.
|
||||
|
||||
To resume training from a checkpoint, below is an example command to resume from `last` checkpoint of the `act_so100_test` policy:
|
||||
```bash
|
||||
python lerobot/scripts/train.py \
|
||||
--config_path=outputs/train/act_so100_test/checkpoints/last/pretrained_model/train_config.json \
|
||||
--resume=true
|
||||
```
|
||||
|
||||
## J. Evaluate your policy
|
||||
|
||||
You can use the `record` function from [`lerobot/scripts/control_robot.py`](../lerobot/scripts/control_robot.py) but with a policy checkpoint as input. For instance, run this command to record 10 evaluation episodes:
|
||||
```bash
|
||||
python lerobot/scripts/control_robot.py \
|
||||
--robot.type=so100 \
|
||||
--control.type=record \
|
||||
--control.fps=30 \
|
||||
--control.single_task="Grasp a lego block and put it in the bin." \
|
||||
--control.repo_id=${HF_USER}/eval_act_so100_test \
|
||||
--control.tags='["tutorial"]' \
|
||||
--control.warmup_time_s=5 \
|
||||
--control.episode_time_s=30 \
|
||||
--control.reset_time_s=30 \
|
||||
--control.num_episodes=10 \
|
||||
--control.push_to_hub=true \
|
||||
--control.policy.path=outputs/train/act_so100_test/checkpoints/last/pretrained_model
|
||||
```
|
||||
|
||||
As you can see, it's almost the same command as previously used to record your training dataset. Two things changed:
|
||||
1. There is an additional `--control.policy.path` argument which indicates the path to your policy checkpoint with (e.g. `outputs/train/eval_act_so100_test/checkpoints/last/pretrained_model`). You can also use the model repository if you uploaded a model checkpoint to the hub (e.g. `${HF_USER}/act_so100_test`).
|
||||
2. The name of dataset begins by `eval` to reflect that you are running inference (e.g. `${HF_USER}/eval_act_so100_test`).
|
||||
|
||||
## K. More Information
|
||||
|
||||
Follow this [previous tutorial](https://github.com/huggingface/lerobot/blob/main/examples/7_get_started_with_real_robot.md#4-train-a-policy-on-your-data) for a more in-depth tutorial on controlling real robots with LeRobot.
|
||||
|
||||
> [!TIP]
|
||||
> If you have any questions or need help, please reach out on [Discord](https://discord.com/invite/s3KuuzsPFb) in the channel [`#so100-arm`](https://discord.com/channels/1216765309076115607/1237741463832363039).
|
||||
@@ -1,22 +0,0 @@
|
||||
from dataclasses import dataclass, field
|
||||
|
||||
from lerobot.common.cameras import CameraConfig
|
||||
|
||||
from ..config import RobotConfig
|
||||
|
||||
|
||||
@RobotConfig.register_subclass("koch_follower")
|
||||
@dataclass
|
||||
class KochFollowerConfig(RobotConfig):
|
||||
# Port to connect to the arm
|
||||
port: str
|
||||
|
||||
disable_torque_on_disconnect: bool = True
|
||||
|
||||
# `max_relative_target` limits the magnitude of the relative positional target vector for safety purposes.
|
||||
# Set this to a positive scalar to have the same value for all motors, or a list that is the same length as
|
||||
# the number of motors in your follower arms.
|
||||
max_relative_target: int | None = None
|
||||
|
||||
# cameras
|
||||
cameras: dict[str, CameraConfig] = field(default_factory=dict)
|
||||
@@ -1,597 +0,0 @@
|
||||
# Using the [LeKiwi](https://github.com/SIGRobotics-UIUC/LeKiwi) Robot with LeRobot
|
||||
|
||||
## Table of Contents
|
||||
|
||||
- [A. Source the parts](#a-source-the-parts)
|
||||
- [B. Install software Pi](#b-install-software-on-pi)
|
||||
- [C. Setup LeRobot laptop/pc](#c-install-lerobot-on-laptop)
|
||||
- [D. Assemble the arms](#d-assembly)
|
||||
- [E. Calibrate](#e-calibration)
|
||||
- [F. Teleoperate](#f-teleoperate)
|
||||
- [G. Record a dataset](#g-record-a-dataset)
|
||||
- [H. Visualize a dataset](#h-visualize-a-dataset)
|
||||
- [I. Replay an episode](#i-replay-an-episode)
|
||||
- [J. Train a policy](#j-train-a-policy)
|
||||
- [K. Evaluate your policy](#k-evaluate-your-policy)
|
||||
|
||||
> [!TIP]
|
||||
> If you have any questions or need help, please reach out on [Discord](https://discord.com/invite/s3KuuzsPFb) in the channel [`#mobile-so-100-arm`](https://discord.com/channels/1216765309076115607/1318390825528332371).
|
||||
|
||||
## A. Source the parts
|
||||
|
||||
Follow this [README](https://github.com/SIGRobotics-UIUC/LeKiwi). It contains the bill of materials, with a link to source the parts, as well as the instructions to 3D print the parts, and advice if it's your first time printing or if you don't own a 3D printer.
|
||||
|
||||
Before assembling, you will first need to configure your motors. To this end, we provide a nice script, so let's first install LeRobot. After configuration, we will also guide you through assembly.
|
||||
|
||||
### Wired version
|
||||
If you have the **wired** LeKiwi version you can skip the installation of the Raspberry Pi and setting up SSH. You can also run all commands directly on your PC for both the LeKiwi scripts and the leader arm scripts for teleoperating.
|
||||
|
||||
## B. Install software on Pi
|
||||
Now we have to setup the remote PC that will run on the LeKiwi Robot. This is normally a Raspberry Pi, but can be any PC that can run on 5V and has enough usb ports (2 or more) for the cameras and motor control board.
|
||||
|
||||
### Install OS
|
||||
For setting up the Raspberry Pi and its SD-card see: [Setup PI](https://www.raspberrypi.com/documentation/computers/getting-started.html). Here is explained how to download the [Imager](https://www.raspberrypi.com/software/) to install Raspberry Pi OS or Ubuntu.
|
||||
|
||||
### Setup SSH
|
||||
After setting up your Pi, you should enable and setup [SSH](https://www.raspberrypi.com/news/coding-on-raspberry-pi-remotely-with-visual-studio-code/) (Secure Shell Protocol) so you can login into the Pi from your laptop without requiring a screen, keyboard and mouse in the Pi. A great tutorial on how to do this can be found [here](https://www.raspberrypi.com/documentation/computers/remote-access.html#ssh). Logging into your Pi can be done in your Command Prompt (cmd) or if you use VSCode you can use [this](https://marketplace.visualstudio.com/items?itemName=ms-vscode-remote.remote-ssh) extension.
|
||||
|
||||
### Install LeRobot
|
||||
|
||||
On your Raspberry Pi:
|
||||
|
||||
#### 1. [Install Miniconda](https://docs.anaconda.com/miniconda/install/#quick-command-line-install):
|
||||
|
||||
#### 2. Restart shell
|
||||
Copy paste in your shell: `source ~/.bashrc` or for Mac: `source ~/.bash_profile` or `source ~/.zshrc` if you're using zshell
|
||||
|
||||
#### 3. Create and activate a fresh conda environment for lerobot
|
||||
|
||||
<details>
|
||||
<summary><strong>Video install instructions</strong></summary>
|
||||
|
||||
<video src="https://github.com/user-attachments/assets/17172d3b-3b64-4b80-9cf1-b2b7c5cbd236"></video>
|
||||
|
||||
</details>
|
||||
|
||||
```bash
|
||||
conda create -y -n lerobot python=3.10
|
||||
```
|
||||
|
||||
Then activate your conda environment (do this each time you open a shell to use lerobot!):
|
||||
```bash
|
||||
conda activate lerobot
|
||||
```
|
||||
|
||||
#### 4. Clone LeRobot:
|
||||
```bash
|
||||
git clone https://github.com/huggingface/lerobot.git ~/lerobot
|
||||
```
|
||||
|
||||
#### 5. Install ffmpeg in your environment:
|
||||
When using `miniconda`, install `ffmpeg` in your environment:
|
||||
```bash
|
||||
conda install ffmpeg -c conda-forge
|
||||
```
|
||||
|
||||
#### 6. Install LeRobot with dependencies for the feetech motors:
|
||||
```bash
|
||||
cd ~/lerobot && pip install -e ".[feetech]"
|
||||
```
|
||||
|
||||
## C. Install LeRobot on laptop
|
||||
If you already have install LeRobot on your laptop you can skip this step, otherwise please follow along as we do the same steps we did on the Pi.
|
||||
|
||||
> [!TIP]
|
||||
> We use the Command Prompt (cmd) quite a lot. If you are not comfortable using the cmd or want to brush up using the command line you can have a look here: [Command line crash course](https://developer.mozilla.org/en-US/docs/Learn_web_development/Getting_started/Environment_setup/Command_line)
|
||||
|
||||
On your computer:
|
||||
|
||||
#### 1. [Install Miniconda](https://docs.anaconda.com/miniconda/install/#quick-command-line-install):
|
||||
|
||||
#### 2. Restart shell
|
||||
Copy paste in your shell: `source ~/.bashrc` or for Mac: `source ~/.bash_profile` or `source ~/.zshrc` if you're using zshell
|
||||
|
||||
#### 3. Create and activate a fresh conda environment for lerobot
|
||||
|
||||
<details>
|
||||
<summary><strong>Video install instructions</strong></summary>
|
||||
|
||||
<video src="https://github.com/user-attachments/assets/17172d3b-3b64-4b80-9cf1-b2b7c5cbd236"></video>
|
||||
|
||||
</details>
|
||||
|
||||
```bash
|
||||
conda create -y -n lerobot python=3.10
|
||||
```
|
||||
|
||||
Then activate your conda environment (do this each time you open a shell to use lerobot!):
|
||||
```bash
|
||||
conda activate lerobot
|
||||
```
|
||||
|
||||
#### 4. Clone LeRobot:
|
||||
```bash
|
||||
git clone https://github.com/huggingface/lerobot.git ~/lerobot
|
||||
```
|
||||
|
||||
#### 5. Install ffmpeg in your environment:
|
||||
When using `miniconda`, install `ffmpeg` in your environment:
|
||||
```bash
|
||||
conda install ffmpeg -c conda-forge
|
||||
```
|
||||
|
||||
#### 6. Install LeRobot with dependencies for the feetech motors:
|
||||
```bash
|
||||
cd ~/lerobot && pip install -e ".[feetech]"
|
||||
```
|
||||
|
||||
Great :hugs:! You are now done installing LeRobot and we can begin assembling the SO100 arms and Mobile base :robot:.
|
||||
Every time you now want to use LeRobot you can go to the `~/lerobot` folder where we installed LeRobot and run one of the commands.
|
||||
|
||||
# D. Assembly
|
||||
|
||||
First we will assemble the two SO100 arms. One to attach to the mobile base and one for teleoperation. Then we will assemble the mobile base.
|
||||
|
||||
## SO100 Arms
|
||||
### Configure motors
|
||||
The instructions for configuring the motors can be found [Here](https://github.com/huggingface/lerobot/blob/main/examples/10_use_so100.md#c-configure-the-motors) in step C of the SO100 tutorial. Besides the ID's for the arm motors we also need to set the motor ID's for the mobile base. These need to be in a specific order to work. Below an image of the motor ID's and motor mounting positions for the mobile base. Note that we only use one Motor Control board on LeKiwi. This means the motor ID's for the wheels are 7, 8 and 9.
|
||||
|
||||
<img src="../media/lekiwi/motor_ids.webp?raw=true" alt="Motor ID's for mobile robot" title="Motor ID's for mobile robot" width="60%">
|
||||
|
||||
### Assemble arms
|
||||
[Assemble arms instruction](https://github.com/huggingface/lerobot/blob/main/examples/10_use_so100.md#d-assemble-the-arms)
|
||||
|
||||
## Mobile base (LeKiwi)
|
||||
[Assemble LeKiwi](https://github.com/SIGRobotics-UIUC/LeKiwi)
|
||||
|
||||
### Update config
|
||||
Both config files on the LeKiwi LeRobot and on the laptop should be the same. First we should find the Ip address of the Raspberry Pi of the mobile manipulator. This is the same Ip address used in SSH. We also need the usb port of the control board of the leader arm on the laptop and the port of the control board on LeKiwi. We can find these ports with the following script.
|
||||
|
||||
#### a. Run the script to find port
|
||||
|
||||
<details>
|
||||
<summary><strong>Video finding port</strong></summary>
|
||||
<video src="https://github.com/user-attachments/assets/4a21a14d-2046-4805-93c4-ee97a30ba33f"></video>
|
||||
<video src="https://github.com/user-attachments/assets/1cc3aecf-c16d-4ff9-aec7-8c175afbbce2"></video>
|
||||
</details>
|
||||
|
||||
To find the port for each bus servo adapter, run the utility script:
|
||||
```bash
|
||||
python lerobot/scripts/find_motors_bus_port.py
|
||||
```
|
||||
|
||||
#### b. Example outputs
|
||||
|
||||
Example output when identifying the leader arm's port (e.g., `/dev/tty.usbmodem575E0031751` on Mac, or possibly `/dev/ttyACM0` on Linux):
|
||||
```
|
||||
Finding all available ports for the MotorBus.
|
||||
['/dev/tty.usbmodem575E0032081', '/dev/tty.usbmodem575E0031751']
|
||||
Remove the usb cable from your DynamixelMotorsBus and press Enter when done.
|
||||
|
||||
[...Disconnect leader arm and press Enter...]
|
||||
|
||||
The port of this DynamixelMotorsBus is /dev/tty.usbmodem575E0031751
|
||||
Reconnect the usb cable.
|
||||
```
|
||||
Example output when identifying the follower arm's port (e.g., `/dev/tty.usbmodem575E0032081`, or possibly `/dev/ttyACM1` on Linux):
|
||||
```
|
||||
Finding all available ports for the MotorBus.
|
||||
['/dev/tty.usbmodem575E0032081', '/dev/tty.usbmodem575E0031751']
|
||||
Remove the usb cable from your DynamixelMotorsBus and press Enter when done.
|
||||
|
||||
[...Disconnect follower arm and press Enter...]
|
||||
|
||||
The port of this DynamixelMotorsBus is /dev/tty.usbmodem575E0032081
|
||||
Reconnect the usb cable.
|
||||
```
|
||||
|
||||
#### c. Troubleshooting
|
||||
On Linux, you might need to give access to the USB ports by running:
|
||||
```bash
|
||||
sudo chmod 666 /dev/ttyACM0
|
||||
sudo chmod 666 /dev/ttyACM1
|
||||
```
|
||||
|
||||
#### d. Update config file
|
||||
|
||||
IMPORTANTLY: Now that you have your ports of leader and follower arm and ip address of the mobile-so100, update the **ip** in Network configuration, **port** in leader_arms and **port** in lekiwi. In the [`LeKiwiConfig`](../lerobot/common/robot_devices/robots/configs.py) file. Where you will find something like:
|
||||
```python
|
||||
@RobotConfig.register_subclass("lekiwi")
|
||||
@dataclass
|
||||
class LeKiwiConfig(RobotConfig):
|
||||
# `max_relative_target` limits the magnitude of the relative positional target vector for safety purposes.
|
||||
# Set this to a positive scalar to have the same value for all motors, or a list that is the same length as
|
||||
# the number of motors in your follower arms.
|
||||
max_relative_target: int | None = None
|
||||
|
||||
# Network Configuration
|
||||
ip: str = "172.17.133.91"
|
||||
port: int = 5555
|
||||
video_port: int = 5556
|
||||
|
||||
cameras: dict[str, CameraConfig] = field(
|
||||
default_factory=lambda: {
|
||||
"mobile": OpenCVCameraConfig(camera_index="/dev/video0", fps=30, width=640, height=480),
|
||||
"mobile2": OpenCVCameraConfig(camera_index="/dev/video2", fps=30, width=640, height=480),
|
||||
}
|
||||
)
|
||||
|
||||
calibration_dir: str = ".cache/calibration/lekiwi"
|
||||
|
||||
leader_arms: dict[str, MotorsBusConfig] = field(
|
||||
default_factory=lambda: {
|
||||
"main": FeetechMotorsBusConfig(
|
||||
port="/dev/tty.usbmodem585A0077581",
|
||||
motors={
|
||||
# name: (index, model)
|
||||
"shoulder_pan": [1, "sts3215"],
|
||||
"shoulder_lift": [2, "sts3215"],
|
||||
"elbow_flex": [3, "sts3215"],
|
||||
"wrist_flex": [4, "sts3215"],
|
||||
"wrist_roll": [5, "sts3215"],
|
||||
"gripper": [6, "sts3215"],
|
||||
},
|
||||
),
|
||||
}
|
||||
)
|
||||
|
||||
follower_arms: dict[str, MotorsBusConfig] = field(
|
||||
default_factory=lambda: {
|
||||
"main": FeetechMotorsBusConfig(
|
||||
port="/dev/ttyACM0",
|
||||
motors={
|
||||
# name: (index, model)
|
||||
"shoulder_pan": [1, "sts3215"],
|
||||
"shoulder_lift": [2, "sts3215"],
|
||||
"elbow_flex": [3, "sts3215"],
|
||||
"wrist_flex": [4, "sts3215"],
|
||||
"wrist_roll": [5, "sts3215"],
|
||||
"gripper": [6, "sts3215"],
|
||||
"left_wheel": (7, "sts3215"),
|
||||
"back_wheel": (8, "sts3215"),
|
||||
"right_wheel": (9, "sts3215"),
|
||||
},
|
||||
),
|
||||
}
|
||||
)
|
||||
|
||||
teleop_keys: dict[str, str] = field(
|
||||
default_factory=lambda: {
|
||||
# Movement
|
||||
"forward": "w",
|
||||
"backward": "s",
|
||||
"left": "a",
|
||||
"right": "d",
|
||||
"rotate_left": "z",
|
||||
"rotate_right": "x",
|
||||
# Speed control
|
||||
"speed_up": "r",
|
||||
"speed_down": "f",
|
||||
# quit teleop
|
||||
"quit": "q",
|
||||
}
|
||||
)
|
||||
|
||||
mock: bool = False
|
||||
```
|
||||
|
||||
## Wired version
|
||||
|
||||
For the wired LeKiwi version your configured IP address should refer to your own laptop (127.0.0.1), because leader arm and LeKiwi are in this case connected to own laptop. Below and example configuration for this wired setup:
|
||||
```python
|
||||
@RobotConfig.register_subclass("lekiwi")
|
||||
@dataclass
|
||||
class LeKiwiConfig(RobotConfig):
|
||||
# `max_relative_target` limits the magnitude of the relative positional target vector for safety purposes.
|
||||
# Set this to a positive scalar to have the same value for all motors, or a list that is the same length as
|
||||
# the number of motors in your follower arms.
|
||||
max_relative_target: int | None = None
|
||||
|
||||
# Network Configuration
|
||||
ip: str = "127.0.0.1"
|
||||
port: int = 5555
|
||||
video_port: int = 5556
|
||||
|
||||
cameras: dict[str, CameraConfig] = field(
|
||||
default_factory=lambda: {
|
||||
"front": OpenCVCameraConfig(
|
||||
camera_index=0, fps=30, width=640, height=480, rotation=90
|
||||
),
|
||||
"wrist": OpenCVCameraConfig(
|
||||
camera_index=1, fps=30, width=640, height=480, rotation=180
|
||||
),
|
||||
}
|
||||
)
|
||||
|
||||
calibration_dir: str = ".cache/calibration/lekiwi"
|
||||
|
||||
leader_arms: dict[str, MotorsBusConfig] = field(
|
||||
default_factory=lambda: {
|
||||
"main": FeetechMotorsBusConfig(
|
||||
port="/dev/tty.usbmodem585A0077581",
|
||||
motors={
|
||||
# name: (index, model)
|
||||
"shoulder_pan": [1, "sts3215"],
|
||||
"shoulder_lift": [2, "sts3215"],
|
||||
"elbow_flex": [3, "sts3215"],
|
||||
"wrist_flex": [4, "sts3215"],
|
||||
"wrist_roll": [5, "sts3215"],
|
||||
"gripper": [6, "sts3215"],
|
||||
},
|
||||
),
|
||||
}
|
||||
)
|
||||
|
||||
follower_arms: dict[str, MotorsBusConfig] = field(
|
||||
default_factory=lambda: {
|
||||
"main": FeetechMotorsBusConfig(
|
||||
port="/dev/tty.usbmodem58760431061",
|
||||
motors={
|
||||
# name: (index, model)
|
||||
"shoulder_pan": [1, "sts3215"],
|
||||
"shoulder_lift": [2, "sts3215"],
|
||||
"elbow_flex": [3, "sts3215"],
|
||||
"wrist_flex": [4, "sts3215"],
|
||||
"wrist_roll": [5, "sts3215"],
|
||||
"gripper": [6, "sts3215"],
|
||||
"left_wheel": (7, "sts3215"),
|
||||
"back_wheel": (8, "sts3215"),
|
||||
"right_wheel": (9, "sts3215"),
|
||||
},
|
||||
),
|
||||
}
|
||||
)
|
||||
|
||||
teleop_keys: dict[str, str] = field(
|
||||
default_factory=lambda: {
|
||||
# Movement
|
||||
"forward": "w",
|
||||
"backward": "s",
|
||||
"left": "a",
|
||||
"right": "d",
|
||||
"rotate_left": "z",
|
||||
"rotate_right": "x",
|
||||
# Speed control
|
||||
"speed_up": "r",
|
||||
"speed_down": "f",
|
||||
# quit teleop
|
||||
"quit": "q",
|
||||
}
|
||||
)
|
||||
|
||||
mock: bool = False
|
||||
```
|
||||
|
||||
# E. Calibration
|
||||
Now we have to calibrate the leader arm and the follower arm. The wheel motors don't have to be calibrated.
|
||||
|
||||
|
||||
### Calibrate follower arm (on mobile base)
|
||||
> [!IMPORTANT]
|
||||
> Contrarily to step 6 of the [assembly video](https://youtu.be/FioA2oeFZ5I?t=724) which illustrates the auto calibration, we will actually do manual calibration of follower for now.
|
||||
|
||||
You will need to move the follower arm to these positions sequentially:
|
||||
|
||||
| 1. Zero position | 2. Rotated position | 3. Rest position |
|
||||
| ----------------------------------------------------------------------------------------------------------------------------------------------------------------- | -------------------------------------------------------------------------------------------------------------------------------------------------------------------------- | ----------------------------------------------------------------------------------------------------------------------------------------------------------------- |
|
||||
| <img src="../media/lekiwi/mobile_calib_zero.webp?raw=true" alt="SO-100 follower arm zero position" title="SO-100 follower arm zero position" style="width:100%;"> | <img src="../media/lekiwi/mobile_calib_rotated.webp?raw=true" alt="SO-100 follower arm rotated position" title="SO-100 follower arm rotated position" style="width:100%;"> | <img src="../media/lekiwi/mobile_calib_rest.webp?raw=true" alt="SO-100 follower arm rest position" title="SO-100 follower arm rest position" style="width:100%;"> |
|
||||
|
||||
Make sure the arm is connected to the Raspberry Pi and run this script (on the Raspberry Pi) to launch manual calibration:
|
||||
```bash
|
||||
python lerobot/scripts/control_robot.py \
|
||||
--robot.type=lekiwi \
|
||||
--robot.cameras='{}' \
|
||||
--control.type=calibrate \
|
||||
--control.arms='["main_follower"]'
|
||||
```
|
||||
|
||||
### Wired version
|
||||
If you have the **wired** LeKiwi version please run all commands including this calibration command on your laptop.
|
||||
|
||||
### Calibrate leader arm
|
||||
Then to calibrate the leader arm (which is attached to the laptop/pc). You will need to move the leader arm to these positions sequentially:
|
||||
|
||||
| 1. Zero position | 2. Rotated position | 3. Rest position |
|
||||
| ------------------------------------------------------------------------------------------------------------------------------------------------------ | --------------------------------------------------------------------------------------------------------------------------------------------------------------- | ------------------------------------------------------------------------------------------------------------------------------------------------------ |
|
||||
| <img src="../media/so100/leader_zero.webp?raw=true" alt="SO-100 leader arm zero position" title="SO-100 leader arm zero position" style="width:100%;"> | <img src="../media/so100/leader_rotated.webp?raw=true" alt="SO-100 leader arm rotated position" title="SO-100 leader arm rotated position" style="width:100%;"> | <img src="../media/so100/leader_rest.webp?raw=true" alt="SO-100 leader arm rest position" title="SO-100 leader arm rest position" style="width:100%;"> |
|
||||
|
||||
Run this script (on your laptop/pc) to launch manual calibration:
|
||||
```bash
|
||||
python lerobot/scripts/control_robot.py \
|
||||
--robot.type=lekiwi \
|
||||
--robot.cameras='{}' \
|
||||
--control.type=calibrate \
|
||||
--control.arms='["main_leader"]'
|
||||
```
|
||||
|
||||
# F. Teleoperate
|
||||
|
||||
> [!TIP]
|
||||
> If you're using a Mac, you might need to give Terminal permission to access your keyboard. Go to System Preferences > Security & Privacy > Input Monitoring and check the box for Terminal.
|
||||
|
||||
To teleoperate SSH into your Raspberry Pi, and run `conda activate lerobot` and this script:
|
||||
```bash
|
||||
python lerobot/scripts/control_robot.py \
|
||||
--robot.type=lekiwi \
|
||||
--control.type=remote_robot
|
||||
```
|
||||
|
||||
Then on your laptop, also run `conda activate lerobot` and this script:
|
||||
```bash
|
||||
python lerobot/scripts/control_robot.py \
|
||||
--robot.type=lekiwi \
|
||||
--control.type=teleoperate \
|
||||
--control.fps=30
|
||||
```
|
||||
|
||||
> **NOTE:** To visualize the data, enable `--control.display_data=true`. This streams the data using `rerun`. For the `--control.type=remote_robot` you will also need to set `--control.viewer_ip` and `--control.viewer_port`
|
||||
|
||||
You should see on your laptop something like this: ```[INFO] Connected to remote robot at tcp://172.17.133.91:5555 and video stream at tcp://172.17.133.91:5556.``` Now you can move the leader arm and use the keyboard (w,a,s,d) to drive forward, left, backwards, right. And use (z,x) to turn left or turn right. You can use (r,f) to increase and decrease the speed of the mobile robot. There are three speed modes, see the table below:
|
||||
| Speed Mode | Linear Speed (m/s) | Rotation Speed (deg/s) |
|
||||
| ---------- | ------------------ | ---------------------- |
|
||||
| Fast | 0.4 | 90 |
|
||||
| Medium | 0.25 | 60 |
|
||||
| Slow | 0.1 | 30 |
|
||||
|
||||
|
||||
| Key | Action |
|
||||
| --- | -------------- |
|
||||
| W | Move forward |
|
||||
| A | Move left |
|
||||
| S | Move backward |
|
||||
| D | Move right |
|
||||
| Z | Turn left |
|
||||
| X | Turn right |
|
||||
| R | Increase speed |
|
||||
| F | Decrease speed |
|
||||
|
||||
> [!TIP]
|
||||
> If you use a different keyboard you can change the keys for each command in the [`LeKiwiConfig`](../lerobot/common/robot_devices/robots/configs.py).
|
||||
|
||||
### Wired version
|
||||
If you have the **wired** LeKiwi version please run all commands including both these teleoperation commands on your laptop.
|
||||
|
||||
## Troubleshoot communication
|
||||
|
||||
If you are having trouble connecting to the Mobile SO100, follow these steps to diagnose and resolve the issue.
|
||||
|
||||
### 1. Verify IP Address Configuration
|
||||
Make sure that the correct ip for the Pi is set in the configuration file. To check the Raspberry Pi's IP address, run (on the Pi command line):
|
||||
```bash
|
||||
hostname -I
|
||||
```
|
||||
|
||||
### 2. Check if Pi is reachable from laptop/pc
|
||||
Try pinging the Raspberry Pi from your laptop:
|
||||
```bach
|
||||
ping <your_pi_ip_address>
|
||||
```
|
||||
|
||||
If the ping fails:
|
||||
- Ensure the Pi is powered on and connected to the same network.
|
||||
- Check if SSH is enabled on the Pi.
|
||||
|
||||
### 3. Try SSH connection
|
||||
If you can't SSH into the Pi, it might not be properly connected. Use:
|
||||
```bash
|
||||
ssh <your_pi_user_name>@<your_pi_ip_address>
|
||||
```
|
||||
If you get a connection error:
|
||||
- Ensure SSH is enabled on the Pi by running:
|
||||
```bash
|
||||
sudo raspi-config
|
||||
```
|
||||
Then navigate to: **Interfacing Options -> SSH** and enable it.
|
||||
|
||||
### 4. Same config file
|
||||
Make sure the configuration file on both your laptop/pc and the Raspberry Pi is the same.
|
||||
|
||||
# G. Record a dataset
|
||||
Once you're familiar with teleoperation, you can record your first dataset with LeKiwi.
|
||||
|
||||
To start the program on LeKiwi, SSH into your Raspberry Pi, and run `conda activate lerobot` and this script:
|
||||
```bash
|
||||
python lerobot/scripts/control_robot.py \
|
||||
--robot.type=lekiwi \
|
||||
--control.type=remote_robot
|
||||
```
|
||||
|
||||
If you want to use the Hugging Face hub features for uploading your dataset and you haven't previously done it, make sure you've logged in using a write-access token, which can be generated from the [Hugging Face settings](https://huggingface.co/settings/tokens):
|
||||
```bash
|
||||
huggingface-cli login --token ${HUGGINGFACE_TOKEN} --add-to-git-credential
|
||||
```
|
||||
|
||||
Store your Hugging Face repository name in a variable to run these commands:
|
||||
```bash
|
||||
HF_USER=$(huggingface-cli whoami | head -n 1)
|
||||
echo $HF_USER
|
||||
```
|
||||
On your laptop then run this command to record 2 episodes and upload your dataset to the hub:
|
||||
```bash
|
||||
python lerobot/scripts/control_robot.py \
|
||||
--robot.type=lekiwi \
|
||||
--control.type=record \
|
||||
--control.fps=30 \
|
||||
--control.single_task="Grasp a lego block and put it in the bin." \
|
||||
--control.repo_id=${HF_USER}/lekiwi_test \
|
||||
--control.tags='["tutorial"]' \
|
||||
--control.warmup_time_s=5 \
|
||||
--control.episode_time_s=30 \
|
||||
--control.reset_time_s=30 \
|
||||
--control.num_episodes=2 \
|
||||
--control.push_to_hub=true
|
||||
```
|
||||
|
||||
Note: You can resume recording by adding `--control.resume=true`.
|
||||
|
||||
### Wired version
|
||||
If you have the **wired** LeKiwi version please run all commands including both these record dataset commands on your laptop.
|
||||
|
||||
# H. Visualize a dataset
|
||||
|
||||
If you uploaded your dataset to the hub with `--control.push_to_hub=true`, you can [visualize your dataset online](https://huggingface.co/spaces/lerobot/visualize_dataset) by copy pasting your repo id given by:
|
||||
```bash
|
||||
echo ${HF_USER}/lekiwi_test
|
||||
```
|
||||
|
||||
If you didn't upload with `--control.push_to_hub=false`, you can also visualize it locally with (a window can be opened in the browser `http://127.0.0.1:9090` with the visualization tool):
|
||||
```bash
|
||||
python lerobot/scripts/visualize_dataset_html.py \
|
||||
--repo-id ${HF_USER}/lekiwi_test \
|
||||
--local-files-only 1
|
||||
```
|
||||
|
||||
# I. Replay an episode
|
||||
Now try to replay the first episode on your robot:
|
||||
```bash
|
||||
python lerobot/scripts/control_robot.py \
|
||||
--robot.type=lekiwi \
|
||||
--control.type=replay \
|
||||
--control.fps=30 \
|
||||
--control.repo_id=${HF_USER}/lekiwi_test \
|
||||
--control.episode=0
|
||||
```
|
||||
|
||||
## J. Train a policy
|
||||
|
||||
To train a policy to control your robot, use the [`python lerobot/scripts/train.py`](../lerobot/scripts/train.py) script. A few arguments are required. Here is an example command:
|
||||
```bash
|
||||
python lerobot/scripts/train.py \
|
||||
--dataset.repo_id=${HF_USER}/lekiwi_test \
|
||||
--policy.type=act \
|
||||
--output_dir=outputs/train/act_lekiwi_test \
|
||||
--job_name=act_lekiwi_test \
|
||||
--policy.device=cuda \
|
||||
--wandb.enable=true
|
||||
```
|
||||
|
||||
Let's explain it:
|
||||
1. We provided the dataset as argument with `--dataset.repo_id=${HF_USER}/lekiwi_test`.
|
||||
2. We provided the policy with `policy.type=act`. This loads configurations from [`configuration_act.py`](../lerobot/common/policies/act/configuration_act.py). Importantly, this policy will automatically adapt to the number of motor states, motor actions and cameras of your robot (e.g. `laptop` and `phone`) which have been saved in your dataset.
|
||||
4. We provided `policy.device=cuda` since we are training on a Nvidia GPU, but you could use `policy.device=mps` to train on Apple silicon.
|
||||
5. We provided `wandb.enable=true` to use [Weights and Biases](https://docs.wandb.ai/quickstart) for visualizing training plots. This is optional but if you use it, make sure you are logged in by running `wandb login`.
|
||||
|
||||
Training should take several hours. You will find checkpoints in `outputs/train/act_lekiwi_test/checkpoints`.
|
||||
|
||||
## K. Evaluate your policy
|
||||
|
||||
You can use the `record` function from [`lerobot/scripts/control_robot.py`](../lerobot/scripts/control_robot.py) but with a policy checkpoint as input. For instance, run this command to record 10 evaluation episodes:
|
||||
```bash
|
||||
python lerobot/scripts/control_robot.py \
|
||||
--robot.type=lekiwi \
|
||||
--control.type=record \
|
||||
--control.fps=30 \
|
||||
--control.single_task="Drive to the red block and pick it up" \
|
||||
--control.repo_id=${HF_USER}/eval_act_lekiwi_test \
|
||||
--control.tags='["tutorial"]' \
|
||||
--control.warmup_time_s=5 \
|
||||
--control.episode_time_s=30 \
|
||||
--control.reset_time_s=30 \
|
||||
--control.num_episodes=10 \
|
||||
--control.push_to_hub=true \
|
||||
--control.policy.path=outputs/train/act_lekiwi_test/checkpoints/last/pretrained_model
|
||||
```
|
||||
|
||||
As you can see, it's almost the same command as previously used to record your training dataset. Two things changed:
|
||||
1. There is an additional `--control.policy.path` argument which indicates the path to your policy checkpoint with (e.g. `outputs/train/eval_act_lekiwi_test/checkpoints/last/pretrained_model`). You can also use the model repository if you uploaded a model checkpoint to the hub (e.g. `${HF_USER}/act_lekiwi_test`).
|
||||
2. The name of dataset begins by `eval` to reflect that you are running inference (e.g. `${HF_USER}/eval_act_lekiwi_test`).
|
||||
@@ -1,254 +0,0 @@
|
||||
#!/usr/bin/env python
|
||||
|
||||
# Copyright 2024 The HuggingFace Inc. team. All rights reserved.
|
||||
#
|
||||
# Licensed under the Apache License, Version 2.0 (the "License");
|
||||
# you may not use this file except in compliance with the License.
|
||||
# You may obtain a copy of the License at
|
||||
#
|
||||
# http://www.apache.org/licenses/LICENSE-2.0
|
||||
#
|
||||
# Unless required by applicable law or agreed to in writing, software
|
||||
# distributed under the License is distributed on an "AS IS" BASIS,
|
||||
# WITHOUT WARRANTIES OR CONDITIONS OF ANY KIND, either express or implied.
|
||||
# See the License for the specific language governing permissions and
|
||||
# limitations under the License.
|
||||
|
||||
import logging
|
||||
import time
|
||||
from typing import Any
|
||||
|
||||
from lerobot.common.cameras.utils import make_cameras_from_configs
|
||||
from lerobot.common.constants import OBS_IMAGES, OBS_STATE
|
||||
from lerobot.common.errors import DeviceAlreadyConnectedError, DeviceNotConnectedError
|
||||
from lerobot.common.motors import Motor, MotorCalibration, MotorNormMode
|
||||
from lerobot.common.motors.feetech import (
|
||||
FeetechMotorsBus,
|
||||
OperatingMode,
|
||||
)
|
||||
|
||||
from ..robot import Robot
|
||||
from ..utils import ensure_safe_goal_position
|
||||
from .config_lekiwi import LeKiwiConfig
|
||||
|
||||
logger = logging.getLogger(__name__)
|
||||
|
||||
|
||||
class LeKiwi(Robot):
|
||||
"""
|
||||
The robot includes a three omniwheel mobile base and a remote follower arm.
|
||||
The leader arm is connected locally (on the laptop) and its joint positions are recorded and then
|
||||
forwarded to the remote follower arm (after applying a safety clamp).
|
||||
In parallel, keyboard teleoperation is used to generate raw velocity commands for the wheels.
|
||||
"""
|
||||
|
||||
config_class = LeKiwiConfig
|
||||
name = "lekiwi"
|
||||
|
||||
def __init__(self, config: LeKiwiConfig):
|
||||
super().__init__(config)
|
||||
self.config = config
|
||||
self.bus = FeetechMotorsBus(
|
||||
port=self.config.port,
|
||||
motors={
|
||||
# arm
|
||||
"arm_shoulder_pan": Motor(1, "sts3215", MotorNormMode.RANGE_M100_100),
|
||||
"arm_shoulder_lift": Motor(2, "sts3215", MotorNormMode.RANGE_M100_100),
|
||||
"arm_elbow_flex": Motor(3, "sts3215", MotorNormMode.RANGE_M100_100),
|
||||
"arm_wrist_flex": Motor(4, "sts3215", MotorNormMode.RANGE_M100_100),
|
||||
"arm_wrist_roll": Motor(5, "sts3215", MotorNormMode.RANGE_M100_100),
|
||||
"arm_gripper": Motor(6, "sts3215", MotorNormMode.RANGE_0_100),
|
||||
# base
|
||||
"base_left_wheel": Motor(7, "sts3215", MotorNormMode.RANGE_M100_100),
|
||||
"base_right_wheel": Motor(8, "sts3215", MotorNormMode.RANGE_M100_100),
|
||||
"base_back_wheel": Motor(9, "sts3215", MotorNormMode.RANGE_M100_100),
|
||||
},
|
||||
calibration=self.calibration,
|
||||
)
|
||||
self.arm_motors = [motor for motor in self.bus.motors if motor.startswith("arm")]
|
||||
self.base_motors = [motor for motor in self.bus.motors if motor.startswith("base")]
|
||||
self.cameras = make_cameras_from_configs(config.cameras)
|
||||
|
||||
@property
|
||||
def state_feature(self) -> dict:
|
||||
state_ft = {
|
||||
"arm_shoulder_pan": {"dtype": "float32"},
|
||||
"arm_shoulder_lift": {"dtype": "float32"},
|
||||
"arm_elbow_flex": {"dtype": "float32"},
|
||||
"arm_wrist_flex": {"dtype": "float32"},
|
||||
"arm_wrist_roll": {"dtype": "float32"},
|
||||
"arm_gripper": {"dtype": "float32"},
|
||||
"base_left_wheel": {"dtype": "float32"},
|
||||
"base_right_wheel": {"dtype": "float32"},
|
||||
"base_back_wheel": {"dtype": "float32"},
|
||||
}
|
||||
return state_ft
|
||||
|
||||
@property
|
||||
def action_feature(self) -> dict:
|
||||
return self.state_feature
|
||||
|
||||
@property
|
||||
def camera_features(self) -> dict[str, dict]:
|
||||
cam_ft = {}
|
||||
for cam_key, cam in self.cameras.items():
|
||||
cam_ft[cam_key] = {
|
||||
"shape": (cam.height, cam.width, cam.channels),
|
||||
"names": ["height", "width", "channels"],
|
||||
"info": None,
|
||||
}
|
||||
return cam_ft
|
||||
|
||||
@property
|
||||
def is_connected(self) -> bool:
|
||||
# TODO(aliberts): add cam.is_connected for cam in self.cameras
|
||||
return self.bus.is_connected
|
||||
|
||||
def connect(self, calibrate: bool = True) -> None:
|
||||
if self.is_connected:
|
||||
raise DeviceAlreadyConnectedError(f"{self} already connected")
|
||||
|
||||
self.bus.connect()
|
||||
if not self.is_calibrated and calibrate:
|
||||
self.calibrate()
|
||||
|
||||
for cam in self.cameras.values():
|
||||
cam.connect()
|
||||
|
||||
self.configure()
|
||||
logger.info(f"{self} connected.")
|
||||
|
||||
@property
|
||||
def is_calibrated(self) -> bool:
|
||||
return self.bus.is_calibrated
|
||||
|
||||
def calibrate(self) -> None:
|
||||
logger.info(f"\nRunning calibration of {self}")
|
||||
|
||||
motors = self.arm_motors + self.base_motors
|
||||
|
||||
self.bus.disable_torque(self.arm_motors)
|
||||
for name in self.arm_motors:
|
||||
self.bus.write("Operating_Mode", name, OperatingMode.POSITION.value)
|
||||
|
||||
input("Move robot to the middle of its range of motion and press ENTER....")
|
||||
homing_offsets = self.bus.set_half_turn_homings(self.arm_motors)
|
||||
|
||||
homing_offsets.update(dict.fromkeys(self.base_motors, 0))
|
||||
|
||||
full_turn_motor = [
|
||||
motor for motor in motors if any(keyword in motor for keyword in ["wheel", "wrist"])
|
||||
]
|
||||
unknown_range_motors = [motor for motor in motors if motor not in full_turn_motor]
|
||||
|
||||
print(
|
||||
f"Move all arm joints except '{full_turn_motor}' sequentially through their "
|
||||
"entire ranges of motion.\nRecording positions. Press ENTER to stop..."
|
||||
)
|
||||
range_mins, range_maxes = self.bus.record_ranges_of_motion(unknown_range_motors)
|
||||
for name in full_turn_motor:
|
||||
range_mins[name] = 0
|
||||
range_maxes[name] = 4095
|
||||
|
||||
self.calibration = {}
|
||||
for name, motor in self.bus.motors.items():
|
||||
self.calibration[name] = MotorCalibration(
|
||||
id=motor.id,
|
||||
drive_mode=0,
|
||||
homing_offset=homing_offsets[name],
|
||||
range_min=range_mins[name],
|
||||
range_max=range_maxes[name],
|
||||
)
|
||||
|
||||
self.bus.write_calibration(self.calibration)
|
||||
self._save_calibration()
|
||||
print("Calibration saved to", self.calibration_fpath)
|
||||
|
||||
def configure(self):
|
||||
# Set-up arm actuators (position mode)
|
||||
# We assume that at connection time, arm is in a rest position,
|
||||
# and torque can be safely disabled to run calibration.
|
||||
self.bus.disable_torque()
|
||||
self.bus.configure_motors()
|
||||
for name in self.arm_motors:
|
||||
self.bus.write("Operating_Mode", name, OperatingMode.POSITION.value)
|
||||
# Set P_Coefficient to lower value to avoid shakiness (Default is 32)
|
||||
self.bus.write("P_Coefficient", name, 16)
|
||||
# Set I_Coefficient and D_Coefficient to default value 0 and 32
|
||||
self.bus.write("I_Coefficient", name, 0)
|
||||
self.bus.write("D_Coefficient", name, 32)
|
||||
|
||||
for name in self.base_motors:
|
||||
self.bus.write("Operating_Mode", name, OperatingMode.VELOCITY.value)
|
||||
|
||||
self.bus.enable_torque()
|
||||
|
||||
def get_observation(self) -> dict[str, Any]:
|
||||
if not self.is_connected:
|
||||
raise DeviceNotConnectedError(f"{self} is not connected.")
|
||||
|
||||
# Read actuators position for arm and vel for base
|
||||
start = time.perf_counter()
|
||||
arm_pos = self.bus.sync_read("Present_Position", self.arm_motors)
|
||||
base_vel = self.bus.sync_read("Present_Velocity", self.base_motors)
|
||||
obs_dict = {**arm_pos, **base_vel}
|
||||
obs_dict = {f"{OBS_STATE}." + key: value for key, value in obs_dict.items()}
|
||||
dt_ms = (time.perf_counter() - start) * 1e3
|
||||
logger.debug(f"{self} read state: {dt_ms:.1f}ms")
|
||||
|
||||
# Capture images from cameras
|
||||
for cam_key, cam in self.cameras.items():
|
||||
start = time.perf_counter()
|
||||
obs_dict[f"{OBS_IMAGES}.{cam_key}"] = cam.async_read()
|
||||
dt_ms = (time.perf_counter() - start) * 1e3
|
||||
logger.debug(f"{self} read {cam_key}: {dt_ms:.1f}ms")
|
||||
|
||||
return obs_dict
|
||||
|
||||
def send_action(self, action: dict[str, Any]) -> dict[str, Any]:
|
||||
"""Command lekiwi to move to a target joint configuration.
|
||||
|
||||
The relative action magnitude may be clipped depending on the configuration parameter
|
||||
`max_relative_target`. In this case, the action sent differs from original action.
|
||||
Thus, this function always returns the action actually sent.
|
||||
|
||||
Raises:
|
||||
RobotDeviceNotConnectedError: if robot is not connected.
|
||||
|
||||
Returns:
|
||||
np.ndarray: the action sent to the motors, potentially clipped.
|
||||
"""
|
||||
if not self.is_connected:
|
||||
raise DeviceNotConnectedError(f"{self} is not connected.")
|
||||
|
||||
arm_goal_pos = {k: v for k, v in action.items() if k in self.arm_motors}
|
||||
base_goal_vel = {k: v for k, v in action.items() if k in self.base_motors}
|
||||
|
||||
# Cap goal position when too far away from present position.
|
||||
# /!\ Slower fps expected due to reading from the follower.
|
||||
if self.config.max_relative_target is not None:
|
||||
present_pos = self.bus.sync_read("Present_Position", self.arm_motors)
|
||||
goal_present_pos = {key: (g_pos, present_pos[key]) for key, g_pos in arm_goal_pos.items()}
|
||||
arm_safe_goal_pos = ensure_safe_goal_position(goal_present_pos, self.config.max_relative_target)
|
||||
arm_goal_pos = arm_safe_goal_pos
|
||||
|
||||
# Send goal position to the actuators
|
||||
self.bus.sync_write("Goal_Position", arm_goal_pos)
|
||||
self.bus.sync_write("Goal_Velocity", base_goal_vel)
|
||||
|
||||
return {**arm_goal_pos, **base_goal_vel}
|
||||
|
||||
def stop_base(self):
|
||||
self.bus.sync_write("Goal_Velocity", dict.fromkeys(self.base_motors, 0), num_retry=5)
|
||||
logger.info("Base motors stopped")
|
||||
|
||||
def disconnect(self):
|
||||
if not self.is_connected:
|
||||
raise DeviceNotConnectedError(f"{self} is not connected.")
|
||||
|
||||
self.stop_base()
|
||||
self.bus.disconnect(self.config.disable_torque_on_disconnect)
|
||||
for cam in self.cameras.values():
|
||||
cam.disconnect()
|
||||
|
||||
logger.info(f"{self} disconnected.")
|
||||
@@ -1,495 +0,0 @@
|
||||
# Copyright 2024 The HuggingFace Inc. team. All rights reserved.
|
||||
#
|
||||
# Licensed under the Apache License, Version 2.0 (the "License");
|
||||
# you may not use this file except in compliance with the License.
|
||||
# You may obtain a copy of the License at
|
||||
#
|
||||
# http://www.apache.org/licenses/LICENSE-2.0
|
||||
#
|
||||
# Unless required by applicable law or agreed to in writing, software
|
||||
# distributed under the License is distributed on an "AS IS" BASIS,
|
||||
# WITHOUT WARRANTIES OR CONDITIONS OF ANY KIND, either express or implied.
|
||||
# See the License for the specific language governing permissions and
|
||||
# limitations under the License.
|
||||
|
||||
import base64
|
||||
import json
|
||||
import logging
|
||||
from typing import Any, Dict, Optional, Tuple
|
||||
|
||||
import cv2
|
||||
import numpy as np
|
||||
import torch
|
||||
import zmq
|
||||
|
||||
from lerobot.common.constants import OBS_IMAGES, OBS_STATE
|
||||
from lerobot.common.errors import DeviceAlreadyConnectedError, DeviceNotConnectedError
|
||||
|
||||
from ..robot import Robot
|
||||
from .config_lekiwi import LeKiwiClientConfig
|
||||
|
||||
|
||||
class LeKiwiClient(Robot):
|
||||
config_class = LeKiwiClientConfig
|
||||
name = "lekiwi_client"
|
||||
|
||||
def __init__(self, config: LeKiwiClientConfig):
|
||||
super().__init__(config)
|
||||
self.config = config
|
||||
self.id = config.id
|
||||
self.robot_type = config.type
|
||||
|
||||
self.remote_ip = config.remote_ip
|
||||
self.port_zmq_cmd = config.port_zmq_cmd
|
||||
self.port_zmq_observations = config.port_zmq_observations
|
||||
|
||||
self.teleop_keys = config.teleop_keys
|
||||
|
||||
self.polling_timeout_ms = config.polling_timeout_ms
|
||||
self.connect_timeout_s = config.connect_timeout_s
|
||||
|
||||
self.zmq_context = None
|
||||
self.zmq_cmd_socket = None
|
||||
self.zmq_observation_socket = None
|
||||
|
||||
self.last_frames = {}
|
||||
|
||||
self.last_remote_arm_state = {}
|
||||
self.last_remote_base_state = {"base_left_wheel": 0, "base_back_wheel": 0, "base_right_wheel": 0}
|
||||
|
||||
# Define three speed levels and a current index
|
||||
self.speed_levels = [
|
||||
{"xy": 0.1, "theta": 30}, # slow
|
||||
{"xy": 0.2, "theta": 60}, # medium
|
||||
{"xy": 0.3, "theta": 90}, # fast
|
||||
]
|
||||
self.speed_index = 0 # Start at slow
|
||||
|
||||
self._is_connected = False
|
||||
self.logs = {}
|
||||
|
||||
@property
|
||||
def state_feature(self) -> dict:
|
||||
state_ft = {
|
||||
"arm_shoulder_pan": {"shape": (1,), "info": None, "dtype": "float32"},
|
||||
"arm_shoulder_lift": {"shape": (1,), "info": None, "dtype": "float32"},
|
||||
"arm_elbow_flex": {"shape": (1,), "info": None, "dtype": "float32"},
|
||||
"arm_wrist_flex": {"shape": (1,), "info": None, "dtype": "float32"},
|
||||
"arm_wrist_roll": {"shape": (1,), "info": None, "dtype": "float32"},
|
||||
"arm_gripper": {"shape": (1,), "info": None, "dtype": "float32"},
|
||||
"x_cmd": {"shape": (1,), "info": None, "dtype": "float32"},
|
||||
"y_cmd": {"shape": (1,), "info": None, "dtype": "float32"},
|
||||
"theta_cmd": {"shape": (1,), "info": None, "dtype": "float32"},
|
||||
}
|
||||
return state_ft
|
||||
|
||||
@property
|
||||
def action_feature(self) -> dict:
|
||||
action_ft = {
|
||||
"arm_shoulder_pan": {"shape": (1,), "info": None, "dtype": "float32"},
|
||||
"arm_shoulder_lift": {"shape": (1,), "info": None, "dtype": "float32"},
|
||||
"arm_elbow_flex": {"shape": (1,), "info": None, "dtype": "float32"},
|
||||
"arm_wrist_flex": {"shape": (1,), "info": None, "dtype": "float32"},
|
||||
"arm_wrist_roll": {"shape": (1,), "info": None, "dtype": "float32"},
|
||||
"arm_gripper": {"shape": (1,), "info": None, "dtype": "float32"},
|
||||
"base_left_wheel": {"shape": (1,), "info": None, "dtype": "float32"},
|
||||
"base_right_wheel": {"shape": (1,), "info": None, "dtype": "float32"},
|
||||
"base_back_wheel": {"shape": (1,), "info": None, "dtype": "float32"},
|
||||
}
|
||||
return action_ft
|
||||
|
||||
@property
|
||||
def camera_features(self) -> dict[str, dict]:
|
||||
cam_ft = {
|
||||
f"{OBS_IMAGES}.front": {
|
||||
"shape": (480, 640, 3),
|
||||
"names": ["height", "width", "channels"],
|
||||
"info": None,
|
||||
"dtype": "image",
|
||||
},
|
||||
f"{OBS_IMAGES}.wrist": {
|
||||
"shape": (480, 640, 3),
|
||||
"names": ["height", "width", "channels"],
|
||||
"dtype": "image",
|
||||
"info": None,
|
||||
},
|
||||
}
|
||||
return cam_ft
|
||||
|
||||
@property
|
||||
def is_connected(self) -> bool:
|
||||
return self._is_connected
|
||||
|
||||
@property
|
||||
def is_calibrated(self) -> bool:
|
||||
pass
|
||||
|
||||
def connect(self) -> None:
|
||||
"""Establishes ZMQ sockets with the remote mobile robot"""
|
||||
|
||||
if self._is_connected:
|
||||
raise DeviceAlreadyConnectedError(
|
||||
"LeKiwi Daemon is already connected. Do not run `robot.connect()` twice."
|
||||
)
|
||||
|
||||
self.zmq_context = zmq.Context()
|
||||
self.zmq_cmd_socket = self.zmq_context.socket(zmq.PUSH)
|
||||
zmq_cmd_locator = f"tcp://{self.remote_ip}:{self.port_zmq_cmd}"
|
||||
self.zmq_cmd_socket.connect(zmq_cmd_locator)
|
||||
self.zmq_cmd_socket.setsockopt(zmq.CONFLATE, 1)
|
||||
|
||||
self.zmq_observation_socket = self.zmq_context.socket(zmq.PULL)
|
||||
zmq_observations_locator = f"tcp://{self.remote_ip}:{self.port_zmq_observations}"
|
||||
self.zmq_observation_socket.connect(zmq_observations_locator)
|
||||
self.zmq_observation_socket.setsockopt(zmq.CONFLATE, 1)
|
||||
|
||||
poller = zmq.Poller()
|
||||
poller.register(self.zmq_observation_socket, zmq.POLLIN)
|
||||
socks = dict(poller.poll(self.connect_timeout_s * 1000))
|
||||
if self.zmq_observation_socket not in socks or socks[self.zmq_observation_socket] != zmq.POLLIN:
|
||||
raise DeviceNotConnectedError("Timeout waiting for LeKiwi Host to connect expired.")
|
||||
|
||||
self._is_connected = True
|
||||
|
||||
def calibrate(self) -> None:
|
||||
pass
|
||||
|
||||
@staticmethod
|
||||
def _degps_to_raw(degps: float) -> int:
|
||||
steps_per_deg = 4096.0 / 360.0
|
||||
speed_in_steps = degps * steps_per_deg
|
||||
speed_int = int(round(speed_in_steps))
|
||||
# Cap the value to fit within signed 16-bit range (-32768 to 32767)
|
||||
if speed_int > 0x7FFF:
|
||||
speed_int = 0x7FFF # 32767 -> maximum positive value
|
||||
elif speed_int < -0x8000:
|
||||
speed_int = -0x8000 # -32768 -> minimum negative value
|
||||
return speed_int
|
||||
|
||||
@staticmethod
|
||||
def _raw_to_degps(raw_speed: int) -> float:
|
||||
steps_per_deg = 4096.0 / 360.0
|
||||
magnitude = raw_speed
|
||||
degps = magnitude / steps_per_deg
|
||||
return degps
|
||||
|
||||
def _body_to_wheel_raw(
|
||||
self,
|
||||
x_cmd: float,
|
||||
y_cmd: float,
|
||||
theta_cmd: float,
|
||||
wheel_radius: float = 0.05,
|
||||
base_radius: float = 0.125,
|
||||
max_raw: int = 3000,
|
||||
) -> dict:
|
||||
"""
|
||||
Convert desired body-frame velocities into wheel raw commands.
|
||||
|
||||
Parameters:
|
||||
x_cmd : Linear velocity in x (m/s).
|
||||
y_cmd : Linear velocity in y (m/s).
|
||||
theta_cmd : Rotational velocity (deg/s).
|
||||
wheel_radius: Radius of each wheel (meters).
|
||||
base_radius : Distance from the center of rotation to each wheel (meters).
|
||||
max_raw : Maximum allowed raw command (ticks) per wheel.
|
||||
|
||||
Returns:
|
||||
A dictionary with wheel raw commands:
|
||||
{"base_left_wheel": value, "base_back_wheel": value, "base_right_wheel": value}.
|
||||
|
||||
Notes:
|
||||
- Internally, the method converts theta_cmd to rad/s for the kinematics.
|
||||
- The raw command is computed from the wheels angular speed in deg/s
|
||||
using _degps_to_raw(). If any command exceeds max_raw, all commands
|
||||
are scaled down proportionally.
|
||||
"""
|
||||
# Convert rotational velocity from deg/s to rad/s.
|
||||
theta_rad = theta_cmd * (np.pi / 180.0)
|
||||
# Create the body velocity vector [x, y, theta_rad].
|
||||
velocity_vector = np.array([x_cmd, y_cmd, theta_rad])
|
||||
|
||||
# Define the wheel mounting angles with a -90° offset.
|
||||
angles = np.radians(np.array([240, 120, 0]) - 90)
|
||||
# Build the kinematic matrix: each row maps body velocities to a wheel’s linear speed.
|
||||
# The third column (base_radius) accounts for the effect of rotation.
|
||||
m = np.array([[np.cos(a), np.sin(a), base_radius] for a in angles])
|
||||
|
||||
# Compute each wheel’s linear speed (m/s) and then its angular speed (rad/s).
|
||||
wheel_linear_speeds = m.dot(velocity_vector)
|
||||
wheel_angular_speeds = wheel_linear_speeds / wheel_radius
|
||||
|
||||
# Convert wheel angular speeds from rad/s to deg/s.
|
||||
wheel_degps = wheel_angular_speeds * (180.0 / np.pi)
|
||||
|
||||
# Scaling
|
||||
steps_per_deg = 4096.0 / 360.0
|
||||
raw_floats = [abs(degps) * steps_per_deg for degps in wheel_degps]
|
||||
max_raw_computed = max(raw_floats)
|
||||
if max_raw_computed > max_raw:
|
||||
scale = max_raw / max_raw_computed
|
||||
wheel_degps = wheel_degps * scale
|
||||
|
||||
# Convert each wheel’s angular speed (deg/s) to a raw integer.
|
||||
wheel_raw = [self._degps_to_raw(deg) for deg in wheel_degps]
|
||||
|
||||
return {
|
||||
"base_left_wheel": wheel_raw[0],
|
||||
"base_back_wheel": wheel_raw[1],
|
||||
"base_right_wheel": wheel_raw[2],
|
||||
}
|
||||
|
||||
def _wheel_raw_to_body(
|
||||
self, wheel_raw: dict[str, Any], wheel_radius: float = 0.05, base_radius: float = 0.125
|
||||
) -> dict[str, Any]:
|
||||
"""
|
||||
Convert wheel raw command feedback back into body-frame velocities.
|
||||
|
||||
Parameters:
|
||||
wheel_raw : Vector with raw wheel commands ("base_left_wheel", "base_back_wheel", "base_right_wheel").
|
||||
wheel_radius: Radius of each wheel (meters).
|
||||
base_radius : Distance from the robot center to each wheel (meters).
|
||||
|
||||
Returns:
|
||||
A dict (x_cmd, y_cmd, theta_cmd) where:
|
||||
OBS_STATE.x_cmd : Linear velocity in x (m/s).
|
||||
OBS_STATE.y_cmd : Linear velocity in y (m/s).
|
||||
OBS_STATE.theta_cmd : Rotational velocity in deg/s.
|
||||
"""
|
||||
|
||||
# Convert each raw command back to an angular speed in deg/s.
|
||||
wheel_degps = np.array([LeKiwiClient._raw_to_degps(int(v)) for _, v in wheel_raw.items()])
|
||||
# Convert from deg/s to rad/s.
|
||||
wheel_radps = wheel_degps * (np.pi / 180.0)
|
||||
# Compute each wheel’s linear speed (m/s) from its angular speed.
|
||||
wheel_linear_speeds = wheel_radps * wheel_radius
|
||||
|
||||
# Define the wheel mounting angles with a -90° offset.
|
||||
angles = np.radians(np.array([240, 120, 0]) - 90)
|
||||
m = np.array([[np.cos(a), np.sin(a), base_radius] for a in angles])
|
||||
|
||||
# Solve the inverse kinematics: body_velocity = M⁻¹ · wheel_linear_speeds.
|
||||
m_inv = np.linalg.inv(m)
|
||||
velocity_vector = m_inv.dot(wheel_linear_speeds)
|
||||
x_cmd, y_cmd, theta_rad = velocity_vector
|
||||
theta_cmd = theta_rad * (180.0 / np.pi)
|
||||
return {
|
||||
f"{OBS_STATE}.x_cmd": x_cmd * 1000,
|
||||
f"{OBS_STATE}.y_cmd": y_cmd * 1000,
|
||||
f"{OBS_STATE}.theta_cmd": theta_cmd,
|
||||
} # Convert to mm/s
|
||||
|
||||
def _poll_and_get_latest_message(self) -> Optional[str]:
|
||||
"""Polls the ZMQ socket for a limited time and returns the latest message string."""
|
||||
poller = zmq.Poller()
|
||||
poller.register(self.zmq_observation_socket, zmq.POLLIN)
|
||||
|
||||
try:
|
||||
socks = dict(poller.poll(self.polling_timeout_ms))
|
||||
except zmq.ZMQError as e:
|
||||
logging.error(f"ZMQ polling error: {e}")
|
||||
return None
|
||||
|
||||
if self.zmq_observation_socket not in socks:
|
||||
logging.info("No new data available within timeout.")
|
||||
return None
|
||||
|
||||
last_msg = None
|
||||
while True:
|
||||
try:
|
||||
msg = self.zmq_observation_socket.recv_string(zmq.NOBLOCK)
|
||||
last_msg = msg
|
||||
except zmq.Again:
|
||||
break
|
||||
|
||||
if last_msg is None:
|
||||
logging.warning("Poller indicated data, but failed to retrieve message.")
|
||||
|
||||
return last_msg
|
||||
|
||||
def _parse_observation_json(self, obs_string: str) -> Optional[Dict[str, Any]]:
|
||||
"""Parses the JSON observation string."""
|
||||
try:
|
||||
return json.loads(obs_string)
|
||||
except json.JSONDecodeError as e:
|
||||
logging.error(f"Error decoding JSON observation: {e}")
|
||||
return None
|
||||
|
||||
def _decode_image_from_b64(self, image_b64: str) -> Optional[np.ndarray]:
|
||||
"""Decodes a base64 encoded image string to an OpenCV image."""
|
||||
if not image_b64:
|
||||
return None
|
||||
try:
|
||||
jpg_data = base64.b64decode(image_b64)
|
||||
np_arr = np.frombuffer(jpg_data, dtype=np.uint8)
|
||||
frame = cv2.imdecode(np_arr, cv2.IMREAD_COLOR)
|
||||
if frame is None:
|
||||
logging.warning("cv2.imdecode returned None for an image.")
|
||||
return frame
|
||||
except (TypeError, ValueError) as e:
|
||||
logging.error(f"Error decoding base64 image data: {e}")
|
||||
return None
|
||||
|
||||
def _remote_state_from_obs(
|
||||
self, observation: Dict[str, Any]
|
||||
) -> Tuple[Dict[str, np.ndarray], Dict[str, Any], Dict[str, Any]]:
|
||||
"""Extracts frames, speed, and arm state from the parsed observation."""
|
||||
|
||||
# Separate image and state data
|
||||
image_observation = {k: v for k, v in observation.items() if k.startswith(OBS_IMAGES)}
|
||||
state_observation = {k: v for k, v in observation.items() if k.startswith(OBS_STATE)}
|
||||
|
||||
# Decode images
|
||||
current_frames: Dict[str, np.ndarray] = {}
|
||||
for cam_name, image_b64 in image_observation.items():
|
||||
frame = self._decode_image_from_b64(image_b64)
|
||||
if frame is not None:
|
||||
current_frames[cam_name] = frame
|
||||
|
||||
# Extract state components
|
||||
current_arm_state = {k: v for k, v in state_observation.items() if k.startswith(f"{OBS_STATE}.arm")}
|
||||
current_base_state = {k: v for k, v in state_observation.items() if k.startswith(f"{OBS_STATE}.base")}
|
||||
|
||||
return current_frames, current_arm_state, current_base_state
|
||||
|
||||
def _get_data(self) -> Tuple[Dict[str, np.ndarray], Dict[str, Any], Dict[str, Any]]:
|
||||
"""
|
||||
Polls the video socket for the latest observation data.
|
||||
|
||||
Attempts to retrieve and decode the latest message within a short timeout.
|
||||
If successful, updates and returns the new frames, speed, and arm state.
|
||||
If no new data arrives or decoding fails, returns the last known values.
|
||||
"""
|
||||
|
||||
# 1. Get the latest message string from the socket
|
||||
latest_message_str = self._poll_and_get_latest_message()
|
||||
|
||||
# 2. If no message, return cached data
|
||||
if latest_message_str is None:
|
||||
return self.last_frames, self.last_remote_arm_state, self.last_remote_base_state
|
||||
|
||||
# 3. Parse the JSON message
|
||||
observation = self._parse_observation_json(latest_message_str)
|
||||
|
||||
# 4. If JSON parsing failed, return cached data
|
||||
if observation is None:
|
||||
return self.last_frames, self.last_remote_arm_state, self.last_remote_base_state
|
||||
|
||||
# 5. Process the valid observation data
|
||||
try:
|
||||
new_frames, new_arm_state, new_base_state = self._remote_state_from_obs(observation)
|
||||
except Exception as e:
|
||||
logging.error(f"Error processing observation data, serving last observation: {e}")
|
||||
return self.last_frames, self.last_remote_arm_state, self.last_remote_base_state
|
||||
|
||||
self.last_frames = new_frames
|
||||
self.last_remote_arm_state = new_arm_state
|
||||
self.last_remote_base_state = new_base_state
|
||||
|
||||
return new_frames, new_arm_state, new_base_state
|
||||
|
||||
def get_observation(self) -> dict[str, Any]:
|
||||
"""
|
||||
Capture observations from the remote robot: current follower arm positions,
|
||||
present wheel speeds (converted to body-frame velocities: x, y, theta),
|
||||
and a camera frame. Receives over ZMQ, translate to body-frame vel
|
||||
"""
|
||||
if not self._is_connected:
|
||||
raise DeviceNotConnectedError("LeKiwiClient is not connected. You need to run `robot.connect()`.")
|
||||
|
||||
frames, remote_arm_state, remote_base_state = self._get_data()
|
||||
remote_body_state = self._wheel_raw_to_body(remote_base_state)
|
||||
|
||||
obs_dict = {**remote_arm_state, **remote_body_state}
|
||||
|
||||
# TODO(Steven): Remove this when it is possible to record a non-numpy array value
|
||||
obs_dict = {k: np.array([v], dtype=np.float32) for k, v in obs_dict.items()}
|
||||
|
||||
# Loop over each configured camera
|
||||
for cam_name, frame in frames.items():
|
||||
if frame is None:
|
||||
logging.warning("Frame is None")
|
||||
frame = np.zeros((640, 480, 3), dtype=np.uint8)
|
||||
obs_dict[cam_name] = torch.from_numpy(frame)
|
||||
|
||||
return obs_dict
|
||||
|
||||
def _from_keyboard_to_wheel_action(self, pressed_keys: np.ndarray):
|
||||
# Speed control
|
||||
if self.teleop_keys["speed_up"] in pressed_keys:
|
||||
self.speed_index = min(self.speed_index + 1, 2)
|
||||
if self.teleop_keys["speed_down"] in pressed_keys:
|
||||
self.speed_index = max(self.speed_index - 1, 0)
|
||||
speed_setting = self.speed_levels[self.speed_index]
|
||||
xy_speed = speed_setting["xy"] # e.g. 0.1, 0.25, or 0.4
|
||||
theta_speed = speed_setting["theta"] # e.g. 30, 60, or 90
|
||||
|
||||
x_cmd = 0.0 # m/s forward/backward
|
||||
y_cmd = 0.0 # m/s lateral
|
||||
theta_cmd = 0.0 # deg/s rotation
|
||||
|
||||
if self.teleop_keys["forward"] in pressed_keys:
|
||||
x_cmd += xy_speed
|
||||
if self.teleop_keys["backward"] in pressed_keys:
|
||||
x_cmd -= xy_speed
|
||||
if self.teleop_keys["left"] in pressed_keys:
|
||||
y_cmd += xy_speed
|
||||
if self.teleop_keys["right"] in pressed_keys:
|
||||
y_cmd -= xy_speed
|
||||
if self.teleop_keys["rotate_left"] in pressed_keys:
|
||||
theta_cmd += theta_speed
|
||||
if self.teleop_keys["rotate_right"] in pressed_keys:
|
||||
theta_cmd -= theta_speed
|
||||
return self._body_to_wheel_raw(x_cmd, y_cmd, theta_cmd)
|
||||
|
||||
def configure(self):
|
||||
pass
|
||||
|
||||
def send_action(self, action: dict[str, Any]) -> dict[str, Any]:
|
||||
"""Command lekiwi to move to a target joint configuration. Translates to motor space + sends over ZMQ
|
||||
|
||||
Args:
|
||||
action (np.ndarray): array containing the goal positions for the motors.
|
||||
|
||||
Raises:
|
||||
RobotDeviceNotConnectedError: if robot is not connected.
|
||||
|
||||
Returns:
|
||||
np.ndarray: the action sent to the motors, potentially clipped.
|
||||
"""
|
||||
if not self._is_connected:
|
||||
raise DeviceNotConnectedError(
|
||||
"ManipulatorRobot is not connected. You need to run `robot.connect()`."
|
||||
)
|
||||
|
||||
goal_pos = {}
|
||||
|
||||
common_keys = [
|
||||
key
|
||||
for key in action
|
||||
if key in (motor.replace("arm_", "") for motor, _ in self.action_feature.items())
|
||||
]
|
||||
|
||||
arm_actions = {"arm_" + arm_motor: action[arm_motor] for arm_motor in common_keys}
|
||||
goal_pos = arm_actions
|
||||
|
||||
keyboard_keys = np.array(list(set(action.keys()) - set(common_keys)))
|
||||
wheel_actions = self._from_keyboard_to_wheel_action(keyboard_keys)
|
||||
goal_pos = {**arm_actions, **wheel_actions}
|
||||
|
||||
self.zmq_cmd_socket.send_string(json.dumps(goal_pos)) # action is in motor space
|
||||
|
||||
# TODO(Steven): Remove the np conversion when it is possible to record a non-numpy array value
|
||||
goal_pos = {"action." + k: np.array([v], dtype=np.float32) for k, v in goal_pos.items()}
|
||||
return goal_pos
|
||||
|
||||
def disconnect(self):
|
||||
"""Cleans ZMQ comms"""
|
||||
|
||||
if not self._is_connected:
|
||||
raise DeviceNotConnectedError(
|
||||
"LeKiwi is not connected. You need to run `robot.connect()` before disconnecting."
|
||||
)
|
||||
self.zmq_observation_socket.close()
|
||||
self.zmq_cmd_socket.close()
|
||||
self.zmq_context.term()
|
||||
self._is_connected = False
|
||||
@@ -1,91 +0,0 @@
|
||||
import abc
|
||||
from pathlib import Path
|
||||
from typing import Any
|
||||
|
||||
import draccus
|
||||
|
||||
from lerobot.common.constants import HF_LEROBOT_CALIBRATION, ROBOTS
|
||||
from lerobot.common.motors import MotorCalibration
|
||||
|
||||
from .config import RobotConfig
|
||||
|
||||
|
||||
# TODO(aliberts): action/obs typing such as Generic[ObsType, ActType] similar to gym.Env ?
|
||||
# https://github.com/Farama-Foundation/Gymnasium/blob/3287c869f9a48d99454306b0d4b4ec537f0f35e3/gymnasium/core.py#L23
|
||||
class Robot(abc.ABC):
|
||||
"""The main LeRobot class for implementing robots."""
|
||||
|
||||
# Set these in ALL subclasses
|
||||
config_class: RobotConfig
|
||||
name: str
|
||||
|
||||
def __init__(self, config: RobotConfig):
|
||||
self.robot_type = self.name
|
||||
self.id = config.id
|
||||
self.calibration_dir = (
|
||||
config.calibration_dir if config.calibration_dir else HF_LEROBOT_CALIBRATION / ROBOTS / self.name
|
||||
)
|
||||
self.calibration_dir.mkdir(parents=True, exist_ok=True)
|
||||
self.calibration_fpath = self.calibration_dir / f"{self.id}.json"
|
||||
self.calibration: dict[str, MotorCalibration] = {}
|
||||
if self.calibration_fpath.is_file():
|
||||
self._load_calibration()
|
||||
|
||||
def __str__(self) -> str:
|
||||
return f"{self.id} {self.__class__.__name__}"
|
||||
|
||||
# TODO(aliberts): create a proper Feature class for this that links with datasets
|
||||
@abc.abstractproperty
|
||||
def observation_features(self) -> dict:
|
||||
pass
|
||||
|
||||
@abc.abstractproperty
|
||||
def action_features(self) -> dict:
|
||||
pass
|
||||
|
||||
@abc.abstractproperty
|
||||
def is_connected(self) -> bool:
|
||||
pass
|
||||
|
||||
@abc.abstractmethod
|
||||
def connect(self, calibrate: bool = True) -> None:
|
||||
"""Connects to the robot."""
|
||||
pass
|
||||
|
||||
@abc.abstractproperty
|
||||
def is_calibrated(self) -> bool:
|
||||
pass
|
||||
|
||||
@abc.abstractmethod
|
||||
def calibrate(self) -> None:
|
||||
"""Calibrates the robot."""
|
||||
pass
|
||||
|
||||
def _load_calibration(self, fpath: Path | None = None) -> None:
|
||||
fpath = self.calibration_fpath if fpath is None else fpath
|
||||
with open(fpath) as f, draccus.config_type("json"):
|
||||
self.calibration = draccus.load(dict[str, MotorCalibration], f)
|
||||
|
||||
def _save_calibration(self, fpath: Path | None = None) -> None:
|
||||
fpath = self.calibration_fpath if fpath is None else fpath
|
||||
with open(fpath, "w") as f, draccus.config_type("json"):
|
||||
draccus.dump(self.calibration, f, indent=4)
|
||||
|
||||
@abc.abstractmethod
|
||||
def configure(self) -> None:
|
||||
pass
|
||||
|
||||
@abc.abstractmethod
|
||||
def get_observation(self) -> dict[str, Any]:
|
||||
"""Gets observation from the robot."""
|
||||
pass
|
||||
|
||||
@abc.abstractmethod
|
||||
def send_action(self, action: dict[str, Any]) -> dict[str, Any]:
|
||||
"""Sends actions to the robot."""
|
||||
pass
|
||||
|
||||
@abc.abstractmethod
|
||||
def disconnect(self) -> None:
|
||||
"""Disconnects from the robot."""
|
||||
pass
|
||||
@@ -1,624 +0,0 @@
|
||||
# Using the [SO-100](https://github.com/TheRobotStudio/SO-ARM100) with LeRobot
|
||||
|
||||
## Table of Contents
|
||||
|
||||
- [A. Source the parts](#a-source-the-parts)
|
||||
- [B. Install LeRobot](#b-install-lerobot)
|
||||
- [C. Configure the Motors](#c-configure-the-motors)
|
||||
- [D. Step-by-Step Assembly Instructions](#d-step-by-step-assembly-instructions)
|
||||
- [E. Calibrate](#e-calibrate)
|
||||
- [F. Teleoperate](#f-teleoperate)
|
||||
- [G. Record a dataset](#g-record-a-dataset)
|
||||
- [H. Visualize a dataset](#h-visualize-a-dataset)
|
||||
- [I. Replay an episode](#i-replay-an-episode)
|
||||
- [J. Train a policy](#j-train-a-policy)
|
||||
- [K. Evaluate your policy](#k-evaluate-your-policy)
|
||||
- [L. More Information](#l-more-information)
|
||||
|
||||
## A. Source the parts
|
||||
|
||||
Follow this [README](https://github.com/TheRobotStudio/SO-ARM100). It contains the bill of materials, with a link to source the parts, as well as the instructions to 3D print the parts,
|
||||
and advice if it's your first time printing or if you don't own a 3D printer.
|
||||
|
||||
Before assembling, you will first need to configure your motors. To this end, we provide a nice script, so let's first install LeRobot. After configuration, we will also guide you through assembly.
|
||||
|
||||
## B. Install LeRobot
|
||||
|
||||
> [!TIP]
|
||||
> We use the Command Prompt (cmd) quite a lot. If you are not comfortable using the cmd or want to brush up using the command line you can have a look here: [Command line crash course](https://developer.mozilla.org/en-US/docs/Learn_web_development/Getting_started/Environment_setup/Command_line)
|
||||
|
||||
On your computer:
|
||||
|
||||
#### 1. [Install Miniconda](https://docs.anaconda.com/miniconda/install/#quick-command-line-install):
|
||||
|
||||
#### 2. Restart shell
|
||||
Copy paste in your shell: `source ~/.bashrc` or for Mac: `source ~/.bash_profile` or `source ~/.zshrc` if you're using zshell
|
||||
|
||||
#### 3. Create and activate a fresh conda environment for lerobot
|
||||
|
||||
<details>
|
||||
<summary><strong>Video install instructions</strong></summary>
|
||||
|
||||
<video src="https://github.com/user-attachments/assets/17172d3b-3b64-4b80-9cf1-b2b7c5cbd236"></video>
|
||||
|
||||
</details>
|
||||
|
||||
```bash
|
||||
conda create -y -n lerobot python=3.10
|
||||
```
|
||||
|
||||
Then activate your conda environment (do this each time you open a shell to use lerobot!):
|
||||
```bash
|
||||
conda activate lerobot
|
||||
```
|
||||
|
||||
#### 4. Clone LeRobot:
|
||||
```bash
|
||||
git clone https://github.com/huggingface/lerobot.git ~/lerobot
|
||||
```
|
||||
|
||||
#### 5. Install ffmpeg in your environment:
|
||||
When using `miniconda`, install `ffmpeg` in your environment:
|
||||
```bash
|
||||
conda install ffmpeg -c conda-forge
|
||||
```
|
||||
|
||||
#### 6. Install LeRobot with dependencies for the feetech motors:
|
||||
```bash
|
||||
cd ~/lerobot && pip install -e ".[feetech]"
|
||||
```
|
||||
|
||||
Great :hugs:! You are now done installing LeRobot and we can begin assembling the SO100 arms :robot:.
|
||||
Every time you now want to use LeRobot you can go to the `~/lerobot` folder where we installed LeRobot and run one of the commands.
|
||||
|
||||
## C. Configure the motors
|
||||
|
||||
> [!NOTE]
|
||||
> Throughout this tutorial you will find videos on how to do the steps, the full video tutorial can be found here: [assembly video](https://www.youtube.com/watch?v=FioA2oeFZ5I).
|
||||
|
||||
### 1. Find the USB ports associated to each arm
|
||||
|
||||
Designate one bus servo adapter and 6 motors for your leader arm, and similarly the other bus servo adapter and 6 motors for the follower arm. It's convenient to label them and write on each motor if it's for the follower `F` or for the leader `L` and it's ID from 1 to 6 (F1...F6 and L1...L6).
|
||||
|
||||
#### a. Run the script to find port
|
||||
|
||||
<details>
|
||||
<summary><strong>Video finding port</strong></summary>
|
||||
<video src="https://github.com/user-attachments/assets/4a21a14d-2046-4805-93c4-ee97a30ba33f"></video>
|
||||
<video src="https://github.com/user-attachments/assets/1cc3aecf-c16d-4ff9-aec7-8c175afbbce2"></video>
|
||||
</details>
|
||||
|
||||
To find the port for each bus servo adapter, run the utility script:
|
||||
```bash
|
||||
python lerobot/scripts/find_motors_bus_port.py
|
||||
```
|
||||
|
||||
#### b. Example outputs
|
||||
|
||||
Example output when identifying the leader arm's port (e.g., `/dev/tty.usbmodem575E0031751` on Mac, or possibly `/dev/ttyACM0` on Linux):
|
||||
```
|
||||
Finding all available ports for the MotorBus.
|
||||
['/dev/tty.usbmodem575E0032081', '/dev/tty.usbmodem575E0031751']
|
||||
Remove the usb cable from your MotorsBus and press Enter when done.
|
||||
|
||||
[...Disconnect leader arm and press Enter...]
|
||||
|
||||
The port of this MotorsBus is /dev/tty.usbmodem575E0031751
|
||||
Reconnect the usb cable.
|
||||
```
|
||||
Example output when identifying the follower arm's port (e.g., `/dev/tty.usbmodem575E0032081`, or possibly `/dev/ttyACM1` on Linux):
|
||||
```
|
||||
Finding all available ports for the MotorBus.
|
||||
['/dev/tty.usbmodem575E0032081', '/dev/tty.usbmodem575E0031751']
|
||||
Remove the usb cable from your MotorsBus and press Enter when done.
|
||||
|
||||
[...Disconnect follower arm and press Enter...]
|
||||
|
||||
The port of this MotorsBus is /dev/tty.usbmodem575E0032081
|
||||
Reconnect the usb cable.
|
||||
```
|
||||
|
||||
#### c. Troubleshooting
|
||||
On Linux, you might need to give access to the USB ports by running:
|
||||
```bash
|
||||
sudo chmod 666 /dev/ttyACM0
|
||||
sudo chmod 666 /dev/ttyACM1
|
||||
```
|
||||
|
||||
#### d. Update config file
|
||||
|
||||
IMPORTANTLY: Now that you have your ports, update the **port** default values of [`SO100RobotConfig`](../lerobot/common/robot_devices/robots/configs.py). You will find something like:
|
||||
```diff
|
||||
@RobotConfig.register_subclass("so100")
|
||||
@dataclass
|
||||
class So100RobotConfig(ManipulatorRobotConfig):
|
||||
calibration_dir: str = ".cache/calibration/so100"
|
||||
# `max_relative_target` limits the magnitude of the relative positional target vector for safety purposes.
|
||||
# Set this to a positive scalar to have the same value for all motors, or a list that is the same length as
|
||||
# the number of motors in your follower arms.
|
||||
max_relative_target: int | None = None
|
||||
|
||||
leader_arms: dict[str, MotorsBusConfig] = field(
|
||||
default_factory=lambda: {
|
||||
"main": FeetechMotorsBusConfig(
|
||||
- port="/dev/tty.usbmodem58760431091",
|
||||
+ port="{ADD YOUR LEADER PORT}",
|
||||
motors={
|
||||
# name: (index, model)
|
||||
"shoulder_pan": [1, "sts3215"],
|
||||
"shoulder_lift": [2, "sts3215"],
|
||||
"elbow_flex": [3, "sts3215"],
|
||||
"wrist_flex": [4, "sts3215"],
|
||||
"wrist_roll": [5, "sts3215"],
|
||||
"gripper": [6, "sts3215"],
|
||||
},
|
||||
),
|
||||
}
|
||||
)
|
||||
|
||||
follower_arms: dict[str, MotorsBusConfig] = field(
|
||||
default_factory=lambda: {
|
||||
"main": FeetechMotorsBusConfig(
|
||||
- port="/dev/tty.usbmodem585A0076891",
|
||||
+ port="{ADD YOUR FOLLOWER PORT}",
|
||||
motors={
|
||||
# name: (index, model)
|
||||
"shoulder_pan": [1, "sts3215"],
|
||||
"shoulder_lift": [2, "sts3215"],
|
||||
"elbow_flex": [3, "sts3215"],
|
||||
"wrist_flex": [4, "sts3215"],
|
||||
"wrist_roll": [5, "sts3215"],
|
||||
"gripper": [6, "sts3215"],
|
||||
},
|
||||
),
|
||||
}
|
||||
)
|
||||
```
|
||||
|
||||
### 2. Assembling the Base
|
||||
Let's begin with assembling the follower arm base
|
||||
|
||||
#### a. Set IDs for all 12 motors
|
||||
|
||||
<details>
|
||||
<summary><strong>Video configuring motor</strong></summary>
|
||||
<video src="https://github.com/user-attachments/assets/ef9b3317-2e11-4858-b9d3-f0a02fb48ecf"></video>
|
||||
<video src="https://github.com/user-attachments/assets/f36b5ed5-c803-4ebe-8947-b39278776a0d"></video>
|
||||
</details>
|
||||
|
||||
Plug your first motor F1 and run this script to set its ID to 1. It will also set its present position to 2048, so expect your motor to rotate. Replace the text after --port to the corresponding follower control board port and run this command in cmd:
|
||||
```bash
|
||||
python lerobot/scripts/configure_motor.py \
|
||||
--port /dev/tty.usbmodem58760432961 \
|
||||
--brand feetech \
|
||||
--model sts3215 \
|
||||
--baudrate 1000000 \
|
||||
--id 1
|
||||
```
|
||||
|
||||
> [!NOTE]
|
||||
> These motors are currently limited. They can take values between 0 and 4096 only, which corresponds to a full turn. They can't turn more than that. 2048 is at the middle of this range, so we can take -2048 steps (180 degrees anticlockwise) and reach the maximum range, or take +2048 steps (180 degrees clockwise) and reach the maximum range. The configuration step also sets the homing offset to 0, so that if you misassembled the arm, you can always update the homing offset to account for a shift up to ± 2048 steps (± 180 degrees).
|
||||
|
||||
Then unplug your motor and plug the second motor and set its ID to 2.
|
||||
```bash
|
||||
python lerobot/scripts/configure_motor.py \
|
||||
--port /dev/tty.usbmodem58760432961 \
|
||||
--brand feetech \
|
||||
--model sts3215 \
|
||||
--baudrate 1000000 \
|
||||
--id 2
|
||||
```
|
||||
|
||||
Redo the process for all your motors until ID 6. Do the same for the 6 motors of the leader arm.
|
||||
|
||||
|
||||
#### b. Remove the gears of the 6 leader motors
|
||||
|
||||
<details>
|
||||
<summary><strong>Video removing gears</strong></summary>
|
||||
|
||||
<video src="https://github.com/user-attachments/assets/0c95b88c-5b85-413d-ba19-aee2f864f2a7"></video>
|
||||
|
||||
</details>
|
||||
|
||||
|
||||
Follow the video for removing gears. You need to remove the gear for the motors of the leader arm. As a result, you will only use the position encoding of the motor and reduce friction to more easily operate the leader arm.
|
||||
|
||||
## D. Step-by-Step Assembly Instructions
|
||||
|
||||
**Step 1: Clean Parts**
|
||||
- Remove all support material from the 3D-printed parts.
|
||||
---
|
||||
|
||||
### Additional Guidance
|
||||
|
||||
<details>
|
||||
<summary><strong>Video assembling arms</strong></summary>
|
||||
|
||||
<video src="https://github.com/user-attachments/assets/488a39de-0189-4461-9de3-05b015f90cca"></video>
|
||||
|
||||
</details>
|
||||
|
||||
**Note:**
|
||||
This video provides visual guidance for assembling the arms, but it doesn't specify when or how to do the wiring. Inserting the cables beforehand is much easier than doing it afterward. The first arm may take a bit more than 1 hour to assemble, but once you get used to it, you can assemble the second arm in under 1 hour.
|
||||
|
||||
---
|
||||
|
||||
### First Motor
|
||||
|
||||
**Step 2: Insert Wires**
|
||||
- Insert two wires into the first motor.
|
||||
|
||||
<img src="../media/tutorial/img1.jpg" style="height:300px;">
|
||||
|
||||
**Step 3: Install in Base**
|
||||
- Place the first motor into the base.
|
||||
|
||||
<img src="../media/tutorial/img2.jpg" style="height:300px;">
|
||||
|
||||
**Step 4: Secure Motor**
|
||||
- Fasten the motor with 4 screws. Two from the bottom and two from top.
|
||||
|
||||
**Step 5: Attach Motor Holder**
|
||||
- Slide over the first motor holder and fasten it using two screws (one on each side).
|
||||
|
||||
<img src="../media/tutorial/img4.jpg" style="height:300px;">
|
||||
|
||||
**Step 6: Attach Motor Horns**
|
||||
- Install both motor horns, securing the top horn with a screw. Try not to move the motor position when attaching the motor horn, especially for the leader arms, where we removed the gears.
|
||||
|
||||
<img src="../media/tutorial/img5.jpg" style="height:300px;">
|
||||
<details>
|
||||
<summary><strong>Video adding motor horn</strong></summary>
|
||||
<video src="https://github.com/user-attachments/assets/ef3391a4-ad05-4100-b2bd-1699bf86c969"></video>
|
||||
</details>
|
||||
|
||||
**Step 7: Attach Shoulder Part**
|
||||
- Route one wire to the back of the robot and the other to the left or in photo towards you (see photo).
|
||||
- Attach the shoulder part.
|
||||
|
||||
<img src="../media/tutorial/img6.jpg" style="height:300px;">
|
||||
|
||||
**Step 8: Secure Shoulder**
|
||||
- Tighten the shoulder part with 4 screws on top and 4 on the bottom
|
||||
*(access bottom holes by turning the shoulder).*
|
||||
|
||||
---
|
||||
|
||||
### Second Motor Assembly
|
||||
|
||||
**Step 9: Install Motor 2**
|
||||
- Slide the second motor in from the top and link the wire from motor 1 to motor 2.
|
||||
|
||||
<img src="../media/tutorial/img8.jpg" style="height:300px;">
|
||||
|
||||
**Step 10: Attach Shoulder Holder**
|
||||
- Add the shoulder motor holder.
|
||||
- Ensure the wire from motor 1 to motor 2 goes behind the holder while the other wire is routed upward (see photo).
|
||||
- This part can be tight to assemble, you can use a workbench like the image or a similar setup to push the part around the motor.
|
||||
|
||||
<div style="display: flex;">
|
||||
<img src="../media/tutorial/img9.jpg" style="height:250px;">
|
||||
<img src="../media/tutorial/img10.jpg" style="height:250px;">
|
||||
<img src="../media/tutorial/img12.jpg" style="height:250px;">
|
||||
</div>
|
||||
|
||||
**Step 11: Secure Motor 2**
|
||||
- Fasten the second motor with 4 screws.
|
||||
|
||||
**Step 12: Attach Motor Horn**
|
||||
- Attach both motor horns to motor 2, again use the horn screw.
|
||||
|
||||
**Step 13: Attach Base**
|
||||
- Install the base attachment using 2 screws.
|
||||
|
||||
<img src="../media/tutorial/img11.jpg" style="height:300px;">
|
||||
|
||||
**Step 14: Attach Upper Arm**
|
||||
- Attach the upper arm with 4 screws on each side.
|
||||
|
||||
<img src="../media/tutorial/img13.jpg" style="height:300px;">
|
||||
|
||||
---
|
||||
|
||||
### Third Motor Assembly
|
||||
|
||||
**Step 15: Install Motor 3**
|
||||
- Route the motor cable from motor 2 through the cable holder to motor 3, then secure motor 3 with 4 screws.
|
||||
|
||||
**Step 16: Attach Motor Horn**
|
||||
- Attach both motor horns to motor 3 and secure one again with a horn screw.
|
||||
|
||||
<img src="../media/tutorial/img14.jpg" style="height:300px;">
|
||||
|
||||
**Step 17: Attach Forearm**
|
||||
- Connect the forearm to motor 3 using 4 screws on each side.
|
||||
|
||||
<img src="../media/tutorial/img15.jpg" style="height:300px;">
|
||||
|
||||
---
|
||||
|
||||
### Fourth Motor Assembly
|
||||
|
||||
**Step 18: Install Motor 4**
|
||||
- Slide in motor 4, attach the cable from motor 3, and secure the cable in its holder with a screw.
|
||||
|
||||
<div style="display: flex;">
|
||||
<img src="../media/tutorial/img16.jpg" style="height:300px;">
|
||||
<img src="../media/tutorial/img19.jpg" style="height:300px;">
|
||||
</div>
|
||||
|
||||
**Step 19: Attach Motor Holder 4**
|
||||
- Install the fourth motor holder (a tight fit). Ensure one wire is routed upward and the wire from motor 3 is routed downward (see photo).
|
||||
|
||||
<img src="../media/tutorial/img17.jpg" style="height:300px;">
|
||||
|
||||
**Step 20: Secure Motor 4 & Attach Horn**
|
||||
- Fasten motor 4 with 4 screws and attach its motor horns, use for one a horn screw.
|
||||
|
||||
<img src="../media/tutorial/img18.jpg" style="height:300px;">
|
||||
|
||||
---
|
||||
|
||||
### Wrist Assembly
|
||||
|
||||
**Step 21: Install Motor 5**
|
||||
- Insert motor 5 into the wrist holder and secure it with 2 front screws.
|
||||
|
||||
<img src="../media/tutorial/img20.jpg" style="height:300px;">
|
||||
|
||||
**Step 22: Attach Wrist**
|
||||
- Connect the wire from motor 4 to motor 5. And already insert the other wire for the gripper.
|
||||
- Secure the wrist to motor 4 using 4 screws on both sides.
|
||||
|
||||
<img src="../media/tutorial/img22.jpg" style="height:300px;">
|
||||
|
||||
**Step 23: Attach Wrist Horn**
|
||||
- Install only one motor horn on the wrist motor and secure it with a horn screw.
|
||||
|
||||
<img src="../media/tutorial/img23.jpg" style="height:300px;">
|
||||
|
||||
---
|
||||
|
||||
### Follower Configuration
|
||||
|
||||
**Step 24: Attach Gripper**
|
||||
- Attach the gripper to motor 5.
|
||||
|
||||
<img src="../media/tutorial/img24.jpg" style="height:300px;">
|
||||
|
||||
**Step 25: Install Gripper Motor**
|
||||
- Insert the gripper motor, connect the motor wire from motor 5 to motor 6, and secure it with 3 screws on each side.
|
||||
|
||||
<img src="../media/tutorial/img25.jpg" style="height:300px;">
|
||||
|
||||
**Step 26: Attach Gripper Horn & Claw**
|
||||
- Attach the motor horns and again use a horn screw.
|
||||
- Install the gripper claw and secure it with 4 screws on both sides.
|
||||
|
||||
<img src="../media/tutorial/img26.jpg" style="height:300px;">
|
||||
|
||||
**Step 27: Mount Controller**
|
||||
- Attach the motor controller on the back.
|
||||
|
||||
<div style="display: flex;">
|
||||
<img src="../media/tutorial/img27.jpg" style="height:300px;">
|
||||
<img src="../media/tutorial/img28.jpg" style="height:300px;">
|
||||
</div>
|
||||
|
||||
*Assembly complete – proceed to Leader arm assembly.*
|
||||
|
||||
---
|
||||
|
||||
### Leader Configuration
|
||||
|
||||
For the leader configuration, perform **Steps 1–23**. Make sure that you removed the motor gears from the motors.
|
||||
|
||||
**Step 24: Attach Leader Holder**
|
||||
- Mount the leader holder onto the wrist and secure it with a screw.
|
||||
|
||||
<img src="../media/tutorial/img29.jpg" style="height:300px;">
|
||||
|
||||
**Step 25: Attach Handle**
|
||||
- Attach the handle to motor 5 using 4 screws.
|
||||
|
||||
<img src="../media/tutorial/img30.jpg" style="height:300px;">
|
||||
|
||||
**Step 26: Install Gripper Motor**
|
||||
- Insert the gripper motor, secure it with 3 screws on each side, attach a motor horn using a horn screw, and connect the motor wire.
|
||||
|
||||
<img src="../media/tutorial/img31.jpg" style="height:300px;">
|
||||
|
||||
**Step 27: Attach Trigger**
|
||||
- Attach the follower trigger with 4 screws.
|
||||
|
||||
<img src="../media/tutorial/img32.jpg" style="height:300px;">
|
||||
|
||||
**Step 28: Mount Controller**
|
||||
- Attach the motor controller on the back.
|
||||
|
||||
<div style="display: flex;">
|
||||
<img src="../media/tutorial/img27.jpg" style="height:300px;">
|
||||
<img src="../media/tutorial/img28.jpg" style="height:300px;">
|
||||
</div>
|
||||
|
||||
*Assembly complete – proceed to calibration.*
|
||||
|
||||
|
||||
## E. Calibrate
|
||||
|
||||
Next, you'll need to calibrate your SO-100 robot to ensure that the leader and follower arms have the same position values when they are in the same physical position.
|
||||
The calibration process is very important because it allows a neural network trained on one SO-100 robot to work on another.
|
||||
|
||||
#### Manual calibration of follower arm
|
||||
|
||||
You will need to move the follower arm to these positions sequentially, note that the rotated position is on the right side of the robot and you have to open the gripper fully.
|
||||
|
||||
| 1. Middle position | 2. Zero position | 3. Rotated position | 4. Rest position |
|
||||
| ------------ |------------------------------------------------------------------------------------------------------------------------------------------------------ | --------------------------------------------------------------------------------------------------------------------------------------------------------------- | ------------------------------------------------------------------------------------------------------------------------------------------------------ |
|
||||
| <img src="../media/so101/follower_middle.webp?raw=true" alt="SO-101 leader arm middle position" title="SO-101 leader arm middle position" style="width:100%;"> | <img src="../media/so101/follower_zero.webp?raw=true" alt="SO-101 leader arm zero position" title="SO-101 leader arm zero position" style="width:100%;"> | <img src="../media/so101/follower_rotated.webp?raw=true" alt="SO-101 leader arm rotated position" title="SO-101 leader arm rotated position" style="width:100%;"> | <img src="../media/so101/follower_rest.webp?raw=true" alt="SO-101 leader arm rest position" title="SO-101 leader arm rest position" style="width:100%;"> |
|
||||
|
||||
Make sure both arms are connected and run this script to launch manual calibration:
|
||||
```bash
|
||||
python lerobot/scripts/control_robot.py \
|
||||
--robot.type=so100 \
|
||||
--robot.cameras='{}' \
|
||||
--control.type=calibrate \
|
||||
--control.arms='["main_follower"]'
|
||||
```
|
||||
|
||||
#### Manual calibration of leader arm
|
||||
You will also need to move the leader arm to these positions sequentially:
|
||||
|
||||
| 1. Middle position | 2. Zero position | 3. Rotated position | 4. Rest position |
|
||||
| ------------ |------------------------------------------------------------------------------------------------------------------------------------------------------ | --------------------------------------------------------------------------------------------------------------------------------------------------------------- | ------------------------------------------------------------------------------------------------------------------------------------------------------ |
|
||||
| <img src="../media/so101/leader_middle.webp?raw=true" alt="SO-100 leader arm middle position" title="SO-100 leader arm middle position" style="width:100%;"> | <img src="../media/so101/leader_zero.webp?raw=true" alt="SO-100 leader arm zero position" title="SO-100 leader arm zero position" style="width:100%;"> | <img src="../media/so101/leader_rotated.webp?raw=true" alt="SO-100 leader arm rotated position" title="SO-100 leader arm rotated position" style="width:100%;"> | <img src="../media/so101/leader_rest.webp?raw=true" alt="SO-100 leader arm rest position" title="SO-100 leader arm rest position" style="width:100%;"> |
|
||||
|
||||
Run this script to launch manual calibration:
|
||||
```bash
|
||||
python lerobot/scripts/control_robot.py \
|
||||
--robot.type=so100 \
|
||||
--robot.cameras='{}' \
|
||||
--control.type=calibrate \
|
||||
--control.arms='["main_leader"]'
|
||||
```
|
||||
|
||||
## F. Teleoperate
|
||||
|
||||
**Simple teleop**
|
||||
Then you are ready to teleoperate your robot! Run this simple script (it won't connect and display the cameras):
|
||||
```bash
|
||||
python lerobot/scripts/control_robot.py \
|
||||
--robot.type=so100 \
|
||||
--robot.cameras='{}' \
|
||||
--control.type=teleoperate
|
||||
```
|
||||
|
||||
|
||||
#### a. Teleop with displaying cameras
|
||||
Follow [this guide to setup your cameras](https://github.com/huggingface/lerobot/blob/main/examples/7_get_started_with_real_robot.md#c-add-your-cameras-with-opencvcamera). Then you will be able to display the cameras on your computer while you are teleoperating by running the following code. This is useful to prepare your setup before recording your first dataset.
|
||||
|
||||
> **NOTE:** To visualize the data, enable `--control.display_data=true`. This streams the data using `rerun`.
|
||||
|
||||
```bash
|
||||
python lerobot/scripts/control_robot.py \
|
||||
--robot.type=so100 \
|
||||
--control.type=teleoperate
|
||||
```
|
||||
|
||||
## G. Record a dataset
|
||||
|
||||
Once you're familiar with teleoperation, you can record your first dataset with SO-100.
|
||||
|
||||
If you want to use the Hugging Face hub features for uploading your dataset and you haven't previously done it, make sure you've logged in using a write-access token, which can be generated from the [Hugging Face settings](https://huggingface.co/settings/tokens):
|
||||
```bash
|
||||
huggingface-cli login --token ${HUGGINGFACE_TOKEN} --add-to-git-credential
|
||||
```
|
||||
|
||||
Store your Hugging Face repository name in a variable to run these commands:
|
||||
```bash
|
||||
HF_USER=$(huggingface-cli whoami | head -n 1)
|
||||
echo $HF_USER
|
||||
```
|
||||
|
||||
Record 2 episodes and upload your dataset to the hub:
|
||||
```bash
|
||||
python lerobot/scripts/control_robot.py \
|
||||
--robot.type=so100 \
|
||||
--control.type=record \
|
||||
--control.fps=30 \
|
||||
--control.single_task="Grasp a lego block and put it in the bin." \
|
||||
--control.repo_id=${HF_USER}/so100_test \
|
||||
--control.tags='["so100","tutorial"]' \
|
||||
--control.warmup_time_s=5 \
|
||||
--control.episode_time_s=30 \
|
||||
--control.reset_time_s=30 \
|
||||
--control.num_episodes=2 \
|
||||
--control.push_to_hub=true
|
||||
```
|
||||
|
||||
Note: You can resume recording by adding `--control.resume=true`.
|
||||
|
||||
## H. Visualize a dataset
|
||||
|
||||
If you uploaded your dataset to the hub with `--control.push_to_hub=true`, you can [visualize your dataset online](https://huggingface.co/spaces/lerobot/visualize_dataset) by copy pasting your repo id given by:
|
||||
```bash
|
||||
echo ${HF_USER}/so100_test
|
||||
```
|
||||
|
||||
If you didn't upload with `--control.push_to_hub=false`, you can also visualize it locally with (a window can be opened in the browser `http://127.0.0.1:9090` with the visualization tool):
|
||||
```bash
|
||||
python lerobot/scripts/visualize_dataset_html.py \
|
||||
--repo-id ${HF_USER}/so100_test \
|
||||
--local-files-only 1
|
||||
```
|
||||
|
||||
## I. Replay an episode
|
||||
|
||||
Now try to replay the first episode on your robot:
|
||||
```bash
|
||||
python lerobot/scripts/control_robot.py \
|
||||
--robot.type=so100 \
|
||||
--control.type=replay \
|
||||
--control.fps=30 \
|
||||
--control.repo_id=${HF_USER}/so100_test \
|
||||
--control.episode=0
|
||||
```
|
||||
|
||||
## J. Train a policy
|
||||
|
||||
To train a policy to control your robot, use the [`python lerobot/scripts/train.py`](../lerobot/scripts/train.py) script. A few arguments are required. Here is an example command:
|
||||
```bash
|
||||
python lerobot/scripts/train.py \
|
||||
--dataset.repo_id=${HF_USER}/so100_test \
|
||||
--policy.type=act \
|
||||
--output_dir=outputs/train/act_so100_test \
|
||||
--job_name=act_so100_test \
|
||||
--policy.device=cuda \
|
||||
--wandb.enable=true
|
||||
```
|
||||
|
||||
Let's explain it:
|
||||
1. We provided the dataset as argument with `--dataset.repo_id=${HF_USER}/so100_test`.
|
||||
2. We provided the policy with `policy.type=act`. This loads configurations from [`configuration_act.py`](../lerobot/common/policies/act/configuration_act.py). Importantly, this policy will automatically adapt to the number of motor states, motor actions and cameras of your robot (e.g. `laptop` and `phone`) which have been saved in your dataset.
|
||||
4. We provided `policy.device=cuda` since we are training on a Nvidia GPU, but you could use `policy.device=mps` to train on Apple silicon.
|
||||
5. We provided `wandb.enable=true` to use [Weights and Biases](https://docs.wandb.ai/quickstart) for visualizing training plots. This is optional but if you use it, make sure you are logged in by running `wandb login`.
|
||||
|
||||
Training should take several hours. You will find checkpoints in `outputs/train/act_so100_test/checkpoints`.
|
||||
|
||||
To resume training from a checkpoint, below is an example command to resume from `last` checkpoint of the `act_so100_test` policy:
|
||||
```bash
|
||||
python lerobot/scripts/train.py \
|
||||
--config_path=outputs/train/act_so100_test/checkpoints/last/pretrained_model/train_config.json \
|
||||
--resume=true
|
||||
```
|
||||
|
||||
## K. Evaluate your policy
|
||||
|
||||
You can use the `record` function from [`lerobot/scripts/control_robot.py`](../lerobot/scripts/control_robot.py) but with a policy checkpoint as input. For instance, run this command to record 10 evaluation episodes:
|
||||
```bash
|
||||
python lerobot/scripts/control_robot.py \
|
||||
--robot.type=so100 \
|
||||
--control.type=record \
|
||||
--control.fps=30 \
|
||||
--control.single_task="Grasp a lego block and put it in the bin." \
|
||||
--control.repo_id=${HF_USER}/eval_act_so100_test \
|
||||
--control.tags='["tutorial"]' \
|
||||
--control.warmup_time_s=5 \
|
||||
--control.episode_time_s=30 \
|
||||
--control.reset_time_s=30 \
|
||||
--control.num_episodes=10 \
|
||||
--control.push_to_hub=true \
|
||||
--control.policy.path=outputs/train/act_so100_test/checkpoints/last/pretrained_model
|
||||
```
|
||||
|
||||
As you can see, it's almost the same command as previously used to record your training dataset. Two things changed:
|
||||
1. There is an additional `--control.policy.path` argument which indicates the path to your policy checkpoint with (e.g. `outputs/train/eval_act_so100_test/checkpoints/last/pretrained_model`). You can also use the model repository if you uploaded a model checkpoint to the hub (e.g. `${HF_USER}/act_so100_test`).
|
||||
2. The name of dataset begins by `eval` to reflect that you are running inference (e.g. `${HF_USER}/eval_act_so100_test`).
|
||||
|
||||
## L. More Information
|
||||
|
||||
Follow this [previous tutorial](https://github.com/huggingface/lerobot/blob/main/examples/7_get_started_with_real_robot.md#4-train-a-policy-on-your-data) for a more in-depth tutorial on controlling real robots with LeRobot.
|
||||
|
||||
> [!TIP]
|
||||
> If you have any questions or need help, please reach out on [Discord](https://discord.com/invite/s3KuuzsPFb) in the channel [`#so100-arm`](https://discord.com/channels/1216765309076115607/1237741463832363039).
|
||||
@@ -1,2 +0,0 @@
|
||||
from .config_so100_follower import SO100FollowerConfig
|
||||
from .so100_follower import SO100Follower
|
||||
@@ -1,22 +0,0 @@
|
||||
from dataclasses import dataclass, field
|
||||
|
||||
from lerobot.common.cameras import CameraConfig
|
||||
|
||||
from ..config import RobotConfig
|
||||
|
||||
|
||||
@RobotConfig.register_subclass("so100_follower")
|
||||
@dataclass
|
||||
class SO100FollowerConfig(RobotConfig):
|
||||
# Port to connect to the arm
|
||||
port: str
|
||||
|
||||
disable_torque_on_disconnect: bool = True
|
||||
|
||||
# `max_relative_target` limits the magnitude of the relative positional target vector for safety purposes.
|
||||
# Set this to a positive scalar to have the same value for all motors, or a list that is the same length as
|
||||
# the number of motors in your follower arms.
|
||||
max_relative_target: int | None = None
|
||||
|
||||
# cameras
|
||||
cameras: dict[str, CameraConfig] = field(default_factory=dict)
|
||||
@@ -1,711 +0,0 @@
|
||||
# Assemble and use SO-101
|
||||
|
||||
In the steps below we explain how to assemble and use our flagship robot, the SO-101 with LeRobot 🤗.
|
||||
|
||||
## Source the parts
|
||||
|
||||
Follow this [README](https://github.com/TheRobotStudio/SO-ARM100). It contains the bill of materials, with a link to source the parts, as well as the instructions to 3D print the parts,
|
||||
and advice if it's your first time printing or if you don't own a 3D printer.
|
||||
|
||||
Before assembling, you will first need to configure your motors. To this end, we provide a nice script, so let's first install LeRobot. After configuration, we will also guide you through assembly.
|
||||
|
||||
## Install LeRobot
|
||||
|
||||
> [!TIP]
|
||||
> We use the Command Prompt (cmd) quite a lot. If you are not comfortable using the cmd or want to brush up using the command line you can have a look here: [Command line crash course](https://developer.mozilla.org/en-US/docs/Learn_web_development/Getting_started/Environment_setup/Command_line)
|
||||
|
||||
Download our source code:
|
||||
```bash
|
||||
git clone https://github.com/huggingface/lerobot.git
|
||||
cd lerobot
|
||||
```
|
||||
|
||||
Create a virtual environment with Python 3.10 and activate it, e.g. with [`miniconda`](https://docs.anaconda.com/miniconda/install/#quick-command-line-install):
|
||||
```bash
|
||||
conda create -y -n lerobot python=3.10
|
||||
```
|
||||
Now restart the shell by running:
|
||||
|
||||
##### Windows:
|
||||
```bash
|
||||
`source ~/.bashrc`
|
||||
```
|
||||
|
||||
##### Mac:
|
||||
```bash
|
||||
`source ~/.bash_profile`
|
||||
```
|
||||
|
||||
##### zshell:
|
||||
```bash
|
||||
`source ~/.zshrc`
|
||||
```
|
||||
|
||||
Then activate your conda environment, you have to do this each time you open a shell to use lerobot:
|
||||
```bash
|
||||
conda activate lerobot
|
||||
```
|
||||
|
||||
When using `miniconda`, install `ffmpeg` in your environment:
|
||||
```bash
|
||||
conda install ffmpeg -c conda-forge
|
||||
```
|
||||
|
||||
> [!NOTE]
|
||||
> This usually installs `ffmpeg 7.X` for your platform compiled with the `libsvtav1` encoder. If `libsvtav1` is not supported (check supported encoders with `ffmpeg -encoders`), you can:
|
||||
> - _[On any platform]_ Explicitly install `ffmpeg 7.X` using:
|
||||
> ```bash
|
||||
> conda install ffmpeg=7.1.1 -c conda-forge
|
||||
> ```
|
||||
> - _[On Linux only]_ Install [ffmpeg build dependencies](https://trac.ffmpeg.org/wiki/CompilationGuide/Ubuntu#GettheDependencies) and [compile ffmpeg from source with libsvtav1](https://trac.ffmpeg.org/wiki/CompilationGuide/Ubuntu#libsvtav1), and make sure you use the corresponding ffmpeg binary to your install with `which ffmpeg`.
|
||||
|
||||
Install 🤗 LeRobot:
|
||||
```bash
|
||||
cd lerobot && pip install ".[feetech]"
|
||||
```
|
||||
|
||||
> [!NOTE]
|
||||
> If you encounter build errors, you may need to install additional dependencies (`cmake`, `build-essential`, and `ffmpeg libs`). On Linux, run: `sudo apt-get install cmake build-essential python3-dev pkg-config libavformat-dev libavcodec-dev libavdevice-dev libavutil-dev libswscale-dev libswresample-dev libavfilter-dev pkg-config`. For other systems, see: [Compiling PyAV](https://pyav.org/docs/develop/overview/installation.html#bring-your-own-ffmpeg)
|
||||
|
||||
|
||||
## Configure motors
|
||||
|
||||
To configure the motors designate one bus servo adapter and 6 motors for your leader arm, and similarly the other bus servo adapter and 6 motors for the follower arm. It's convenient to label them and write on each motor if it's for the follower `F` or for the leader `L` and it's ID from 1 to 6.
|
||||
|
||||
You now should plug the 5V or 12V power supply to the motor bus. 5V for the STS3215 7.4V motors and 12V for the STS3215 12V motors. Note that the leader arm always uses the 7.4V motors, so watch out that you plug in the right power supply if you have 12V and 7.4V motors, otherwise you might burn your motors! Now, connect the motor bus to your computer via USB. Note that the USB doesn't provide any power, and both the power supply and USB have to be plugged in.
|
||||
|
||||
### Find the USB ports associated to each arm
|
||||
|
||||
To find the port for each bus servo adapter, run this script:
|
||||
```bash
|
||||
python lerobot/scripts/find_motors_bus_port.py
|
||||
```
|
||||
#### Example outputs of script
|
||||
|
||||
##### Mac:
|
||||
Example output leader arm's port: `/dev/tty.usbmodem575E0031751`
|
||||
|
||||
```bash
|
||||
Finding all available ports for the MotorBus.
|
||||
['/dev/tty.usbmodem575E0032081', '/dev/tty.usbmodem575E0031751']
|
||||
Remove the usb cable from your MotorsBus and press Enter when done.
|
||||
|
||||
[...Disconnect leader arm and press Enter...]
|
||||
|
||||
The port of this MotorsBus is /dev/tty.usbmodem575E0031751
|
||||
Reconnect the usb cable.
|
||||
```
|
||||
|
||||
Example output follower arm port: `/dev/tty.usbmodem575E0032081`
|
||||
|
||||
```
|
||||
Finding all available ports for the MotorBus.
|
||||
['/dev/tty.usbmodem575E0032081', '/dev/tty.usbmodem575E0031751']
|
||||
Remove the usb cable from your MotorsBus and press Enter when done.
|
||||
|
||||
[...Disconnect follower arm and press Enter...]
|
||||
|
||||
The port of this MotorsBus is /dev/tty.usbmodem575E0032081
|
||||
Reconnect the usb cable.
|
||||
```
|
||||
|
||||
##### Linux:
|
||||
On Linux, you might need to give access to the USB ports by running:
|
||||
```bash
|
||||
sudo chmod 666 /dev/ttyACM0
|
||||
sudo chmod 666 /dev/ttyACM1
|
||||
```
|
||||
|
||||
Example output leader arm port: `/dev/ttyACM0`
|
||||
|
||||
```bash
|
||||
Finding all available ports for the MotorBus.
|
||||
['/dev/ttyACM0', '/dev/ttyACM1']
|
||||
Remove the usb cable from your MotorsBus and press Enter when done.
|
||||
|
||||
[...Disconnect leader arm and press Enter...]
|
||||
|
||||
The port of this MotorsBus is /dev/ttyACM0
|
||||
Reconnect the usb cable.
|
||||
```
|
||||
|
||||
Example output follower arm port: `/dev/ttyACM1`
|
||||
|
||||
```
|
||||
Finding all available ports for the MotorBus.
|
||||
['/dev/ttyACM0', '/dev/ttyACM1']
|
||||
Remove the usb cable from your MotorsBus and press Enter when done.
|
||||
|
||||
[...Disconnect follower arm and press Enter...]
|
||||
|
||||
The port of this MotorsBus is /dev/ttyACM1
|
||||
Reconnect the usb cable.
|
||||
```
|
||||
|
||||
#### Update config file
|
||||
|
||||
Now that you have your ports, update the **port** default values of [`SO101RobotConfig`](https://github.com/huggingface/lerobot/blob/main/lerobot/common/robot_devices/robots/configs.py).
|
||||
You will find a class called `so101` where you can update the `port` values with your actual motor ports:
|
||||
```diff
|
||||
@RobotConfig.register_subclass("so101")
|
||||
@dataclass
|
||||
class So101RobotConfig(ManipulatorRobotConfig):
|
||||
calibration_dir: str = ".cache/calibration/so101"
|
||||
# `max_relative_target` limits the magnitude of the relative positional target vector for safety purposes.
|
||||
# Set this to a positive scalar to have the same value for all motors, or a list that is the same length as
|
||||
# the number of motors in your follower arms.
|
||||
max_relative_target: int | None = None
|
||||
|
||||
leader_arms: dict[str, MotorsBusConfig] = field(
|
||||
default_factory=lambda: {
|
||||
"main": FeetechMotorsBusConfig(
|
||||
- port="/dev/tty.usbmodem58760431091",
|
||||
+ port="{ADD YOUR LEADER PORT}",
|
||||
motors={
|
||||
# name: (index, model)
|
||||
"shoulder_pan": [1, "sts3215"],
|
||||
"shoulder_lift": [2, "sts3215"],
|
||||
"elbow_flex": [3, "sts3215"],
|
||||
"wrist_flex": [4, "sts3215"],
|
||||
"wrist_roll": [5, "sts3215"],
|
||||
"gripper": [6, "sts3215"],
|
||||
},
|
||||
),
|
||||
}
|
||||
)
|
||||
|
||||
follower_arms: dict[str, MotorsBusConfig] = field(
|
||||
default_factory=lambda: {
|
||||
"main": FeetechMotorsBusConfig(
|
||||
- port="/dev/tty.usbmodem585A0076891",
|
||||
+ port="{ADD YOUR FOLLOWER PORT}",
|
||||
motors={
|
||||
# name: (index, model)
|
||||
"shoulder_pan": [1, "sts3215"],
|
||||
"shoulder_lift": [2, "sts3215"],
|
||||
"elbow_flex": [3, "sts3215"],
|
||||
"wrist_flex": [4, "sts3215"],
|
||||
"wrist_roll": [5, "sts3215"],
|
||||
"gripper": [6, "sts3215"],
|
||||
},
|
||||
),
|
||||
}
|
||||
)
|
||||
```
|
||||
|
||||
Here is a video of the process:
|
||||
|
||||
<video controls width="640" src="https://github.com/user-attachments/assets/fc45d756-31bb-4a61-b973-a87d633d08a7" type="video/mp4"></video>
|
||||
|
||||
### Set motor IDs
|
||||
|
||||
Now we need to set the motor ID for each motor. Plug your motor in only one of the two ports of the motor bus and run this script to set its ID to 1. Replace the text after --port to the corresponding control board port.
|
||||
```bash
|
||||
python lerobot/scripts/configure_motor.py \
|
||||
--port /dev/tty.usbmodem58760432961 \
|
||||
--brand feetech \
|
||||
--model sts3215 \
|
||||
--baudrate 1000000 \
|
||||
--ID 1
|
||||
```
|
||||
|
||||
Then unplug your motor and plug the second motor and set its ID to 2.
|
||||
```bash
|
||||
python lerobot/scripts/configure_motor.py \
|
||||
--port /dev/tty.usbmodem58760432961 \
|
||||
--brand feetech \
|
||||
--model sts3215 \
|
||||
--baudrate 1000000 \
|
||||
--ID 2
|
||||
```
|
||||
|
||||
Redo this process for all your motors until ID 6. Do the same for the 6 motors of the leader arm, but make sure to change the power supply if you use motors with different voltage.
|
||||
|
||||
Here is a video of the process:
|
||||
|
||||
<video controls width="640" src="https://github.com/user-attachments/assets/b31c115f-e706-4dcd-b7f1-4535da62416d" type="video/mp4"></video>
|
||||
|
||||
## Step-by-Step Assembly Instructions
|
||||
|
||||
The follower arm uses 6x STS3215 motors with 1/345 gearing. The leader however uses three differently geared motors to make sure it can both sustain its own weight and it can be moved without requiring much force. Which motor is needed for which joint is shown in table below.
|
||||
|
||||
| Leader-Arm Axis | Motor | Gear Ratio |
|
||||
|-----------------|:-------:|:----------:|
|
||||
| Base / Shoulder Yaw | 1 | 1 / 191 |
|
||||
| Shoulder Pitch | 2 | 1 / 345 |
|
||||
| Elbow | 3 | 1 / 191 |
|
||||
| Wrist Roll | 4 | 1 / 147 |
|
||||
| Wrist Pitch | 5 | 1 / 147 |
|
||||
| Gripper | 6 | 1 / 147 |
|
||||
|
||||
|
||||
### Clean Parts
|
||||
Remove all support material from the 3D-printed parts.
|
||||
|
||||
### Joint 1
|
||||
|
||||
- Place the first motor into the base.
|
||||
- Fasten the motor with 4 M2x6mm screws (smallest screws). Two from the top and two from bottom.
|
||||
- Slide over the first motor holder and fasten it using two M2x6mm screws (one on each side).
|
||||
- Install both motor horns, securing the top horn with a M3x6mm screw.
|
||||
- Attach the shoulder part.
|
||||
- Tighten the shoulder part with 4 M3x6mm screws on top and 4 M3x6mm screws on the bottom
|
||||
- Add the shoulder motor holder.
|
||||
|
||||
<video controls width="640" src="https://github.com/user-attachments/assets/b0ee9dee-a2d0-445b-8489-02ebecb3d639" type="video/mp4"></video>
|
||||
|
||||
### Joint 2
|
||||
|
||||
- Slide the second motor in from the top.
|
||||
- Fasten the second motor with 4 M2x6mm screws.
|
||||
- Attach both motor horns to motor 2, again use the M3x6mm horn screw.
|
||||
- Attach the upper arm with 4 M3x6mm screws on each side.
|
||||
|
||||
<video controls width="640" src="https://github.com/user-attachments/assets/32453dc2-5006-4140-9f56-f0d78eae5155" type="video/mp4"></video>
|
||||
|
||||
### Joint 3
|
||||
|
||||
- Insert motor 3 and fasten using 4 M2x6mm screws
|
||||
- Attach both motor horns to motor 3 and secure one again with a M3x6mm horn screw.
|
||||
- Connect the forearm to motor 3 using 4 M3x6mm screws on each side.
|
||||
|
||||
<video controls width="640" src="https://github.com/user-attachments/assets/7384b9a7-a946-440c-b292-91391bcc4d6b" type="video/mp4"></video>
|
||||
|
||||
### Joint 4
|
||||
|
||||
- Slide over motor holder 4.
|
||||
- Slide in motor 4.
|
||||
- Fasten motor 4 with 4 M2x6mm screws and attach its motor horns, use a M3x6mm horn screw.
|
||||
|
||||
<video controls width="640" src="https://github.com/user-attachments/assets/dca78ad0-7c36-4bdf-8162-c9ac42a1506f" type="video/mp4"></video>
|
||||
|
||||
### Joint 5
|
||||
|
||||
- Insert motor 5 into the wrist holder and secure it with 2 M2x6mm front screws.
|
||||
- Install only one motor horn on the wrist motor and secure it with a M3x6mm horn screw.
|
||||
- Secure the wrist to motor 4 using 4 M3x6mm screws on both sides.
|
||||
|
||||
<video controls width="640" src="https://github.com/user-attachments/assets/55f5d245-976d-49ff-8b4a-59843c441b12" type="video/mp4"></video>
|
||||
|
||||
### Gripper / Handle
|
||||
|
||||
#### Follower:
|
||||
|
||||
- Attach the gripper to motor 5, attach it to the motor horn on the wrist using 4 M3x6mm screws.
|
||||
- Insert the gripper motor and secure it with 2 M2x6mm screws on each side.
|
||||
- Attach the motor horns and again use a M3x6mm horn screw.
|
||||
- Install the gripper claw and secure it with 4 M3x6mm screws on both sides.
|
||||
|
||||
<video controls width="640" src="https://github.com/user-attachments/assets/6f766aa9-cfae-4388-89e7-0247f198c086" type="video/mp4"></video>
|
||||
|
||||
#### Leader:
|
||||
|
||||
- Mount the leader holder onto the wrist and secure it with 4 M3x6mm screws.
|
||||
- Attach the handle to motor 5 using 1 M2x6mm screw.
|
||||
- Insert the gripper motor, secure it with 2 M2x6mm screws on each side, attach a motor horn using a M3x6mm horn screw.
|
||||
- Attach the follower trigger with 4 M3x6mm screws.
|
||||
|
||||
<video controls width="640" src="https://github.com/user-attachments/assets/1308c93d-2ef1-4560-8e93-a3812568a202" type="video/mp4"></video>
|
||||
|
||||
##### Wiring
|
||||
|
||||
- Attach the motor controller on the back.
|
||||
- Then insert all wires, use the wire guides everywhere to make sure the wires don't unplug themselves and stay in place.
|
||||
|
||||
<video controls width="640" src="https://github.com/user-attachments/assets/4c2cacfd-9276-4ee4-8bf2-ba2492667b78" type="video/mp4"></video>
|
||||
|
||||
## Calibrate
|
||||
|
||||
Next, you'll need to calibrate your SO-101 robot to ensure that the leader and follower arms have the same position values when they are in the same physical position.
|
||||
The calibration process is very important because it allows a neural network trained on one SO-101 robot to work on another.
|
||||
|
||||
#### Manual calibration of follower arm
|
||||
|
||||
You will need to move the follower arm to these positions sequentially, note that the rotated position is on the right side of the robot and you have to open the gripper fully.
|
||||
|
||||
| 1. Middle position | 2. Zero position | 3. Rotated position | 4. Rest position |
|
||||
| ------------ |------------------------------------------------------------------------------------------------------------------------------------------------------ | --------------------------------------------------------------------------------------------------------------------------------------------------------------- | ------------------------------------------------------------------------------------------------------------------------------------------------------ |
|
||||
| <img src="../media/so101/follower_middle.webp?raw=true" alt="SO-101 leader arm middle position" title="SO-101 leader arm middle position" style="width:100%;"> | <img src="../media/so101/follower_zero.webp?raw=true" alt="SO-101 leader arm zero position" title="SO-101 leader arm zero position" style="width:100%;"> | <img src="../media/so101/follower_rotated.webp?raw=true" alt="SO-101 leader arm rotated position" title="SO-101 leader arm rotated position" style="width:100%;"> | <img src="../media/so101/follower_rest.webp?raw=true" alt="SO-101 leader arm rest position" title="SO-101 leader arm rest position" style="width:100%;"> |
|
||||
|
||||
Make sure both arms are connected and run this script to launch manual calibration:
|
||||
```bash
|
||||
python lerobot/scripts/control_robot.py \
|
||||
--robot.type=so101 \
|
||||
--robot.cameras='{}' \
|
||||
--control.type=calibrate \
|
||||
--control.arms='["main_follower"]'
|
||||
```
|
||||
|
||||
#### Manual calibration of leader arm
|
||||
You will also need to move the leader arm to these positions sequentially:
|
||||
|
||||
| 1. Middle position | 2. Zero position | 3. Rotated position | 4. Rest position |
|
||||
| ------------ |------------------------------------------------------------------------------------------------------------------------------------------------------ | --------------------------------------------------------------------------------------------------------------------------------------------------------------- | ------------------------------------------------------------------------------------------------------------------------------------------------------ |
|
||||
| <img src="../media/so101/leader_middle.webp?raw=true" alt="SO-101 leader arm middle position" title="SO-101 leader arm middle position" style="width:100%;"> | <img src="../media/so101/leader_zero.webp?raw=true" alt="SO-101 leader arm zero position" title="SO-101 leader arm zero position" style="width:100%;"> | <img src="../media/so101/leader_rotated.webp?raw=true" alt="SO-101 leader arm rotated position" title="SO-101 leader arm rotated position" style="width:100%;"> | <img src="../media/so101/leader_rest.webp?raw=true" alt="SO-101 leader arm rest position" title="SO-101 leader arm rest position" style="width:100%;"> |
|
||||
|
||||
Run this script to launch manual calibration:
|
||||
```bash
|
||||
python lerobot/scripts/control_robot.py \
|
||||
--robot.type=so101 \
|
||||
--robot.cameras='{}' \
|
||||
--control.type=calibrate \
|
||||
--control.arms='["main_leader"]'
|
||||
```
|
||||
## Control your robot
|
||||
|
||||
Congrats 🎉, your robot is all set to learn a task on its own. Next we will explain to you how to train a neural network to autonomously control a real robot.
|
||||
|
||||
**You'll learn to:**
|
||||
1. How to record and visualize your dataset.
|
||||
2. How to train a policy using your data and prepare it for evaluation.
|
||||
3. How to evaluate your policy and visualize the results.
|
||||
|
||||
By following these steps, you'll be able to replicate tasks like picking up a Lego block and placing it in a bin with a high success rate, as demonstrated in [this video](https://x.com/RemiCadene/status/1814680760592572934).
|
||||
|
||||
This tutorial is specifically made for the affordable [SO-101](https://github.com/TheRobotStudio/SO-ARM100) robot, but it contains additional information to be easily adapted to various types of robots like [Aloha bimanual robot](https://aloha-2.github.io) by changing some configurations. The SO-101 consists of a leader arm and a follower arm, each with 6 motors. It can work with one or several cameras to record the scene, which serve as visual sensors for the robot.
|
||||
|
||||
During the data collection phase, you will control the follower arm by moving the leader arm. This process is known as "teleoperation." This technique is used to collect robot trajectories. Afterward, you'll train a neural network to imitate these trajectories and deploy the network to enable your robot to operate autonomously.
|
||||
|
||||
If you encounter any issues at any step of the tutorial, feel free to seek help on [Discord](https://discord.com/invite/s3KuuzsPFb) or don't hesitate to iterate with us on the tutorial by creating issues or pull requests.
|
||||
|
||||
## Teleoperate
|
||||
|
||||
Run this simple script to teleoperate your robot (it won't connect and display the cameras):
|
||||
```bash
|
||||
python lerobot/scripts/control_robot.py \
|
||||
--robot.type=so101 \
|
||||
--robot.cameras='{}' \
|
||||
--control.type=teleoperate
|
||||
```
|
||||
|
||||
The teleoperate command will automatically:
|
||||
1. Identify any missing calibrations and initiate the calibration procedure.
|
||||
2. Connect the robot and start teleoperation.
|
||||
|
||||
## Setup Cameras
|
||||
|
||||
To connect a camera you have three options:
|
||||
1. OpenCVCamera which allows us to use any camera: usb, realsense, laptop webcam
|
||||
2. iPhone camera with MacOS
|
||||
3. Phone camera on Linux
|
||||
|
||||
### Use OpenCVCamera
|
||||
|
||||
The [`OpenCVCamera`](../lerobot/common/robot_devices/cameras/opencv.py) class allows you to efficiently record frames from most cameras using the [`opencv2`](https://docs.opencv.org) library. For more details on compatibility, see [Video I/O with OpenCV Overview](https://docs.opencv.org/4.x/d0/da7/videoio_overview.html).
|
||||
|
||||
To instantiate an [`OpenCVCamera`](../lerobot/common/robot_devices/cameras/opencv.py), you need a camera index (e.g. `OpenCVCamera(camera_index=0)`). When you only have one camera like a webcam of a laptop, the camera index is usually `0` but it might differ, and the camera index might change if you reboot your computer or re-plug your camera. This behavior depends on your operating system.
|
||||
|
||||
To find the camera indices, run the following utility script, which will save a few frames from each detected camera:
|
||||
```bash
|
||||
python lerobot/common/robot_devices/cameras/opencv.py \
|
||||
--images-dir outputs/images_from_opencv_cameras
|
||||
```
|
||||
|
||||
The output will look something like this if you have two cameras connected:
|
||||
```
|
||||
Mac or Windows detected. Finding available camera indices through scanning all indices from 0 to 60
|
||||
[...]
|
||||
Camera found at index 0
|
||||
Camera found at index 1
|
||||
[...]
|
||||
Connecting cameras
|
||||
OpenCVCamera(0, fps=30.0, width=1920.0, height=1080.0, color_mode=rgb)
|
||||
OpenCVCamera(1, fps=24.0, width=1920.0, height=1080.0, color_mode=rgb)
|
||||
Saving images to outputs/images_from_opencv_cameras
|
||||
Frame: 0000 Latency (ms): 39.52
|
||||
[...]
|
||||
Frame: 0046 Latency (ms): 40.07
|
||||
Images have been saved to outputs/images_from_opencv_cameras
|
||||
```
|
||||
|
||||
Check the saved images in `outputs/images_from_opencv_cameras` to identify which camera index corresponds to which physical camera (e.g. `0` for `camera_00` or `1` for `camera_01`):
|
||||
```
|
||||
camera_00_frame_000000.png
|
||||
[...]
|
||||
camera_00_frame_000047.png
|
||||
camera_01_frame_000000.png
|
||||
[...]
|
||||
camera_01_frame_000047.png
|
||||
```
|
||||
|
||||
Note: Some cameras may take a few seconds to warm up, and the first frame might be black or green.
|
||||
|
||||
Now that you have the camera indexes, you should change them in the config. You can also change the fps, width or height of the camera.
|
||||
|
||||
The camera config is defined per robot, can be found here [`RobotConfig`](https://github.com/huggingface/lerobot/blob/main/lerobot/common/robot_devices/robots/configs.py) and looks like this:
|
||||
```python
|
||||
cameras: dict[str, CameraConfig] = field(
|
||||
default_factory=lambda: {
|
||||
"wrist": OpenCVCameraConfig(
|
||||
camera_index=0, <-- UPDATE HERE
|
||||
fps=30,
|
||||
width=640,
|
||||
height=480,
|
||||
),
|
||||
"base": OpenCVCameraConfig(
|
||||
camera_index=1, <-- UPDATE HERE
|
||||
fps=30,
|
||||
width=640,
|
||||
height=480,
|
||||
),
|
||||
}
|
||||
)
|
||||
```
|
||||
|
||||
### Use your phone
|
||||
#### Mac:
|
||||
|
||||
To use your iPhone as a camera on macOS, enable the Continuity Camera feature:
|
||||
- Ensure your Mac is running macOS 13 or later, and your iPhone is on iOS 16 or later.
|
||||
- Sign in both devices with the same Apple ID.
|
||||
- Connect your devices with a USB cable or turn on Wi-Fi and Bluetooth for a wireless connection.
|
||||
|
||||
For more details, visit [Apple support](https://support.apple.com/en-gb/guide/mac-help/mchl77879b8a/mac).
|
||||
|
||||
Your iPhone should be detected automatically when running the camera setup script in the next section.
|
||||
|
||||
#### Linux:
|
||||
|
||||
If you want to use your phone as a camera on Linux, follow these steps to set up a virtual camera
|
||||
|
||||
1. *Install `v4l2loopback-dkms` and `v4l-utils`*. Those packages are required to create virtual camera devices (`v4l2loopback`) and verify their settings with the `v4l2-ctl` utility from `v4l-utils`. Install them using:
|
||||
```python
|
||||
sudo apt install v4l2loopback-dkms v4l-utils
|
||||
```
|
||||
2. *Install [DroidCam](https://droidcam.app) on your phone*. This app is available for both iOS and Android.
|
||||
3. *Install [OBS Studio](https://obsproject.com)*. This software will help you manage the camera feed. Install it using [Flatpak](https://flatpak.org):
|
||||
```python
|
||||
flatpak install flathub com.obsproject.Studio
|
||||
```
|
||||
4. *Install the DroidCam OBS plugin*. This plugin integrates DroidCam with OBS Studio. Install it with:
|
||||
```python
|
||||
flatpak install flathub com.obsproject.Studio.Plugin.DroidCam
|
||||
```
|
||||
5. *Start OBS Studio*. Launch with:
|
||||
```python
|
||||
flatpak run com.obsproject.Studio
|
||||
```
|
||||
6. *Add your phone as a source*. Follow the instructions [here](https://droidcam.app/obs/usage). Be sure to set the resolution to `640x480`.
|
||||
7. *Adjust resolution settings*. In OBS Studio, go to `File > Settings > Video`. Change the `Base(Canvas) Resolution` and the `Output(Scaled) Resolution` to `640x480` by manually typing it in.
|
||||
8. *Start virtual camera*. In OBS Studio, follow the instructions [here](https://obsproject.com/kb/virtual-camera-guide).
|
||||
9. *Verify the virtual camera setup*. Use `v4l2-ctl` to list the devices:
|
||||
```python
|
||||
v4l2-ctl --list-devices
|
||||
```
|
||||
You should see an entry like:
|
||||
```
|
||||
VirtualCam (platform:v4l2loopback-000):
|
||||
/dev/video1
|
||||
```
|
||||
10. *Check the camera resolution*. Use `v4l2-ctl` to ensure that the virtual camera output resolution is `640x480`. Change `/dev/video1` to the port of your virtual camera from the output of `v4l2-ctl --list-devices`.
|
||||
```python
|
||||
v4l2-ctl -d /dev/video1 --get-fmt-video
|
||||
```
|
||||
You should see an entry like:
|
||||
```
|
||||
>>> Format Video Capture:
|
||||
>>> Width/Height : 640/480
|
||||
>>> Pixel Format : 'YUYV' (YUYV 4:2:2)
|
||||
```
|
||||
|
||||
Troubleshooting: If the resolution is not correct you will have to delete the Virtual Camera port and try again as it cannot be changed.
|
||||
|
||||
If everything is set up correctly, you can proceed with the rest of the tutorial.
|
||||
|
||||
### Add wrist camera
|
||||
If you have an additional camera you can add a wrist camera to the SO101. There are already many premade wrist camera holders that you can find in the SO101 repo: [Wrist camera's](https://github.com/TheRobotStudio/SO-ARM100#wrist-cameras)
|
||||
|
||||
## Teleoperate with cameras
|
||||
|
||||
We can now teleoperate again while at the same time visualizing the cameras and joint positions with `rerun`.
|
||||
|
||||
```bash
|
||||
python lerobot/scripts/control_robot.py \
|
||||
--robot.type=so101 \
|
||||
--control.type=teleoperate \
|
||||
--control.display_data=true
|
||||
```
|
||||
|
||||
## Record a dataset
|
||||
|
||||
Once you're familiar with teleoperation, you can record your first dataset with SO-101.
|
||||
|
||||
We use the Hugging Face hub features for uploading your dataset. If you haven't previously used the Hub, make sure you can login via the cli using a write-access token, this token can be generated from the [Hugging Face settings](https://huggingface.co/settings/tokens).
|
||||
|
||||
Add your token to the cli by running this command:
|
||||
```bash
|
||||
huggingface-cli login --token ${HUGGINGFACE_TOKEN} --add-to-git-credential
|
||||
```
|
||||
|
||||
Then store your Hugging Face repository name in a variable:
|
||||
```bash
|
||||
HF_USER=$(huggingface-cli whoami | head -n 1)
|
||||
echo $HF_USER
|
||||
```
|
||||
|
||||
Now you can record a dataset, to record 2 episodes and upload your dataset to the hub execute this command:
|
||||
```bash
|
||||
python lerobot/scripts/control_robot.py \
|
||||
--robot.type=so101 \
|
||||
--control.type=record \
|
||||
--control.fps=30 \
|
||||
--control.single_task="Grasp a lego block and put it in the bin." \
|
||||
--control.repo_id=${HF_USER}/so101_test \
|
||||
--control.tags='["so101","tutorial"]' \
|
||||
--control.warmup_time_s=5 \
|
||||
--control.episode_time_s=30 \
|
||||
--control.reset_time_s=30 \
|
||||
--control.num_episodes=2 \
|
||||
--control.display_data=true \
|
||||
--control.push_to_hub=true
|
||||
```
|
||||
|
||||
You will see a lot of lines appearing like this one:
|
||||
```
|
||||
INFO 2024-08-10 15:02:58 ol_robot.py:219 dt:33.34 (30.0hz) dtRlead: 5.06 (197.5hz) dtWfoll: 0.25 (3963.7hz) dtRfoll: 6.22 (160.7hz) dtRlaptop: 32.57 (30.7hz) dtRphone: 33.84 (29.5hz)
|
||||
```
|
||||
It contains:
|
||||
- `2024-08-10 15:02:58` which is the date and time of the call to the print function,
|
||||
- `ol_robot.py:219` which is the end of the file name and the line number where the print function is called (`lerobot/scripts/control_robot.py` line `219`).
|
||||
- `dt:33.34 (30.0hz)` which is the "delta time" or the number of milliseconds spent between the previous call to `robot.teleop_step(record_data=True)` and the current one, associated with the frequency (33.34 ms equals 30.0 Hz) ; note that we use `--fps 30` so we expect 30.0 Hz ; when a step takes more time, the line appears in yellow.
|
||||
- `dtRlead: 5.06 (197.5hz)` which is the delta time of reading the present position of the leader arm.
|
||||
- `dtWfoll: 0.25 (3963.7hz)` which is the delta time of writing the goal position on the follower arm ; writing is asynchronous so it takes less time than reading.
|
||||
- `dtRfoll: 6.22 (160.7hz)` which is the delta time of reading the present position on the follower arm.
|
||||
- `dtRlaptop:32.57 (30.7hz) ` which is the delta time of capturing an image from the laptop camera in the thread running asynchronously.
|
||||
- `dtRphone:33.84 (29.5hz)` which is the delta time of capturing an image from the phone camera in the thread running asynchronously.
|
||||
|
||||
#### Dataset upload
|
||||
Locally your dataset is stored in this folder: `~/.cache/huggingface/lerobot/{repo-id}` (e.g. `data/cadene/so101_test`). At the end of data recording, your dataset will be uploaded on your Hugging Face page (e.g. https://huggingface.co/datasets/cadene/so101_test) that you can obtain by running:
|
||||
```bash
|
||||
echo https://huggingface.co/datasets/${HF_USER}/so101_test
|
||||
```
|
||||
Your dataset will be automatically tagged with `LeRobot` for the community to find it easily, and you can also add custom tags (in this case `tutorial` for example).
|
||||
|
||||
You can look for other LeRobot datasets on the hub by searching for `LeRobot` [tags](https://huggingface.co/datasets?other=LeRobot).
|
||||
|
||||
#### Record function
|
||||
|
||||
The `record` function provides a suite of tools for capturing and managing data during robot operation:
|
||||
1. Set the flow of data recording using command line arguments:
|
||||
- `--control.warmup_time_s=10` defines the number of seconds before starting data collection. It allows the robot devices to warmup and synchronize (10 seconds by default).
|
||||
- `--control.episode_time_s=60` defines the number of seconds for data recording for each episode (60 seconds by default).
|
||||
- `--control.reset_time_s=60` defines the number of seconds for resetting the environment after each episode (60 seconds by default).
|
||||
- `--control.num_episodes=50` defines the number of episodes to record (50 by default).
|
||||
2. Control the flow during data recording using keyboard keys:
|
||||
- Press right arrow `->` at any time during episode recording to early stop and go to resetting. Same during resetting, to early stop and to go to the next episode recording.
|
||||
- Press left arrow `<-` at any time during episode recording or resetting to early stop, cancel the current episode, and re-record it.
|
||||
- Press escape `ESC` at any time during episode recording to end the session early and go straight to video encoding and dataset uploading.
|
||||
3. Checkpoints are done set during recording, so if any issue occurs, you can resume recording by re-running the same command again with `--control.resume=true`. You will need to manually delete the dataset directory if you want to start recording from scratch.
|
||||
|
||||
#### Tips for gathering data
|
||||
|
||||
Once you're comfortable with data recording, you can create a larger dataset for training. A good starting task is grasping an object at different locations and placing it in a bin. We suggest recording at least 50 episodes, with 10 episodes per location. Keep the cameras fixed and maintain consistent grasping behavior throughout the recordings. Also make sure the object you are manipulating is visible on the camera's. A good rule of thumb is you should be able to do the task yourself by only looking at the camera images.
|
||||
|
||||
In the following sections, you’ll train your neural network. After achieving reliable grasping performance, you can start introducing more variations during data collection, such as additional grasp locations, different grasping techniques, and altering camera positions.
|
||||
|
||||
Avoid adding too much variation too quickly, as it may hinder your results.
|
||||
|
||||
#### Troubleshooting:
|
||||
- On Linux, if the left and right arrow keys and escape key don't have any effect during data recording, make sure you've set the `$DISPLAY` environment variable. See [pynput limitations](https://pynput.readthedocs.io/en/latest/limitations.html#linux).
|
||||
|
||||
## Visualize a dataset
|
||||
|
||||
If you uploaded your dataset to the hub with `--control.push_to_hub=true`, you can [visualize your dataset online](https://huggingface.co/spaces/lerobot/visualize_dataset) by copy pasting your repo id given by:
|
||||
```bash
|
||||
echo ${HF_USER}/so101_test
|
||||
```
|
||||
|
||||
If you didn't upload with `--control.push_to_hub=false`, you can visualize it locally with (via a window in the browser `http://127.0.0.1:9090` with the visualization tool):
|
||||
```bash
|
||||
python lerobot/scripts/visualize_dataset_html.py \
|
||||
--repo-id ${HF_USER}/so101_test \
|
||||
--local-files-only 1
|
||||
```
|
||||
|
||||
This will launch a local web server that looks like this:
|
||||
|
||||
<div style="text-align:center;">
|
||||
<img src="../media/tutorial/visualize_dataset_html.webp?raw=true" alt="Koch v1.1 leader and follower arms" title="Koch v1.1 leader and follower arms" width="100%"></img>
|
||||
</div>
|
||||
|
||||
## Replay an episode
|
||||
|
||||
A useful feature is the `replay` function, which allows to replay on your robot any episode that you've recorded or episodes from any dataset out there. This function helps you test the repeatability of your robot's actions and assess transferability across robots of the same model.
|
||||
|
||||
You can replay the first episode on your robot with:
|
||||
```bash
|
||||
python lerobot/scripts/control_robot.py \
|
||||
--robot.type=so101 \
|
||||
--control.type=replay \
|
||||
--control.fps=30 \
|
||||
--control.repo_id=${HF_USER}/so101_test \
|
||||
--control.episode=0
|
||||
```
|
||||
|
||||
Your robot should replicate movements similar to those you recorded. For example, check out [this video](https://x.com/RemiCadene/status/1793654950905680090) where we use `replay` on a Aloha robot from [Trossen Robotics](https://www.trossenrobotics.com).
|
||||
|
||||
## Train a policy
|
||||
|
||||
To train a policy to control your robot, use the [`python lerobot/scripts/train.py`](../lerobot/scripts/train.py) script. A few arguments are required. Here is an example command:
|
||||
```bash
|
||||
python lerobot/scripts/train.py \
|
||||
--dataset.repo_id=${HF_USER}/so101_test \
|
||||
--policy.type=act \
|
||||
--output_dir=outputs/train/act_so101_test \
|
||||
--job_name=act_so101_test \
|
||||
--policy.device=cuda \
|
||||
--wandb.enable=true
|
||||
```
|
||||
|
||||
Let's explain the command:
|
||||
1. We provided the dataset as argument with `--dataset.repo_id=${HF_USER}/so101_test`.
|
||||
2. We provided the policy with `policy.type=act`. This loads configurations from [`configuration_act.py`](../lerobot/common/policies/act/configuration_act.py). Importantly, this policy will automatically adapt to the number of motor states, motor actions and cameras of your robot (e.g. `laptop` and `phone`) which have been saved in your dataset.
|
||||
4. We provided `policy.device=cuda` since we are training on a Nvidia GPU, but you could use `policy.device=mps` to train on Apple silicon.
|
||||
5. We provided `wandb.enable=true` to use [Weights and Biases](https://docs.wandb.ai/quickstart) for visualizing training plots. This is optional but if you use it, make sure you are logged in by running `wandb login`.
|
||||
|
||||
Training should take several hours. You will find checkpoints in `outputs/train/act_so101_test/checkpoints`.
|
||||
|
||||
To resume training from a checkpoint, below is an example command to resume from `last` checkpoint of the `act_so101_test` policy:
|
||||
```bash
|
||||
python lerobot/scripts/train.py \
|
||||
--config_path=outputs/train/act_so101_test/checkpoints/last/pretrained_model/train_config.json \
|
||||
--resume=true
|
||||
```
|
||||
|
||||
#### Upload policy checkpoints
|
||||
|
||||
Once training is done, upload the latest checkpoint with:
|
||||
```bash
|
||||
huggingface-cli upload ${HF_USER}/act_so101_test \
|
||||
outputs/train/act_so101_test/checkpoints/last/pretrained_model
|
||||
```
|
||||
|
||||
You can also upload intermediate checkpoints with:
|
||||
```bash
|
||||
CKPT=010000
|
||||
huggingface-cli upload ${HF_USER}/act_so101_test${CKPT} \
|
||||
outputs/train/act_so101_test/checkpoints/${CKPT}/pretrained_model
|
||||
```
|
||||
|
||||
## Evaluate your policy
|
||||
|
||||
You can use the `record` function from [`lerobot/scripts/control_robot.py`](../lerobot/scripts/control_robot.py) but with a policy checkpoint as input. For instance, run this command to record 10 evaluation episodes:
|
||||
```bash
|
||||
python lerobot/scripts/control_robot.py \
|
||||
--robot.type=so101 \
|
||||
--control.type=record \
|
||||
--control.fps=30 \
|
||||
--control.single_task="Grasp a lego block and put it in the bin." \
|
||||
--control.repo_id=${HF_USER}/eval_act_so101_test \
|
||||
--control.tags='["tutorial"]' \
|
||||
--control.warmup_time_s=5 \
|
||||
--control.episode_time_s=30 \
|
||||
--control.reset_time_s=30 \
|
||||
--control.num_episodes=10 \
|
||||
--control.push_to_hub=true \
|
||||
--control.policy.path=outputs/train/act_so101_test/checkpoints/last/pretrained_model
|
||||
```
|
||||
|
||||
As you can see, it's almost the same command as previously used to record your training dataset. Two things changed:
|
||||
1. There is an additional `--control.policy.path` argument which indicates the path to your policy checkpoint with (e.g. `outputs/train/eval_act_so101_test/checkpoints/last/pretrained_model`). You can also use the model repository if you uploaded a model checkpoint to the hub (e.g. `${HF_USER}/act_so101_test`).
|
||||
2. The name of dataset begins by `eval` to reflect that you are running inference (e.g. `${HF_USER}/eval_act_so101_test`).
|
||||
@@ -1,17 +0,0 @@
|
||||
import abc
|
||||
from dataclasses import dataclass
|
||||
from pathlib import Path
|
||||
|
||||
import draccus
|
||||
|
||||
|
||||
@dataclass(kw_only=True)
|
||||
class TeleoperatorConfig(draccus.ChoiceRegistry, abc.ABC):
|
||||
# Allows to distinguish between different teleoperators of the same type
|
||||
id: str | None = None
|
||||
# Directory to store calibration file
|
||||
calibration_dir: Path | None = None
|
||||
|
||||
@property
|
||||
def type(self) -> str:
|
||||
return self.get_choice_name(self.__class__)
|
||||
@@ -1,4 +0,0 @@
|
||||
from .configuration_keyboard import KeyboardTeleopConfig
|
||||
from .teleop_keyboard import KeyboardTeleop
|
||||
|
||||
__all__ = ["KeyboardTeleopConfig", "KeyboardTeleop"]
|
||||
@@ -1,89 +0,0 @@
|
||||
import abc
|
||||
from pathlib import Path
|
||||
from typing import Any
|
||||
|
||||
import draccus
|
||||
|
||||
from lerobot.common.constants import HF_LEROBOT_CALIBRATION, TELEOPERATORS
|
||||
from lerobot.common.motors.motors_bus import MotorCalibration
|
||||
|
||||
from .config import TeleoperatorConfig
|
||||
|
||||
|
||||
class Teleoperator(abc.ABC):
|
||||
"""The main LeRobot class for implementing teleoperation devices."""
|
||||
|
||||
# Set these in ALL subclasses
|
||||
config_class: TeleoperatorConfig
|
||||
name: str
|
||||
|
||||
def __init__(self, config: TeleoperatorConfig):
|
||||
self.id = config.id
|
||||
self.calibration_dir = (
|
||||
config.calibration_dir
|
||||
if config.calibration_dir
|
||||
else HF_LEROBOT_CALIBRATION / TELEOPERATORS / self.name
|
||||
)
|
||||
self.calibration_dir.mkdir(parents=True, exist_ok=True)
|
||||
self.calibration_fpath = self.calibration_dir / f"{self.id}.json"
|
||||
self.calibration: dict[str, MotorCalibration] = {}
|
||||
if self.calibration_fpath.is_file():
|
||||
self._load_calibration()
|
||||
|
||||
def __str__(self) -> str:
|
||||
return f"{self.id} {self.__class__.__name__}"
|
||||
|
||||
@abc.abstractproperty
|
||||
def action_features(self) -> dict:
|
||||
pass
|
||||
|
||||
@abc.abstractproperty
|
||||
def feedback_features(self) -> dict:
|
||||
pass
|
||||
|
||||
@abc.abstractproperty
|
||||
def is_connected(self) -> bool:
|
||||
pass
|
||||
|
||||
@abc.abstractmethod
|
||||
def connect(self, calibrate: bool = True) -> None:
|
||||
"""Connects to the teleoperator."""
|
||||
pass
|
||||
|
||||
@abc.abstractproperty
|
||||
def is_calibrated(self) -> bool:
|
||||
pass
|
||||
|
||||
@abc.abstractmethod
|
||||
def calibrate(self) -> None:
|
||||
"""Calibrates the teleoperator."""
|
||||
pass
|
||||
|
||||
def _load_calibration(self, fpath: Path | None = None) -> None:
|
||||
fpath = self.calibration_fpath if fpath is None else fpath
|
||||
with open(fpath) as f, draccus.config_type("json"):
|
||||
self.calibration = draccus.load(dict[str, MotorCalibration], f)
|
||||
|
||||
def _save_calibration(self, fpath: Path | None = None) -> None:
|
||||
fpath = self.calibration_fpath if fpath is None else fpath
|
||||
with open(fpath, "w") as f, draccus.config_type("json"):
|
||||
draccus.dump(self.calibration, f, indent=4)
|
||||
|
||||
@abc.abstractmethod
|
||||
def configure(self) -> None:
|
||||
pass
|
||||
|
||||
@abc.abstractmethod
|
||||
def get_action(self) -> dict[str, Any]:
|
||||
"""Gets the action to send to a teleoperator."""
|
||||
pass
|
||||
|
||||
@abc.abstractmethod
|
||||
def send_feedback(self, feedback: dict[str, Any]) -> None:
|
||||
"""Sends feedback captured from a robot to the teleoperator."""
|
||||
pass
|
||||
|
||||
@abc.abstractmethod
|
||||
def disconnect(self) -> None:
|
||||
"""Disconnects from the teleoperator."""
|
||||
pass
|
||||
@@ -1,12 +0,0 @@
|
||||
import os
|
||||
|
||||
import rerun as rr
|
||||
|
||||
|
||||
def _init_rerun(session_name: str = "lerobot_control_loop") -> None:
|
||||
"""Initializes the Rerun SDK for visualizing the control loop."""
|
||||
batch_size = os.getenv("RERUN_FLUSH_NUM_BYTES", "8000")
|
||||
os.environ["RERUN_FLUSH_NUM_BYTES"] = batch_size
|
||||
rr.init(session_name)
|
||||
memory_limit = os.getenv("LEROBOT_RERUN_MEMORY_LIMIT", "10%")
|
||||
rr.spawn(memory_limit=memory_limit)
|
||||
@@ -1,134 +0,0 @@
|
||||
# Copyright 2024 The HuggingFace Inc. team. All rights reserved.
|
||||
#
|
||||
# Licensed under the Apache License, Version 2.0 (the "License");
|
||||
# you may not use this file except in compliance with the License.
|
||||
# You may obtain a copy of the License at
|
||||
#
|
||||
# http://www.apache.org/licenses/LICENSE-2.0
|
||||
#
|
||||
# Unless required by applicable law or agreed to in writing, software
|
||||
# distributed under the License is distributed on an "AS IS" BASIS,
|
||||
# WITHOUT WARRANTIES OR CONDITIONS OF ANY KIND, either express or implied.
|
||||
# See the License for the specific language governing permissions and
|
||||
# limitations under the License.
|
||||
|
||||
from dataclasses import dataclass
|
||||
from pathlib import Path
|
||||
|
||||
import draccus
|
||||
|
||||
from lerobot.common.robots import RobotConfig
|
||||
from lerobot.configs import parser
|
||||
from lerobot.configs.policies import PreTrainedConfig
|
||||
|
||||
|
||||
@dataclass
|
||||
class ControlConfig(draccus.ChoiceRegistry):
|
||||
pass
|
||||
|
||||
|
||||
@ControlConfig.register_subclass("calibrate")
|
||||
@dataclass
|
||||
class CalibrateControlConfig(ControlConfig):
|
||||
# List of arms to calibrate (e.g. `--arms='["left_follower","right_follower"]' left_leader`)
|
||||
arms: list[str] | None = None
|
||||
|
||||
|
||||
@ControlConfig.register_subclass("teleoperate")
|
||||
@dataclass
|
||||
class TeleoperateControlConfig(ControlConfig):
|
||||
# Limit the maximum frames per second. By default, no limit.
|
||||
fps: int | None = None
|
||||
teleop_time_s: float | None = None
|
||||
# Display all cameras on screen
|
||||
display_data: bool = False
|
||||
|
||||
|
||||
@ControlConfig.register_subclass("record")
|
||||
@dataclass
|
||||
class RecordControlConfig(ControlConfig):
|
||||
# Dataset identifier. By convention it should match '{hf_username}/{dataset_name}' (e.g. `lerobot/test`).
|
||||
repo_id: str
|
||||
# A short but accurate description of the task performed during the recording (e.g. "Pick the Lego block and drop it in the box on the right.")
|
||||
single_task: str
|
||||
# Root directory where the dataset will be stored (e.g. 'dataset/path').
|
||||
root: str | Path | None = None
|
||||
policy: PreTrainedConfig | None = None
|
||||
# Limit the frames per second. By default, uses the policy fps.
|
||||
fps: int | None = None
|
||||
# Number of seconds before starting data collection. It allows the robot devices to warmup and synchronize.
|
||||
warmup_time_s: int | float = 10
|
||||
# Number of seconds for data recording for each episode.
|
||||
episode_time_s: int | float = 60
|
||||
# Number of seconds for resetting the environment after each episode.
|
||||
reset_time_s: int | float = 60
|
||||
# Number of episodes to record.
|
||||
num_episodes: int = 50
|
||||
# Encode frames in the dataset into video
|
||||
video: bool = True
|
||||
# Upload dataset to Hugging Face hub.
|
||||
push_to_hub: bool = True
|
||||
# Upload on private repository on the Hugging Face hub.
|
||||
private: bool = False
|
||||
# Add tags to your dataset on the hub.
|
||||
tags: list[str] | None = None
|
||||
# Number of subprocesses handling the saving of frames as PNG. Set to 0 to use threads only;
|
||||
# set to ≥1 to use subprocesses, each using threads to write images. The best number of processes
|
||||
# and threads depends on your system. We recommend 4 threads per camera with 0 processes.
|
||||
# If fps is unstable, adjust the thread count. If still unstable, try using 1 or more subprocesses.
|
||||
num_image_writer_processes: int = 0
|
||||
# Number of threads writing the frames as png images on disk, per camera.
|
||||
# Too many threads might cause unstable teleoperation fps due to main thread being blocked.
|
||||
# Not enough threads might cause low camera fps.
|
||||
num_image_writer_threads_per_camera: int = 4
|
||||
# Display all cameras on screen
|
||||
display_data: bool = False
|
||||
# Use vocal synthesis to read events.
|
||||
play_sounds: bool = True
|
||||
# Resume recording on an existing dataset.
|
||||
resume: bool = False
|
||||
|
||||
def __post_init__(self):
|
||||
# HACK: We parse again the cli args here to get the pretrained path if there was one.
|
||||
policy_path = parser.get_path_arg("control.policy")
|
||||
if policy_path:
|
||||
cli_overrides = parser.get_cli_overrides("control.policy")
|
||||
self.policy = PreTrainedConfig.from_pretrained(policy_path, cli_overrides=cli_overrides)
|
||||
self.policy.pretrained_path = policy_path
|
||||
|
||||
|
||||
@ControlConfig.register_subclass("replay")
|
||||
@dataclass
|
||||
class ReplayControlConfig(ControlConfig):
|
||||
# Dataset identifier. By convention it should match '{hf_username}/{dataset_name}' (e.g. `lerobot/test`).
|
||||
repo_id: str
|
||||
# Index of the episode to replay.
|
||||
episode: int
|
||||
# Root directory where the dataset will be stored (e.g. 'dataset/path').
|
||||
root: str | Path | None = None
|
||||
# Limit the frames per second. By default, uses the dataset fps.
|
||||
fps: int | None = None
|
||||
# Use vocal synthesis to read events.
|
||||
play_sounds: bool = True
|
||||
|
||||
|
||||
@ControlConfig.register_subclass("remote_robot")
|
||||
@dataclass
|
||||
class RemoteRobotConfig(ControlConfig):
|
||||
log_interval: int = 100
|
||||
# Display all cameras on screen
|
||||
display_data: bool = False
|
||||
# Rerun configuration for remote robot (https://ref.rerun.io/docs/python/0.22.1/common/initialization_functions/#rerun.connect_tcp)
|
||||
viewer_ip: str | None = None
|
||||
viewer_port: str | None = None
|
||||
|
||||
|
||||
@dataclass
|
||||
class ControlPipelineConfig:
|
||||
robot: RobotConfig
|
||||
control: ControlConfig
|
||||
|
||||
@classmethod
|
||||
def __get_path_fields__(cls) -> list[str]:
|
||||
"""This enables the parser to load config from the policy using `--policy.path=local/dir`"""
|
||||
return ["control.policy"]
|
||||
@@ -1,71 +0,0 @@
|
||||
#!/usr/bin/env python
|
||||
|
||||
# Copyright 2024 The HuggingFace Inc. team. All rights reserved.
|
||||
#
|
||||
# Licensed under the Apache License, Version 2.0 (the "License");
|
||||
# you may not use this file except in compliance with the License.
|
||||
# You may obtain a copy of the License at
|
||||
#
|
||||
# http://www.apache.org/licenses/LICENSE-2.0
|
||||
#
|
||||
# Unless required by applicable law or agreed to in writing, software
|
||||
# distributed under the License is distributed on an "AS IS" BASIS,
|
||||
# WITHOUT WARRANTIES OR CONDITIONS OF ANY KIND, either express or implied.
|
||||
# See the License for the specific language governing permissions and
|
||||
# limitations under the License.
|
||||
"""
|
||||
Once you have trained a policy with our training script (lerobot/scripts/train.py), use this script to push it
|
||||
to the hub.
|
||||
|
||||
Example:
|
||||
|
||||
```bash
|
||||
python lerobot/scripts/push_pretrained.py \
|
||||
--pretrained_path=outputs/train/act_aloha_sim_transfer_cube_human/checkpoints/last/pretrained_model \
|
||||
--repo_id=lerobot/act_aloha_sim_transfer_cube_human
|
||||
```
|
||||
"""
|
||||
|
||||
from dataclasses import dataclass
|
||||
from pathlib import Path
|
||||
|
||||
import draccus
|
||||
from huggingface_hub import HfApi
|
||||
|
||||
|
||||
@dataclass
|
||||
class PushPreTrainedConfig:
|
||||
pretrained_path: Path
|
||||
repo_id: str
|
||||
branch: str | None = None
|
||||
private: bool = False
|
||||
exist_ok: bool = False
|
||||
|
||||
|
||||
@draccus.wrap()
|
||||
def main(cfg: PushPreTrainedConfig):
|
||||
hub_api = HfApi()
|
||||
hub_api.create_repo(
|
||||
repo_id=cfg.repo_id,
|
||||
private=cfg.private,
|
||||
repo_type="model",
|
||||
exist_ok=cfg.exist_ok,
|
||||
)
|
||||
if cfg.branch:
|
||||
hub_api.create_branch(
|
||||
repo_id=cfg.repo_id,
|
||||
branch=cfg.branch,
|
||||
repo_type="model",
|
||||
exist_ok=cfg.exist_ok,
|
||||
)
|
||||
|
||||
hub_api.upload_folder(
|
||||
repo_id=cfg.repo_id,
|
||||
folder_path=cfg.pretrained_path,
|
||||
repo_type="model",
|
||||
revision=cfg.branch,
|
||||
)
|
||||
|
||||
|
||||
if __name__ == "__main__":
|
||||
main()
|
||||

|
Before Width: | Height: | Size: 370 KiB |

|
Before Width: | Height: | Size: 391 KiB |

|
Before Width: | Height: | Size: 387 KiB |

|
Before Width: | Height: | Size: 479 KiB |

|
Before Width: | Height: | Size: 474 KiB |

|
Before Width: | Height: | Size: 471 KiB |

|
Before Width: | Height: | Size: 326 KiB |

|
Before Width: | Height: | Size: 312 KiB |

|
Before Width: | Height: | Size: 469 KiB |

|
Before Width: | Height: | Size: 339 KiB |

|
Before Width: | Height: | Size: 232 KiB |

|
Before Width: | Height: | Size: 484 KiB |

|
Before Width: | Height: | Size: 220 KiB |

|
Before Width: | Height: | Size: 272 KiB |

|
Before Width: | Height: | Size: 186 KiB |

|
Before Width: | Height: | Size: 185 KiB |

|
Before Width: | Height: | Size: 116 KiB |

|
Before Width: | Height: | Size: 153 KiB |

|
Before Width: | Height: | Size: 208 KiB |

|
Before Width: | Height: | Size: 296 KiB |

|
Before Width: | Height: | Size: 87 KiB |

|
Before Width: | Height: | Size: 114 KiB |

|
Before Width: | Height: | Size: 155 KiB |